
Removing a motherboard may seem like a daunting task, but it’s actually quite simple as long as you know what you’re doing. Whether you’re upgrading your PC or troubleshooting an issue, removing the motherboard is a necessary step. But where do you even start? In this guide, we’ll walk you through the steps to safely and easily remove your motherboard.
So grab your screwdriver and let’s get started!
Preparation
If you’re planning to upgrade your computer components, you might need to remove the motherboard first. It’s essential to prepare your workspace before you start working inside your computer. First, disconnect all cables from the power source and the computer case and place the computer on a clean and stable surface.
It’s also important to ground yourself by wearing an anti-static wrist strap or touching a grounded object before handling any components. To remove the motherboard, start by removing any screws or fasteners that hold it in place on the backplate. Then, gently pull the motherboard away from the backplate, being careful not to damage any of the components.
If necessary, disconnect any cables or components that are still connected to the motherboard before removing it completely. Remember, removing a motherboard can be a delicate process, so take extra care and follow the manufacturer’s instructions to avoid damaging any components.
Gather Necessary Tools
Preparation is key when it comes to completing any task, and gathering necessary tools is essential to ensure success. Whether it’s cooking a meal, repairing a car, or crafting a DIY project, having the right tools at your disposal will make the job easier and faster. Before starting any project, take the time to make a list of the tools you’ll need and gather them together.
This will save you time and frustration later on. Ensure that all the tools are in good condition and functioning properly. It’s also important to have the appropriate protective gear, such as gloves or safety glasses, depending on the task at hand.
By taking the time to gather the necessary tools, you’ll be setting yourself up for a much smoother and efficient project.
Shutdown Computer
When it comes to shutting down your computer, it’s important to prepare it properly beforehand to avoid losing any unsaved work or damaging any hardware. First, make sure that all of your programs and documents are closed and saved. This will prevent any data loss or corruption if your computer shuts down unexpectedly.
Next, ensure that all peripherals such as printers and external hard drives are disconnected. This will prevent any damage to these devices and ensure that they can be used again without any issues. Additionally, make sure to check that all updates and backups have been completed before shutting down your computer.
Taking these simple steps will help prevent any potential problems when shutting down your computer and ensure that it runs smoothly the next time you use it.
Disconnecting Components
If you need to remove or replace your motherboard, there are a few crucial steps to follow. First, shut down your computer and unplug all cables, including the power cord. Then, open the case and locate the motherboard.
You’ll need to disconnect all components from it, such as the CPU, RAM, and graphics card. Make sure to handle them gently and follow any specific instructions for each component. Then, unscrew the standoffs that attach the motherboard to the case, carefully lift out the motherboard, and set it aside.
Make sure to keep track of any screws or standoffs you remove to ensure easy reassembly later. Removing a motherboard can seem daunting, but taking it step by step and following the proper procedures can make the process go smoothly. So, if you’re ever in need of replacing your motherboard, feel confident in your ability to get the job done!
Remove Power Supply
When it comes to disconnecting components from your computer, one of the first things you’ll need to do is remove the power supply. This is a crucial step in ensuring your safety and the safety of your devices. The power supply is what delivers electricity to all the components inside your computer, so it’s important to handle it with care.
Start by unplugging the power cord from the wall and your computer. Then, open up your computer case and locate the power supply. It’s usually mounted on the top or bottom of the case and has a bundle of cables running out of it.
Before you start disconnecting any cables, make sure to discharge any static electricity by touching a grounded metal object. Once you’ve done that, you can begin unplugging the cables from the power supply. Make sure to gently pull on the connector, not the cables themselves, to avoid damaging anything.
Once you’ve removed all the cables, you can unscrew the power supply from the case and carefully remove it. With the power supply safely removed, you can move on to disconnecting other components. Overall, removing your power supply is a simple process as long as you take your time and follow these steps carefully.
Disconnect Hard Drives and Other Cables
When it comes to disconnecting components from your computer before moving it, one of the most important steps is to disconnect hard drives and other cables. This will ensure that your data is safe and won’t be damaged during transportation. Hard drives can be quite delicate and any jostling or impact can cause damage to the magnetic platters inside.
Therefore, always disconnect the data and power cables from your hard drives or solid-state drives before moving your computer. Also, don’t forget to disconnect any other cables that may be connected to your computer, such as Ethernet cables, USB cables, or HDMI cables. Doing so will prevent any damage to the ports or cables themselves.
Overall, taking the time to properly disconnect all your components will help to keep your data and computer safe during the move.
Remove Cooling System
Removing the cooling system of a vehicle can seem like a daunting task, but with the right steps, it can be accomplished. The first step is to disconnect the battery to avoid any electrical shock and then drain the coolant from the radiator and engine block. Next, remove the radiator hoses, followed by the upper and lower radiator brackets, and then the radiator itself.
Afterward, remove the water pump, fan, and any other components attached to the front of the engine. It is important to remember to loosen all clamps and bolts carefully to avoid damaging any of the parts. By following these steps, the cooling system can be successfully removed, allowing for repairs or replacements to be made.
Removing the Motherboard
If you’re looking to upgrade your computer or perform maintenance, you’ll likely need to remove the motherboard. Before you begin, make sure to unplug all cables and power sources and ground yourself to avoid any static electricity damage. Next, locate the screws or clips holding the motherboard in place and carefully remove them.
It’s important to keep track of which screws or clips go where, as they may be different sizes or shapes. Once the motherboard is free, lift it from the case, being mindful of any connections or wires that may still be attached. If there are any difficult spots, use gentle pressure to release the motherboard, but avoid any aggressive or forceful movements.
Now that the motherboard is removed, you can inspect it for any damage, install upgrades, or begin cleaning to ensure optimal performance. By following these steps and using caution, removing the motherboard can be a straightforward process in any computer maintenance routine.
Unscrew Motherboard from Case
Removing the motherboard from a computer case may seem daunting, but with the right tools and technique, it’s not as complicated as it sounds. The first step is to turn off the computer, unplug it, and remove the side panel from the case. Once you have access to the inside, locate the screws or fasteners holding the motherboard in place.
These are typically found around the perimeter of the board and may require a Phillips head screwdriver to remove. It’s essential to handle the motherboard carefully and avoid bending or damaging any of the delicate components. Once all the screws are removed, gently lift the motherboard out of the case and set it aside.
Congratulations, you’ve successfully removed the motherboard from your computer. Always remember to ground yourself before handling any electronic components to prevent static electricity from damaging them. With the motherboard removed, you can now upgrade or replace components, or troubleshoot any issues that may have brought you to this point.
Remove any Screws Around Motherboard
Removing the motherboard from your computer involves taking off any screws that might be holding it in place. These screws can be found on the back panel of many desktop computers and laptops. Before unscrewing them, it’s important to make sure that you have disconnected any cables and wires that might be attached to your motherboard.
You don’t want to accidentally damage anything as you remove the screws. Once you have removed all the screws, you can carefully lift the motherboard up and out of your computer. Be sure to handle it gently, as it can be fragile.
Remember, taking out the motherboard is not something that should be attempted by someone who is not comfortable with working on computer hardware. If you’re unsure, it’s always better to ask for help or take it to a professional. In conclusion, removing the screws that hold your motherboard in place is just one step in the process of removing it from your computer.
Take care to disconnect any cables and wires beforehand, and handle the motherboard gently once it’s free.
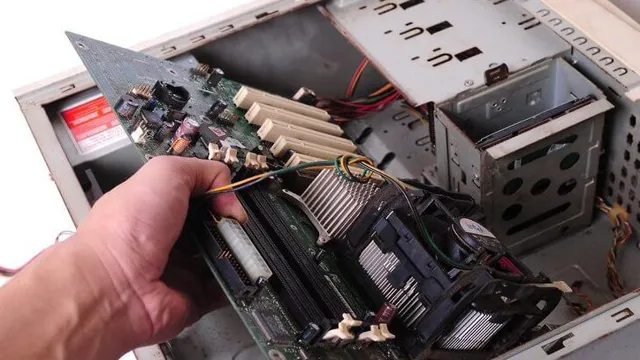
Lift Motherboard out of Case
Removing the motherboard from a computer tower is a straightforward process that requires a few steps and some careful handling. Before attempting to remove the motherboard, be sure to power off the computer and unplug any power cables. Then, locate the screws that secure the motherboard to the case and unscrew them using a screwdriver.
Remember to keep the screws in a safe place for later reassembly. After removing the screws, carefully lift the motherboard out of the case, being mindful of any attached cables or components. It’s usually a good idea to gently disconnect cables and components as you go, as this can make the process easier and prevent any accidental damage.
Once the motherboard is free from the case, you can inspect it for any signs of damage or wear and begin any necessary repairs or upgrades. Overall, removing the motherboard requires some patience and attention to detail, but with the right approach, it can be done quickly and safely.
Conclusion
Removing a motherboard can be intimidating, but with a few simple steps it can be a breeze! First, gather all necessary tools and ensure power is disconnected. Then, carefully remove all components attached to the motherboard. Next, unscrew any screws holding the motherboard in place and gently lift it out.
But remember, just because you’re removing the motherboard doesn’t mean you have to forget about it. Think about all the fond memories you’ve shared and maybe even give it a little pat before you say goodbye. Just kidding, please don’t pat your motherboard.
Good luck!”
FAQs
How do you remove a motherboard from a computer?
To remove a motherboard, start by unplugging all cables and removing any screws or standoffs that hold it in place. Gently lift the motherboard out of the case, taking care not to damage any components.
Is it difficult to remove a motherboard?
Removing a motherboard can be tricky, especially if you have never done it before. However, with the right tools and some patience, it can be done by most people.
What tools do I need to remove a motherboard?
To remove a motherboard, you will need a screwdriver, pliers (or tweezers), and a grounding strap. It is also a good idea to have an antistatic mat or grounding wrist strap to prevent damage to your computer components.
Can I remove a motherboard without damaging other components?
Yes, it is possible to remove a motherboard without damaging other components, but it does require some care. Make sure to unplug all cables and remove any screws or standoffs holding the motherboard in place. Gently lift the motherboard out of the case, taking care not to damage any components.