
Getting a new motherboard is always exciting, but the thought of connecting all the front panel connectors can be intimidating. With so many different cables and pins, it’s easy to feel overwhelmed and unsure of where everything should go. But don’t worry, we’ve got you covered! In this blog post, we’ll guide you through the process of connecting front panel connectors to the motherboard so that you can get your system up and running in no time.
Whether you’re a veteran system builder or a newbie, you’ll find everything you need to know right here. So sit back, relax, and let’s get started!
Gathering Materials
When building a computer, connecting the front panel connectors to the motherboard can be a daunting task. However, it is crucial to get it right to ensure proper functionality of your computer. But worry no more as we have a simple diagram on how to connect the front panel connectors to the motherboard.
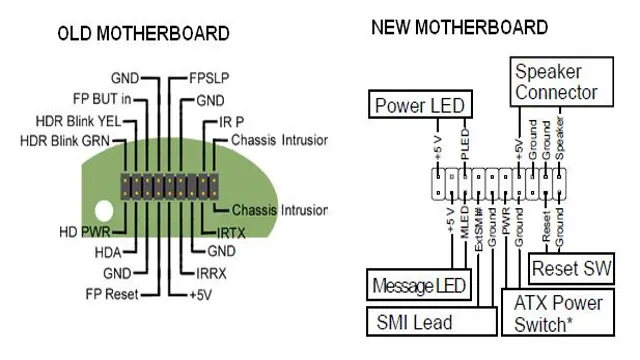
Firstly, identify the front panel connector pins on the motherboard. They are usually labeled with their respective functions- Power switch, reset, HDD LED, and power LED. Next, consult your computer case manual, which should have a corresponding layout of the front panel connectors.
Finally, connect the corresponding pins to their respective connectors, and you are done. It is crucial to have a steady hand and gentle touch to avoid damaging the connectors. With this simple diagram, connecting the front panel connectors to the motherboard is now a walk in the park, and you can have your computer up and running in no time.
Identifying the Connectors
When it comes to identifying connectors, it’s important to have the right materials on hand. Whether you’re working on a DIY project or trying to fix something around the house, having the proper tools is essential. Some of the materials you’ll need to gather include wire strippers, pliers, and a voltage tester.
Wire strippers are used to remove the insulation from the ends of wires, while pliers can be used to crimp connectors onto the ends of wires. A voltage tester is an important tool for ensuring that the electrical current has been cut off before you begin working on a project. By gathering these materials ahead of time, you’ll be able to work efficiently and safely, ensuring that your connectors are properly installed and secure.
Locating the Front Panel Connector Pins
When assembling a PC, connecting the front panel connectors to the motherboard could be a confusing task. However, with a proper diagram, it can be a straightforward process. Firstly, one must locate the pins on the motherboard that correspond to the front panel connectors.
A motherboard manual typically has a labeled diagram depicting the location of each pin. Alternatively, one can find a diagram online by searching for the motherboard model number. Once the pins have been located, the front panel connectors such as power button, reset button, HDD LED, and power LED must be connected correctly.
It is essential to connect the connectors in the right orientation to avoid inverting the polarity. A connector that is misplaced or connected wrongly might lead to computer failure or damage. With a little patience and attention to detail, it is easy to connect the front panel connectors to the motherboard and have a smooth running PC.
Consulting the Motherboard Manual
When building a PC, it’s important to consult the motherboard manual to ensure everything is connected properly. One important component of this is locating the front panel connector pins, which enable you to connect the power button, reset button, and other front panel components to the motherboard. These pins can be tricky to find, as they’re usually grouped together and labeled with small print.
However, with the help of the motherboard manual, you can quickly locate the pins and connect everything correctly. Some manuals even have diagrams or photos to help you visualize the process. Remember, taking the time to consult the manual and properly connect your components can save you a headache down the line.
So, don’t be afraid to dive into the manual and get familiar with your motherboard.
Locating the Pins on the Motherboard
Locating the front panel connector pins on the motherboard can seem like a daunting task, especially for those new to building their own PC. However, with the right guidance and a little patience, it doesn’t have to be difficult. These pins are typically located near the bottom of the motherboard, closest to the front of the case.
They are often labeled with abbreviations such as PWR_SW for the power switch, RESET_SW for the reset button, HDD_LED for the hard drive activity light, and POWER_LED for the power indicator light. The pins themselves are typically small and can be difficult to see without proper lighting and orientation. Using the motherboard manual or online resources can help identify the correct pins and ensure proper connection for a functioning front panel.
With a little practice, anyone can become comfortable locating and connecting these important pins.
Making Connections
If you’re building your own PC, one thing that might seem daunting is connecting the front panel connectors to the motherboard. However, it’s actually a fairly straightforward process once you know which pins to connect to. A diagram of your motherboard should show you where the pins are located, and each connector should be labeled to indicate what it’s for.
Common connectors include power and reset switches, as well as indicator lights for power and hard drive activity. Make sure to connect these pins correctly to avoid damaging your components, and double check your connections before powering on your computer. With a little bit of patience and attention to detail, you can successfully connect your front panel connectors and get your PC up and running in no time.
Matching the Connectors to the Pins
One of the most crucial steps in making electronic connections is matching the connectors to the pins. This process involves ensuring that the connectors on a cable or device match up with the pins on the connector port. Failure to do so can lead to faulty connections or even damage to the device.
To make successful connections, it is essential to double-check that the connector and pin configurations are compatible. It is also crucial to ensure that both connectors are clean and free of any obstructions, as dirt or debris can interfere with connectivity. Taking the time to make sure the connectors and pins match up correctly can save you time, money, and headaches in the long run.
Securing the Connections
When it comes to securing your connections, there are a few things you should keep in mind. First and foremost, make sure you’re connecting to a trusted network. Whether you’re using public Wi-Fi or connecting to a friend’s hotspot, always make sure you know who owns the network and that it’s secure.
Additionally, be sure to use reputable software and services to protect your data. There are plenty of free antivirus programs and VPNs out there, so take advantage of them! Finally, don’t forget about physical security. Always lock your devices and keep them safe from potential theft or damage.
By taking these simple steps, you can help ensure that your connections are secure and your data remains protected. So, next time you’re about to connect to a network, take a moment to ensure that you’re doing so safely and securely.
Testing the Connections
One of the most crucial steps when building a desktop computer is connecting the front panel connectors to the motherboard. These are the power buttons, LED lights, audio jacks, and USB ports located on the front panel of the case. To ensure everything works properly, it’s important to follow the diagram provided by the motherboard manual, which shows where each connector should be plugged in.
Generally, these connectors are labeled on the motherboard, but it never hurts to double-check. Once all the connectors are plugged in, it’s time to test the connections by powering on the computer. Take note of any strange noises or lights that may indicate a problem with the connectors.
If everything appears to be functioning properly, then congratulations! You have successfully connected the front panel connectors to your motherboard.
Turning on the Computer and Testing the Buttons and LEDs
When it comes to building a computer, testing the connections is one of the most crucial steps to ensure everything is working as it should be. After assembling all the components, the next step is to power on the computer and test the buttons and LEDs. It’s essential to check each connection to ensure that everything is connected properly.
If any component is not connected correctly, it may cause issues such as failure to boot, error messages, or even damage to some components. Thus, it’s best to take your time and carefully test every connection. Additionally, it’s essential to test the functionality of each button and LED.
To do this, you can press on each button and observe whether it responds appropriately. Similarly, check the LED lights to ensure they light up when they should and turn off when they should. Remember that testing everything before operating the computer can save you a lot of trouble and expensive repairs later on.
Overall, when testing the connections of your newly assembled computer, take the time to inspect each connection and ensure everything is firmly in place. Pay attention to the buttons and LEDs, making sure they respond appropriately. By doing so, you can avoid headaches down the line and enjoy your new computer without any issues.
So, take your time, be patient, and double-check everything before completing the final setup steps.
Troubleshooting
Connecting the front panel connectors to the motherboard can be a tricky process, but with a bit of patience and attention to detail, it can be done with ease. Firstly, it’s important to find the motherboard manual and locate the appropriate pins for the connectors. Different motherboards may have a different layout, so it’s essential to refer to the manual.
Some of the connections may include the Power LED, Reset Switch, Power Switch, and HDD LED. Once the pins have been located, it’s time to connect the wires. In cases where the connectors are attached to a single block, it’s important to connect them in the right orientation.
It’s also essential to double-check that each connector is seated securely. A diagram of the connections can be found in the motherboard manual, but an even simpler method is to follow the indications printed on the connectors themselves. A little bit of care and attention goes a long way in ensuring that the front panel connectors are connected correctly.
Common Issues and Solutions
When it comes to troubleshooting common issues, nothing is more frustrating than not knowing where to start. One common issue that many people face is slow internet speeds. Before calling your internet service provider, try resetting your router or modem, or moving it to a different location in your home.
Another issue that can cause frustration is a frozen or unresponsive computer. This can be caused by a variety of things, such as too many programs running at once or a lack of available storage space. Try closing unused programs and clearing out any unnecessary files to see if that solves the problem.
In general, it’s always a good idea to keep your computer updated with the latest software and to have a reliable antivirus program installed. By taking these simple steps, you can often solve common issues on your own and avoid the hassle of calling in a professional.
Conclusion
Now that you’re all wired up like a tech-savvy spider web, it’s time to sit back and enjoy the fruits of your labor. Connecting the front panel connectors to your motherboard may have seemed daunting, but with our handy diagram, you have successfully navigated the maddening maze of wires and pins. Congratulations, you may now revel in the glorious and illuminating power of your computer’s front panel features.
Happy computing!”
FAQs
What are front panel connectors?
Front panel connectors are the physical ports located on the front of your computer case that allow you to connect devices such as USBs and audio jacks.
Why is it important to connect front panel connectors correctly?
It is important to connect front panel connectors correctly because incorrect connections can cause damage to your motherboard and also lead to incorrect functioning of the connected devices.
How do I know which connector goes where on the motherboard?
Your motherboard manual should have a detailed diagram of the pin layouts for the front panel connectors. If you don’t have your manual, you can usually find it online by searching for your motherboard model.
What do I do if my front panel connectors don’t seem to fit on the motherboard pins?
Make sure you are aligning the connectors correctly before attempting to connect them. If they still don’t seem to fit, double-check that you have the correct connectors and contact your motherboard manufacturer for assistance.