
If you’re an avid PC gamer, you know that having a high-performance computer is crucial for the best gaming experience. And one of the factors that can significantly enhance your system’s performance is enabling XMP on your ASUS motherboard. XMP, or Extreme Memory Profile, is a feature that allows your RAM to run at its advertised speed instead of defaulting to a lower speed.
This means you can maximize the potential of your RAM and boost your PC’s overall speed and efficiency. But how do you enable XMP on your ASUS motherboard? Don’t worry; it’s not as complicated as it might seem. In this blog post, we’ll guide you through the steps to enable XMP on your ASUS motherboard and get the most out of your gaming PC.
So, grab a cup of coffee, and let’s dive in!
What is XMP?
If you’re looking to enhance the performance of your computer, enabling XMP on your ASUS motherboard may be the answer you’ve been searching for. XMP, or eXtreme Memory Profile, is a technology developed by Intel that allows you to get the most out of your RAM by optimizing its speed and performance. To enable XMP on your ASUS motherboard, you will need to access your BIOS (Basic Input/Output System) settings and navigate to the RAM timing options.
Once there, you can select the XMP profile that best suits your needs and preferences. Enabling XMP can significantly improve your computer’s overall speed and performance, making it a worthwhile step for any tech enthusiast or gamer. So, why not give it a try and see the difference for yourself? Your computer will thank you for it.
Explanation of XMP and its advantages
XMP is an acronym used to refer to Extensible Metadata Platform, which is a file format developed by Adobe Systems for adding metadata to digital files such as images, videos, and documents. This standardized format allows metadata to be stored in a centralized location, making it possible for different software applications to access and read the data. One major advantage of using XMP file format is that it allows file metadata to be embedded within the file itself.
This implies that even if the file is moved, renamed, or copied, the metadata will not be lost or separated from the file. In addition, XMP metadata is searchable, making it easy to find specific files by keywords. Furthermore, XMP can be used to encapsulate a wide range of data, including technical details about the file such as camera settings, copyright information, and personal information about the author.
Overall, XMP helps to streamline the digital asset management process by providing a more efficient way to handle file metadata.
Check if XMP is Supported on Your ASUS Motherboard
If you’re looking to ensure the best performance from your ASUS motherboard, enabling XMP (eXtreme Memory Profile) can make a big difference. Not all motherboards support XMP, so the first thing you need to do is check if your ASUS motherboard does. Thankfully, it’s easy to find out.
Simply navigate to the BIOS settings by restarting your PC and pressing the delete key during the bootup process. Once you’re in the BIOS, look for the XMP option. If it’s there, you’re good to go! Simply enable it, save your changes, and restart your computer.
If it’s not there, unfortunately your motherboard doesn’t support XMP. With XMP enabled, you’ll be able to take full advantage of the clock speed and timing settings of your RAM, resulting in faster overall performance. So, if you have an ASUS motherboard that supports XMP, it’s definitely worth enabling.
Steps to determine if your ASUS motherboard supports XMP
If you’re keen on overclocking your ASUS motherboard, you might be interested in using XMP. Unfortunately, not all ASUS motherboards support XMP, so it’s essential to check if your motherboard does before attempting it. Fortunately, determining whether or not your ASUS motherboard supports XMP is pretty simple.
The first step is to check your motherboard’s manual or technical data sheet for the memory specifications. If the maximum frequency is higher than the default speed of your RAM, then your motherboard probably supports XMP. You can also check the BIOS settings to determine if XMP is available.
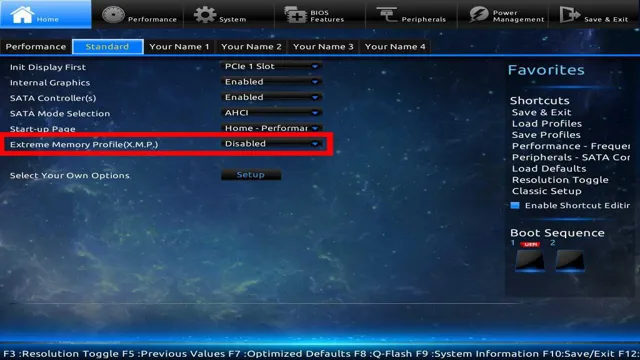
If you can see the XMP profile setting in the DRAM configuration section of your BIOS, it most likely means that your ASUS motherboard supports XMP technology. If your motherboard does not support XMP, you can still overclock your RAM manually, but it will take more time, effort, and expertise.
Enabling XMP in BIOS Settings
If you’re looking to boost your computer’s performance, one way to do it is by enabling XMP in your BIOS settings. XMP (Extensible Memory Profile) is a technology that allows your memory modules to run at their maximum advertised speed. If you own an Asus motherboard, enabling XMP is a straightforward process.
First, enter the BIOS by pressing Delete or F2 during bootup. Then, navigate to the Extreme Tweaker menu and locate the AI Overclock Tuner option. From there, you can select the XMP profile that corresponds with your memory modules.
Save changes and exit the BIOS, and you should notice a significant improvement in your computer’s performance. So, if you’re looking to optimize your computer’s speed, don’t hesitate to enable XMP on your Asus motherboard.
Step-by-step guide to enable XMP in ASUS motherboard BIOS settings
If you’re looking to boost your PC’s performance, enabling XMP in your ASUS motherboard’s BIOS settings is a great place to start. XMP (Extreme Memory Profile) allows your RAM to run at higher clock speeds than standard, giving you a noticeable performance boost. Here’s how to enable XMP in your ASUS motherboard BIOS settings:
Reboot your PC and press the “Delete” key to enter BIOS settings Locate the “Ai Tweaker” or “Overclocking” section in the menu Look for the XMP setting (may be called “DOCP” or “EOCP” in some ASUS BIOS menus)
Enable XMP and select the desired memory profile (usually labeled 1 or 2) Save and exit BIOS settings, then reboot your PC Keep in mind that enabling XMP may cause stability issues or even damage to your system if done improperly. Make sure to follow the manufacturer’s guidelines and test your system for stability after enabling XMP.
With XMP enabled, you’ll enjoy faster RAM speeds and improved overall performance.
Save and Exit BIOS
When it comes to maximizing the performance of your Asus motherboard, enabling XMP can make a huge difference. To do this, you’ll need to access your BIOS settings and navigate to the “Overclocking” or “Advanced” section. Look for the XMP (Extreme Memory Profile) option and select the profile that matches your RAM’s specifications.
Once you’ve done this, make sure to save and exit the BIOS to ensure the changes take effect. With XMP enabled, your RAM will operate at its full potential, providing faster and more efficient performance for your system. So if you’re looking to squeeze every last bit of power out of your Asus motherboard, enabling XMP is definitely worth considering.
Steps to save the changes and exit BIOS settings
Saving and exiting BIOS correctly is essential to ensure the changes you made are saved and implemented. Once you have made the necessary changes, you need to save them to the BIOS memory. To do this, you will need to select “Save and Exit” or “Exit and Save Changes” from the BIOS menu.
Different BIOS versions may have slightly different phrasing for this option. Once you have selected the option, the computer will save the changes and restart. This may take a few moments, so wait patiently for the computer to go through the process.
After the successful boot-up, check to see if the changes you made are implemented correctly, and everything is working fine. If there are issues, open BIOS again and repeat the steps to make changes until you get it right. Remember to always save and exit before shutting down your computer.
Conclusion
So, there you have it folks – enabling XMP on an ASUS motherboard is as easy as pie! Keep in mind that by doing so, you’ll unlock the full potential of your RAM, giving your PC the extra boost it needs to handle even the most demanding tasks. So go ahead, enable XMP and watch your rig soar like an eagle! Happy computing!”
Brief summary of the steps to enable XMP on an ASUS motherboard
“enabling XMP on an ASUS motherboard” Enabling XMP (eXtreme Memory Profile) on an ASUS motherboard can greatly improve your system’s performance by increasing the speed of your RAM. To do this, you’ll need to enter your BIOS by pressing the designated key when your computer boots up. Once inside, navigate to the “Extreme Tweaker” or similarly named section.
Look for the option to enable XMP, which may be labeled as “DOCP” instead. Select the correct profile for your RAM, typically labeled with the manufacturer and speed. Make sure to save any changes before exiting the BIOS.
After restarting your computer, your RAM should now be running at the selected higher speed, giving you a faster and more responsive system. It’s important to note that not all RAM is compatible with XMP, so be sure to check with your manufacturer before attempting to enable it. With these simple steps, you can unleash the full potential of your RAM and get the most out of your ASUS motherboard.
FAQs
What is XMP, and why do I need to enable it on my ASUS motherboard?
XMP stands for Extreme Memory Profile and is a setting that allows you to take advantage of the full speed and performance of your RAM. Enabling XMP on your ASUS motherboard will unlock the full potential of your RAM and improve your system’s performance.
How do I enable XMP on my ASUS motherboard?
To enable XMP on your ASUS motherboard, you need to enter the BIOS settings and look for the XMP (or sometimes called DOCP) profile settings. Once you find it, simply turn it on and save the changes. Your system will now run at the full speed of your RAM.
Will enabling XMP on my ASUS motherboard void my warranty?
No, enabling XMP on your ASUS motherboard will not void your warranty. This is a standard setting provided by ASUS to help you get the best performance out of your system.
What happens if I enable XMP, but my RAM is not compatible or stable at the rated speed?
If your RAM is not compatible or not stable at the rated speed, enabling XMP can cause instability and crashes. In this case, you might need to lower the RAM speed or timings manually to make it stable. It’s always a good idea to test your system’s stability after enabling XMP.