
Is your computer acting up? Are you experiencing crashes, slow performance, and random shutdowns? The culprit could be your motherboard. Removing your motherboard can be a daunting task, but it’s a necessary step if you want to replace it or clean your computer’s components thoroughly. In this step-by-step guide, we’ll walk you through the entire process of removing your motherboard safely.
You’ll discover the tools you’ll need, the precautions you must take, and the necessary steps to avoid damaging your computer. Think of removing your motherboard as disassembling a puzzle. Each part is closely connected, and taking one piece out may affect the whole.
But fear not, with this guide, you’ll be able to navigate through this process successfully. So grab your screwdriver, and let’s get started!
Preparation
Removing a motherboard can seem like a daunting task, but with proper preparation, it can be done smoothly and safely. The first step is to ensure that all power sources are disconnected and that safety precautions are taken, such as wearing an anti-static wristband. Next, it’s important to identify all of the screws and connectors holding the motherboard in place and carefully remove them using a screwdriver.
It may also be helpful to take a picture of the current setup to ensure that all components are reinstalled in the correct locations. Overall, taking the time to properly prepare can prevent damage to the motherboard or other components and make the removal process much easier.
Shut down your computer and unplug all cables
When it comes to shutting down your computer and unplugging all cables, preparation is key. This simple task can help prevent damage to your hardware and ensure that everything is working properly the next time you turn on your device. So, before you start unplugging and shutting down, make sure to save any unsaved work and close all open programs.
This will prevent any data loss or corruption when you shut down your computer. Once everything is saved, shut down your computer using the appropriate process for your operating system, whether that be through the Start menu or using a keyboard shortcut. Then, unplug all cables, including the power cord, monitor cable, and any other peripherals.
This will not only protect your hardware, but also make it easier to clean and maintain your workspace. By taking a few minutes to prepare before shutting down and unplugging, you can ensure that your technology is always running smoothly and efficiently.
Remove the computer case
Before attempting to remove your computer case, it’s important to prepare yourself for the job. Firstly, make sure you have unplugged all the cables and cords from your computer and disconnected it from any power source. Once you have ensured the safety of the computer, you can begin removing the case.
The first step is to inspect the case and locate all the screws holding it in place. Some computer cases may have thumb screws that are easy to remove by hand, while others may require a screwdriver. Once you have located the screws, carefully remove them one by one, ensuring you do not lose any or strip the threads.
With all the screws removed, gently slide the case off the computer, being mindful of any wires that may still be connected. Taking these precautions will help to make the process of removing the computer case easier and safer.
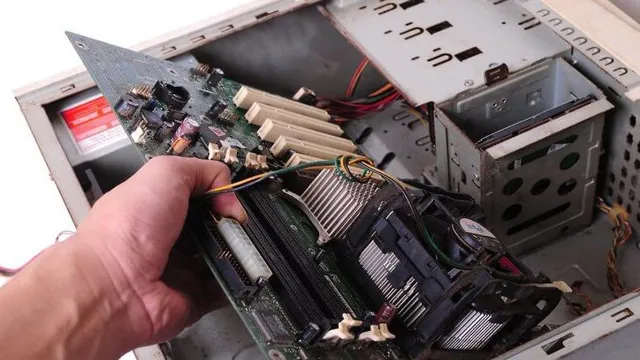
Locating and Removing the Motherboard
If you’re wondering how to remove a motherboard from your computer, the first step is to locate it. Depending on the make and model of your PC, the location of the motherboard may differ. Generally speaking, the motherboard is located at the bottom of your computer case, near the power supply unit (PSU).
In some cases, you may need to take out other components like the hard drive or graphics card to access the motherboard. Once you’ve located it, it’s time to remove it. You’ll need to unplug all the cables and connectors that are attached to the motherboard, including the power supply cables, data cables, and PCI-E cards.
Be careful not to damage any of the connectors in the process. Then, remove any screws that are holding the motherboard in place and gently lift it out of the case. With these steps, you’ll be able to successfully remove your motherboard from your computer.
Identify where your motherboard is located
When it comes to repairing or upgrading your computer, it’s essential to know where your motherboard is located. Typically, the motherboard is found inside the computer case, positioned horizontally near the bottom. To locate it, remove the side panel of the computer case, which is usually held in place by screws or clasps.
Once open, the motherboard will be the largest circuit board found inside the case. Before removing the motherboard, it’s important to unplug all power and data cables connected to it, including the CPU fan. If you’re unsure about how to remove the motherboard, refer to your computer’s manual or consult a technician.
It’s crucial to handle the motherboard with care to prevent damaging any delicate components, such as the CPU or RAM. Don’t forget to ground yourself before touching any internal components to discharge any static electricity. By locating and removing the motherboard correctly, you can easily upgrade or repair your computer without causing any harm to its essential parts.
Disconnect the power supply and all other cables
When it comes to removing your motherboard, the first step is to disconnect the power supply and all other cables from your computer. This ensures that there are no electrical hazards and no power running through your system while you work. Once you’ve done this, you can move on to locating your motherboard.
Motherboards can be found in different locations depending on your computer’s design, but they are usually attached to the side of your computer’s case. The next step is to carefully remove the screws that are holding the motherboard in place. Some computer cases have a removable motherboard tray that makes this step easier, while other cases will require you to unscrew the entire back panel of the case.
Whatever the case may be, take your time and be sure to keep track of all the screws you remove. You don’t want to lose any or accidentally damage any of the components on your motherboard. Once you’ve removed all the screws, you can gently lift the motherboard out of its socket and carefully disconnect any remaining cables.
With a little bit of patience and attention to detail, you can safely remove your motherboard and move on to upgrading or replacing it.
Remove any expansion cards and RAM
When it comes to locating and removing the motherboard of your computer, it’s important to take the necessary steps to avoid damaging any of the internal components. One of the first things you’ll need to do is remove any expansion cards and RAM modules attached to the motherboard. This will give you easier access to the motherboard and prevent any accidental damage while removing it.
Once you’ve removed the expansion cards and RAM, unscrew any mounting screws surrounding the perimeter of the motherboard and gently lift it from the case. Be sure to use caution and take your time during this step, as the motherboard can be fragile and sensitive to movement. By following these instructions, you’ll be able to safely and efficiently remove your computer’s motherboard for any necessary repairs or upgrades.
Unscrew the motherboard from the case
To dismantle a computer, it’s vital to unscrew the motherboard from the case. Before attempting to remove the motherboard, ensure that all cables and components attached to it are disconnected. Locate the motherboard screws, these are typically found around the edges or near the expansion slots.
Use the appropriate screwdriver to loosen the screws and keep them aside in a safe place as they will be needed during reinstallation. Once all screws have been removed, gently hold the motherboard and lift it out of the case. Be careful not to damage any attached components or cables while removing the motherboard.
The motherboard is one of the most critical components of a computer; it holds the central processing unit, memory modules, expansion slots, and many other critical components, so handle it with care. Removing the motherboard allows you to access other components such as the power supply unit, graphics card, and storage devices for repair or replacement. Remember to label or take photos of all the cables’ original positions to make reinstallation more manageable.
Final Steps
Removing a motherboard from a computer can seem like a daunting task, but with some careful steps, it can be done easily. First, make sure to disconnect all cables connected to the motherboard, such as power and data cables. Next, remove any screws or fasteners that are holding the motherboard in place.
Once all screws have been removed, gently lift the motherboard out of the computer case, being careful not to damage any other components. In some cases, the motherboard may be secured with a retention bracket, which will need to be removed before the motherboard can be lifted out. When removing a motherboard, it is important to take care so as not to damage any of the other components in the computer.
It can be helpful to take pictures or make notes to help with reassembly later. By following these steps, it is possible to safely remove a motherboard from a computer.
Remove the motherboard slowly and carefully
As you near the end of the process of replacing or repairing your motherboard, it’s time to remove the motherboard. It’s essential to do this step slowly and carefully to avoid causing any damage to the delicate components that populate the motherboard. Before removing the motherboard, ensure that all the screws and cables are removed, and the motherboard is entirely free.
Then, delicately hold the motherboard’s edges and slowly lift it out of the computer case. Remember to place the motherboard somewhere safe where it won’t come in contact with any static electricity, which can damage the motherboard. With patience, focus, and care, removing the motherboard is a simple process that will help you get to the next steps of replacing or repairing your computer.
Check for any damage
After completing all the basic checks and repairs, the final step in maintaining your home’s appliances is to carefully inspect and check for any damage. This includes checking for any cracks, leaks, or other signs of wear and tear that could potentially become safety hazards. Start by examining the exterior of the appliance for any visible damage, then move on to the interior to ensure that all the components are working properly.
Don’t forget to check the electrical wiring and connections for any signs of damage or fraying. Ensuring that your appliances are in good working order not only keeps your home running smoothly but also ensures the safety of your family and loved ones. So take the time to perform regular maintenance checks to keep your appliances in top shape for years to come.
Clean the area around the motherboard
As you near the end of your build, it’s important to take a few moments to clean up the area around the motherboard. Depending on how much dust and debris has accumulated, you may want to use a can of compressed air to blow everything away. This step is crucial for preventing any loose particles from interfering with your computer’s components.
It’s also a good idea to double-check that nothing is left behind on top of the motherboard. You wouldn’t want a tiny screw or metal shaving from earlier in the build process to cause problems down the line. Taking the time to tidy up now will save you any headaches in the future.
So, grab a cloth and some compressed air and give the area around your motherboard a thorough once-over. Your computer will thank you for it.
Conclusion
In conclusion, removing a motherboard can be a daunting task, but with the proper tools and knowledge, it can be a breeze. Just remember, always power down and unplug your computer before attempting to remove any components. And if all else fails, call a tech-savvy friend or professional for assistance.
Otherwise, you may end up with a pile of shiny parts and no clue how to put them back together. Trust us, we’ve been there.”
FAQs
How do I remove the motherboard from my computer?
To remove the motherboard, first turn off and unplug the computer. Open the case and locate the screws holding the motherboard in place. Unscrew these and gently lift the motherboard out of the case, being careful not to damage any of the components.
Are there any tools I need to remove the motherboard?
Yes, you may need a Phillips-head screwdriver and possibly pliers if any screws are difficult to remove.
Do I need to disconnect any cables before removing the motherboard?
Yes, you will need to disconnect any cables that are connected to the motherboard, such as the power supply cables and any other cables connected to expansion cards.
Is it necessary to remove the motherboard if I just want to upgrade the CPU or RAM?
Not necessarily. In most cases, you can upgrade the CPU or RAM without removing the motherboard. However, if you need to access the underside of the motherboard for any reason, you will need to remove it.