
Removing a motherboard from a computer may sound like a daunting task, but with the right tools and knowledge, it can be a straightforward process. Whether you’re upgrading your motherboard or repairing a faulty one, knowing how to safely remove and uninstall it is essential. In this blog post, we’ll walk you through the step-by-step process and provide some helpful tips to ensure a successful removal.
So, if you’re ready to dive in and learn how to remove a motherboard, grab your screwdriver, and let’s get started!
Preparation
If you’re looking to upgrade your computer system, changing your motherboard might be necessary. Removing a motherboard is not a complicated process, but it requires preparation to avoid any potential damages. First and foremost, ensure that you have all the necessary tools, such as a screwdriver and an anti-static wrist strap.
You must also have a safe working environment, free of any dust or static electricity, as these can severely damage your system’s components. You should power off the computer and unplug all cables, removing any additional components such as the CPU, RAM, or graphics card before you start to remove the motherboard. This will make it easier to remove the motherboard and help prevent damage to other parts of your system.
With the right tools and preparation, you can safely remove your motherboard and continue with the upgrade process, ensuring a smooth and successful installation of the new motherboard. Remember always to handle your computer components with care to avoid any negative consequences.
Gather Necessary Tools
When it comes to starting a new project, it’s essential to gather all the necessary tools before diving in. This not only ensures that you have everything you need to complete the task at hand but also saves you time and frustration later on when you realize you’re missing something critical. Depending on your project, the tools you need may include basic supplies like a hammer, screwdriver, or measuring tape, or more specialized tools like a saw, drill, or welding equipment.
It’s essential to research what tools you will need before you begin to avoid any unnecessary delays. Additionally, investing in high-quality equipment can save you money in the long run, as cheap tools are more likely to break or need replacement sooner. Overall, taking the time to gather the necessary tools beforehand is a crucial step in ensuring a successful and efficient project.
Power off and Disconnect Everything
Preparation is an essential step before you start working on your computer or any other electronics. To fully prepare, you must power off and disconnect everything. This may seem like a simple task, but it is crucial.
When you power off your computer, you are allowing it to completely shut down, which helps avoid any potential damage or data loss. Disconnecting all cords and cables ensures that none of the devices attached to your computer are still receiving power, which can also help prevent any damage or data loss. Furthermore, this step keeps you safe from electrical shock or other mishaps when you are working around your computer.
It only takes a few moments, but powering off and disconnecting everything will give you peace of mind knowing that you have taken the necessary steps to protect your computer and yourself.
Removing the Motherboard
Removing a motherboard can be an intimidating task, but with the proper guidance, it can be done smoothly. First, ensure all power sources are disconnected from the system. Then, start by gently removing any attached cables and components from the motherboard, such as the CPU fan and SATA cables.
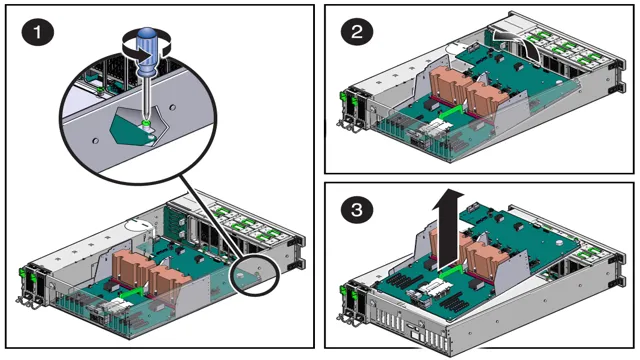
Next, locate and remove any screws or standoffs securing the motherboard in place. Be sure to keep track of these screws and standoffs for reassembly later on. Once all screws and standoffs have been removed, gently lift the motherboard from the case.
It’s essential to be careful as the motherboard is delicate and can easily break. Also, don’t forget to discharge any static electricity from your body by touching a metal object before handling the motherboard. Now that you know how to remove a motherboard, make sure to handle it with care and keep track of any screws or standoffs to ensure a successful reassembly process.
Locate the Screws and Disconnect Cables
When it comes to removing the motherboard, one of the most crucial steps is locating and removing the screws and cables that keep it in place. This may seem like a daunting task, but with the right tools and a little bit of patience, it can be easily accomplished. Before getting started, it’s important to make sure you have a clear workspace and all the necessary tools.
Once you’re ready, start by locating the screws that are holding the motherboard in place. These screws are typically found around the edges of the motherboard and may be obscured by other components. Once you have located them, carefully unscrew them using a screwdriver and set them aside.
After removing the screws, you’ll need to disconnect the cables that are attached to the motherboard. These cables include the power supply, data cables, and any other connectors that are in use. Simply pull gently on each cable to disconnect it, being careful not to damage the cables or the motherboard itself.
With the screws and cables removed, the motherboard should now be free to slide out of its position. By taking care during this process, you can ensure that the rest of your computer components remain undamaged and that your motherboard can be safely replaced or repaired.
Remove the Motherboard from its Mounting Brackets
If you’re looking to upgrade or repair your computer, removing the motherboard is often necessary. The first step in this process is to remove the motherboard from its mounting brackets. This requires opening up your computer case and locating the screws or clips that hold the motherboard in place.
Once you have identified these fasteners, you can begin to carefully remove them one by one. It’s important to take your time during this step and avoid damaging any other components that may be connected to the motherboard. Once the final screw or clip has been removed, you can carefully lift the motherboard out of the case and set it aside.
Remember to keep all screws and clips in a safe place so that you can put everything back together again later. By taking the time to properly remove your motherboard, you can ensure a smooth and successful computer repair or upgrade.
After Removal
After successfully removing the motherboard from your device, the next step would be to carefully inspect it for any damages or faults. It’s always best to perform a thorough check before reusing or disposing of the motherboard. Look out for any broken or bent pins, cracks, or physical damages on the motherboard.
In case you notice any damages, it’s best to replace the motherboard entirely. However, if the motherboard appears to be in good condition, you can clean it with rubbing alcohol and a soft-bristled brush to remove any dirt or dust. Once cleaned, you can store it away in an anti-static bag to prevent damage from electrical damage.
For reassembly, ensure that you install the motherboard correctly, attach all the cables and ensure that everything is snugly in place before powering on the device. Overall, safely removing and handling the motherboard is crucial to prevent further damages or risks and prolong the longevity of your device.
Inspect for Damage
After removing your item, it’s important to take a closer look and inspect it for any damage that may have occurred during the removal process. This can be particularly vital if the item is fragile or has delicate components. Start by carefully examining the item for any scratches, dents, or cracks.
If you find any damage, take note of it and capture it in photographs. This is particularly important if you’re moving the item for insurance purposes, as it can provide evidence of any damage that occurred during transportation. Don’t forget to also check the packaging material to see if it has cushioned and protected the item as it should have.
By taking the time to carefully inspect your item, you can ensure that it arrives at its destination safely and in good condition.
Clean and Store Components Safely
When it comes to working with electronic components, it is vital to handle them with care. After removing the components, you should clean and store them safely to prevent any damage or contamination that may affect their functionality. Cleaning the parts after removal involves using cleaning agents, such as alcohol or compressed air, to remove any dirt or debris that may have accumulated on the surface.
After cleaning, it’s essential to store the components in a safe place, free from moisture and dust, to protect them from corrosion and other forms of damage. At this point, using anti-static bags or containers can help eliminate the buildup of static electricity, which can result in damage to sensitive components. Additionally, organizing these components in a systematic manner can make it easier to find the right component for a particular project when needed.
By handling your electronic components with the utmost care, you can ensure their safekeeping and efficient functionality in the long run.
Conclusion
Removing a motherboard can seem like a daunting task, but with the right approach and tools, it can be a smooth and satisfying experience. Think of it like taking apart a puzzle, one piece at a time. Just be sure to take your time, stay organized, and use caution, or you may end up with a jigsaw puzzle that is missing a few crucial pieces.
And if all else fails, don’t be afraid to ask for help from a fellow tech-savvy friend or professional. After all, teamwork makes the dream work!”
FAQs
How do I remove a motherboard from my computer?
To remove a motherboard, first power off your computer and unplug all cables. Next, remove any expansion cards or cables attached to the motherboard. Then, use a screwdriver to remove the screws securing the motherboard to the case. Finally, gently lift the motherboard out of the case.
What tools do I need to remove a motherboard?
To remove a motherboard, you will need a Phillips head screwdriver and possibly a flathead screwdriver. It may also be helpful to have a pair of pliers to remove any stubborn cables or connectors.
Do I need to remove the CPU before removing the motherboard?
It is not strictly necessary to remove the CPU before removing the motherboard, but it is recommended. This will allow you to inspect the CPU and make sure it is not damaged before re-installing the motherboard. To remove the CPU, carefully lift the retention arm and gently lift the CPU straight out of its socket.
How do I reinstall a motherboard after removing it?
To reinstall a motherboard, simply reverse the steps you took to remove it. Make sure to align the screw holes and connectors properly before securing the motherboard to the case. Connect any cables or expansion cards that were removed, making sure everything is properly seated and fastened. Finally, power on your computer to make sure everything is working correctly.