
Have you ever needed to remove your 24-pin connector from your motherboard but found yourself unsure of how to do it correctly? Fear not, as we’ve got you covered! In this blog post, we’ll walk you through the steps to safely disconnect your motherboard’s power supply connector. This vital component connects your power supply to your motherboard, ensuring that your computer can run smoothly and efficiently. However, when it comes to disconnection or removing the connector, you must take extra precautions to ensure that you don’t harm your motherboard or any other components.
Let’s dive in and learn how to safely remove your 24-pin connector from your motherboard!
Preparation
One of the crucial steps in building or upgrading a PC is the preparation, which includes learning how to remove a 24 pin connector from the motherboard. Before starting, make sure to turn off the computer and unplug it from the power source. Wear an anti-static wristband or ground yourself to prevent any electrostatic discharge that can damage the components.
Locate the 24 pin connector, which is usually located near the center of the motherboard, and carefully loosen the clip or latch that holds it in place. Use your fingers to grip the connector, wiggle it gently, and pull it straight out from the socket. Avoid pulling at an angle or using excessive force as it can bend the pins or damage the motherboard.
Removing the 24 pin connector may take some effort, but with proper preparation and caution, you can do it without any problems.
Turn off the computer and disconnect all cables.
When it comes to preparing your computer for maintenance or repairs, it’s important to take the time to do it right. One of the first steps in this process is turning off the computer and disconnecting all cables. This may seem like a simple task, but it’s important to do it properly to avoid any potential risks or damage to your computer.
Start by shutting down your computer completely, then unplug all cables from the back of the computer, including the power cord, monitor cable, keyboard, mouse, and any other peripheral devices. Once everything is unplugged, take the time to carefully organize and label each cable, so you can easily reconnect them later. By taking these simple steps, you can ensure that your computer is properly prepared for any maintenance or repairs that may be needed, minimizing the risk of damage and ensuring everything runs smoothly when you plug it back in.
Remove the computer case cover.
Before beginning to remove the computer case cover, it’s important to prepare the workstation and gather the necessary tools. This includes unplugging all cables and cords from the back of the computer, moving the computer to a flat surface, and grounding yourself to prevent electrostatic discharge. Once you have taken these steps, you can proceed to removing the screws or clips that hold the computer case cover in place.
It’s important to keep the screws or clips in a safe place to avoid losing them. One easy way to do this is to use a small magnetic dish to hold the screws. With the screws removed, you can lift off the case cover and gain access to the internal components of your computer.
Remember to take care not to touch any of the components inside with your hands, as oil and dirt from your skin can damage the parts. With a little bit of preparation and care, removing the computer case cover can be a simple, straightforward process.
Removing the 24 Pin Connector
If you are looking to remove the 24-pin connector from your motherboard, it might seem like a daunting task at first. However, it is actually quite simple! Firstly, you need to make sure your PC is turned off and unplugged from any power sources. Next, locate the 24-pin connector on your motherboard, this will usually be located towards the right-hand side.
Gently grip the connector and wiggle it back and forth while applying steady pressure until it detaches from the motherboard. You may need to use a bit of force, but do not pull too hard or you risk damaging the motherboard. Once the connector has been removed, you can proceed with any necessary upgrades or repairs.
Just remember to securely reconnect the 24-pin connector when you’re done!
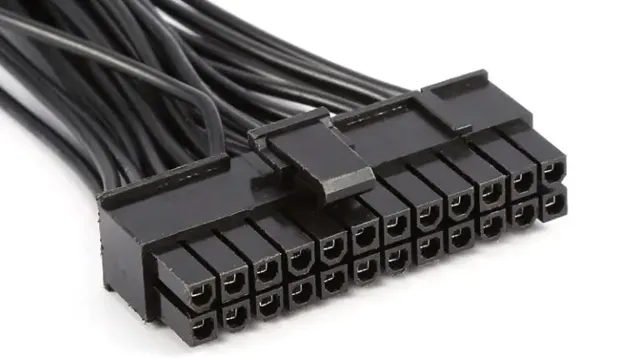
Locate the 24 pin connector on the motherboard.
Looking to remove or replace the 24 pin connector on your motherboard? Then the first step is to locate it. Typically located on the right-hand side of the motherboard, this connector is responsible for delivering power to the motherboard, CPU, and other components. Before removing it, ensure that your PC is switched off and disconnected from the power supply.
To safely remove the 24 pin connector, gently wiggle it back and forth while pulling it upwards. Be cautious not to yank or forcefully remove it, as this may damage the connector or even rip it off the motherboard, causing irreparable damage. So, whether you are upgrading your PC components or troubleshooting power supply issues, taking out the 24 pin connector is a straightforward process once you locate it.
Just remember to handle it with care, and your PC will thank you for it!
Press down on the clip while pulling the connector out.
When it comes to removing the 24-pin connector from your computer’s motherboard, there’s a simple trick to keep in mind. First, locate the clip that’s holding the connector in place. You’ll need to press down on this clip while simultaneously pulling the connector out of the socket.
This might seem like a tricky maneuver, but with a bit of practice, it will become second nature. It’s important to be gentle when removing the 24-pin connector. Tugging too hard or in the wrong direction can cause damage to the motherboard or other components.
Take your time and make sure you’re applying even pressure to both sides of the clip as you press down. This will help to release it from the socket and make it easier to remove. Once you’ve successfully removed the 24-pin connector, it’s a good idea to inspect it for any signs of damage or wear.
If you notice anything out of the ordinary, it’s best to replace the connector rather than reusing it. This will help to ensure that your computer runs smoothly and without any issues. In conclusion, removing the 24-pin connector from your computer’s motherboard is a simple process that just requires a bit of practice and a gentle touch.
Remember to press down on the clip while pulling the connector out, and take your time to avoid damaging any components. With these tips in mind, you’ll be able to easily disconnect your computer’s power supply whenever you need to.
If it’s stuck, gently wiggle it while pulling it out.
Removing the 24 pin connector from a motherboard can be a challenging task, especially if it’s been in place for a long time. It’s essential to approach this with caution to avoid damaging the connector or the pins on the motherboard. The first thing to do is to locate the 24 pin connector and ensure that the computer is turned off and disconnected from the power supply.
Next, gently grip the connector with both hands and begin to wiggle it while pulling it out. It may take some pressure to get the connector out, but avoid using too much force to avoid bending the pins or damaging the motherboard. If it’s still not coming out, you can try wiggling it from side to side to loosen it up.
Once the connector is out, be sure to inspect the pins on both the connector and the motherboard for any damage or bending. If there is damage, you may need to replace the connector or seek the help of a professional. Remember to approach this task with care, and never force the connector out as it may cause irreversible damage.
Tips and Warnings
Removing a 24-pin connector from your motherboard can be tricky, but with the right tips and precautions, it can be done safely. Here’s how to remove a 24-pin connector from your motherboard. First, make sure to power off your computer before attempting to remove any components.
Then, locate the 24-pin connector on your motherboard – it will be the largest connector on the board. To remove it, gently wiggle it back and forth while pulling straight out. Don’t use excessive force – this can damage your motherboard or the connector itself.
It’s also important to remember to line up the connector correctly when reattaching it to avoid damaging the pins. If you run into any issues or are unsure about the process, it’s always a good idea to consult your motherboard manual or seek help from a professional. Overall, removing a 24-pin connector from your motherboard requires a bit of care and attention, but with these tips, the process should be much smoother and stress-free.
Be careful not to damage any other components.
When working on repairing or replacing components in your electronic devices, it’s crucial to be careful not to damage any other components. This is especially important when dealing with delicate items like wiring or circuit boards. One tip is to wear an anti-static wristband to prevent electrostatic discharge, which can damage nearby components.
It’s also important to use the appropriate tools, such as tweezers or a screwdriver of the correct size and type. Be sure to avoid using excessive force or pressure when removing or inserting components, as this can damage other parts of the device. It can be tempting to rush through the process, but taking the time to work methodically and carefully will ultimately save you time and money by avoiding further damage.
Remember, a little bit of caution can go a long way in protecting your electronics!
Don’t use excessive force.
When it comes to using force, it’s essential to remember that less is often more. Whether you’re lifting weights, moving furniture, or trying to open a stuck jar, using excessive force can do more harm than good. For starters, it can put unnecessary strain on your muscles and joints, increasing your risk of injury.
Additionally, it can often damage the object you’re trying to move or handle, leading to costly repairs or replacements. To avoid these issues, take a step back and assess the situation before jumping in with brute force. Can you approach the task from a different angle or use a tool to lighten the load? Are there multiple people who can help you move the object more easily and safely? By considering these options and using a more thoughtful approach, you’ll not only get the job done more efficiently, but you’ll also reduce your risk of injury and avoid causing further damage.
Remember, the key is to work smarter, not harder.
Conclusion
Removing a 24-pin connector from a motherboard can be a daunting task. However, with a few tricks up your sleeve, it can be as easy as pie. Firstly, locate the tabs on either side of the connector and gently press them down with your fingertips.
Then, wiggle the connector back and forth while pulling it away from the motherboard. Voila! The connector should come loose without much resistance. Remember, patience and a gentle touch are key here.
Now go forth and impress your tech-savvy friends with your newfound connector-removing skills!”
FAQs
What tools do I need to remove a 24-pin connector from a motherboard?
You’ll need a flathead screwdriver and a bit of patience.
Should I remove the power supply unit when removing the 24-pin connector from the motherboard?
Yes, it’s always best to unplug the power supply unit before removing or installing any components.
Is it normal to hear a clicking sound when removing the 24-pin connector from the motherboard?
Yes, that clicking sound is the mechanism releasing the latch that locks the connector in place.
What should I do if the 24-pin connector is stuck on the motherboard?
Don’t force it. Apply gentle pressure to wiggle it free. If that doesn’t work, double-check that any locking mechanisms are disengaged before trying again.