
If you are a tech enthusiast who loves to experiment with hardware, then creating your own motherboard might be a dream come true. The process of making your own motherboard can seem daunting at first, but with the right resources, it can be a rewarding experience. Not only will you have a custom-built motherboard that you can be proud of, but you will also have complete control over its features and capabilities.
When you create your own motherboard, you can tailor it to your specific needs and preferences. You can customize the size, the layout, and the connections to suit your requirements. You can also choose the components that you want to include, such as the power supply, the chipset, and the CPU socket.
By building your own motherboard, you can learn about the inner workings of a motherboard and gain a deeper understanding of how computers function. That being said, making your own motherboard is not for everyone. It requires a significant amount of technical knowledge, patience, and attention to detail.
Additionally, it can be a time-consuming process that requires specialized tools and equipment. But for those who are willing to put in the effort, the results can be truly rewarding. In this blog, we’ll provide you with some helpful tips and resources to get started on making your own motherboard.
From selecting the components to assembling the board, we’ll guide you through the process step-by-step. We’ll also provide you with some inspiration by showcasing some of the incredible custom motherboards that have been created by enthusiasts around the world. So, if you’re ready to take on this rewarding challenge, let’s get started!
Understanding the Parts Needed
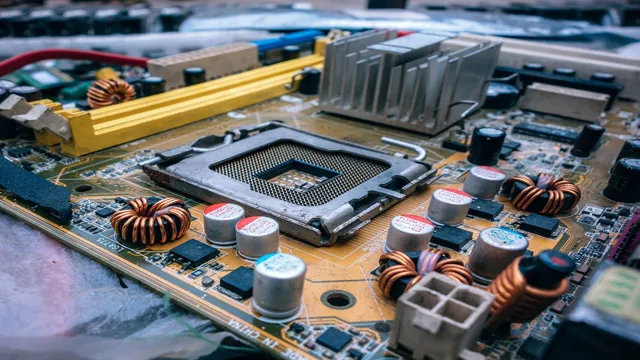
If you’re thinking about building your own motherboard, it’s important to understand the parts needed to get the job done. First and foremost, you’ll need a PCB (printed circuit board) which acts as the foundation for the motherboard. This is where all of the individual components will be soldered onto.
You’ll also need a chipset which acts as the “brain” of the motherboard, directing data between the different components. Other important parts include the CPU (central processing unit), RAM (random access memory), expansion slots for add-on components like graphics cards, and connectors for power, data, and audio. It’s essential to research and carefully select each component to ensure compatibility and optimal performance.
Building your own motherboard can be a challenging project, but with the right parts and a little patience, it can be a rewarding experience.
Researching Compatible Components
When it comes to building a computer or upgrading your current system, it’s crucial to understand the parts needed to ensure they are compatible with each other. Researching compatible components is essential to prevent any potential hardware issues or incompatibilities. These parts include the central processing unit (CPU), motherboard, random access memory (RAM), storage drives, graphics card, and power supply unit (PSU).
Each component has its own set of specifications and requirements that need to be met to ensure compatibility. For example, the motherboard needs to have the right socket type to accommodate the CPU, while the PSU needs to have enough wattage to power all the components. It’s important to do thorough research and read reviews before making any purchases to make sure you’re making the right decisions and avoiding any potential compatibility issues down the line.
By taking the time to understand the necessary parts, you can ensure that your computer runs smoothly and efficiently.
Sourcing the Parts
When it comes to building or repairing electronics, it’s important to know which parts you’ll need to get the job done. Different devices require different components, so it’s important to research and understand which ones you’ll need before you start sourcing them. Generally, you’ll need to find things like resistors, capacitors, transistors, microcontrollers, and more.
Each of these parts plays a specific role in the functioning of your device. For example, resistors regulate the flow of electricity and capacitors store electrical charges. It’s important to also consider factors like size, voltage, and temperature requirements when sourcing parts.
Luckily, there are many online electronics suppliers that offer a wide range of components, making it easier than ever to find the parts you need. With a little research and some careful planning, you’ll be able to quickly and efficiently source all the necessary components for your project.
Assembling the Motherboard
Assembling the motherboard is one of the most crucial steps when creating your own computer. Before we dive into the process, let’s first understand what a motherboard is. A motherboard is a printed circuit board that connects all the components of a computer, such as the CPU, RAM, and storage devices.
To start assembling the motherboard, you will need to open up your computer case and place the motherboard inside. Once you have your motherboard in place, the next step is to attach the power supply, CPU, and RAM. After that, connect the storage devices such as the hard drive or SSD and then attach all the cables for the power supply, data transfer, and audio.
It may sound complicated, but don’t worry, as long as you follow the manual or online tutorials, you’ll be able to complete this process smoothly. Congratulations, you have now successfully assembled your own motherboard, and your computer is ready to go. Remember to handle all the sensitive parts with care, and always ensure safety while working with your computer.
Laying Out the Components
Assembling the motherboard is a critical step in building a PC. Start by placing the motherboard on a flat surface and removing any screws or mounting brackets on the case that will be needed. Ensure the standoffs are in their correct positions before placing the motherboard in the case.
Keeping the cables from the power supply organized will make it much easier to connect all the necessary components. Then attach the motherboard to the standoffs and screw it securely in place. Next, connect the power supply to the proper connectors on the motherboard.
Before installing any of the other components, it’s a good time to double-check everything to ensure it’s properly connected. The motherboard is the backbone of the PC, so it’s important to assemble it correctly. The better the foundation, the more smoothly the rest of the build will go.
Soldering the Pieces Together
Now that all the components have been prepped and tested, it’s time to solder them together to create the motherboard. This may seem like a daunting task, but with a steady hand and some patience, it can be easily accomplished. First, begin by laying out all the components in their correct positions on the PCB.
Then, using a soldering iron and your chosen solder, start attaching the components by melting the solder and carefully placing it onto each pad. It’s important to keep the soldering iron tip clean to ensure a strong connection between the component and pad. As you go along, double-check that each component is in the right position and secure enough.
Don’t forget to trim the excess leads with a pair of flush cutters for a neat finish. Assembling the motherboard may take some time, but once it’s done, you’ll have a functional piece of technology that you’ve built yourself!
Testing and Troubleshooting
Assembling the motherboard is a crucial step in building your computer, and testing and troubleshooting are essential to ensure it’s functioning correctly. The first thing to do is to make sure that you’re working with a clean, dry workspace and that you’re wearing an anti-static wristband to avoid damaging sensitive components. Once you’ve taken the necessary precautions, you’ll want to start by installing the motherboard into the case and connecting the power supply, CPU, and RAM.
It’s essential to make sure that you’re doing this correctly, so consult your motherboard manual and double-check each connection. Once you’ve assembled all the components, it’s time to test the system. Start by connecting the power supply and turning on the system.
Listen for any strange noises like beeps or clicks and check that all fans are spinning. If any errors occur, consult your motherboard manual for troubleshooting instructions. Overall, assembling the motherboard may seem daunting, but with careful attention to detail and thorough testing, you’ll have a functioning computer in no time.
Programming Your Motherboard
If you’re interested in how to make your own motherboard, it’s important to know that this is not a simple task. Designing and programming a motherboard requires advanced knowledge of hardware and software engineering. However, there are resources available for those who want to learn.
One approach is to use a development kit, such as the Raspberry Pi, which provides a platform for experimentation and learning. Starting with simple projects and gradually progressing to more advanced ones can help build the necessary skills. Additionally, there are online courses and tutorials on motherboard design and programming that can provide a more structured learning environment.
If you are passionate about this field and willing to put in the time and effort, you can learn how to program your motherboard and open up new possibilities in the world of computing.
Choosing a Programming Language
When programming your motherboard, choosing the right programming language is crucial. The programming language you use will determine how your motherboard will function, and which types of software will work efficiently with it. As such, it’s important to take your time when choosing a programming language for your motherboard.
Some programming languages are better suited for simple tasks, while others excel at complex calculations and processes. Ultimately, your choice of programming language will depend on your motherboard’s intended use, and the software that will work alongside it. By choosing the right programming language, you can ensure that your motherboard works to its full potential and can handle any task you throw at it.
So take your time, do your research, and choose wisely!
Writing the Code
Programming your motherboard can seem like a daunting task, but with the right tools and knowledge, it can be a rewarding experience. Before you start, it’s essential to ensure that you have all the necessary components, such as a microcontroller and a programming tool. One of the simplest ways to program your motherboard is to use the Arduino IDE, which is user-friendly and widely available.
Once you have the IDE installed, connect your microcontroller to your computer and start writing your code. It’s essential to keep your code organized, use comments, and test your code regularly to ensure that it functions as expected. With a little patience and perseverance, you can turn your motherboard into a powerful tool that can handle complex tasks.
So, don’t be intimidated by programming your motherboard, embrace the challenge, and get coding!
Using Your Custom Motherboard
If you’ve taken the time to design and build your own custom motherboard, congratulations! Now comes the fun part – actually using it to power your dream PC. Before you dive in, there are a few things to keep in mind. First and foremost, make sure all your components are compatible with your motherboard.
This includes the processor, RAM, and any other peripherals you plan to use. Once everything is plugged in and powered up, you can start tweaking your BIOS settings to maximize performance. This might include overclocking your CPU or adjusting the fan speeds for better cooling.
Finally, don’t forget to keep an eye on your system temperatures – custom motherboards are great for optimizing performance, but they can also run hotter than off-the-shelf options. With a little bit of tinkering, your custom motherboard can be the backbone of a truly unique and powerful build.
Conclusion
Well, after all the research and hard work, you now have the knowledge to build your own motherboard! With a little bit of creativity and a lot of patience, you can design a board that fits your exact needs and specifications. However, be forewarned: this is not a project for the faint of heart. Building a motherboard is a highly technical and time-consuming endeavor that requires a deep understanding of computer engineering.
But if you’re up for the challenge, the rewards of creating your own hardware are limitless. So get out there, and start building the computer of your dreams! Just don’t blame us if things go wrong.”
FAQs
What are the materials required to make your own motherboard?
To make your own motherboard, you would need a copper clad board, etching solution, a laser printer, iron, and drill tools.
Can I make a motherboard without any prior electronics experience?
Making a motherboard requires some knowledge of electronics and experience with tools. However, there are detailed guides and tutorials available online that can help you in this process.
How long does it take to make your own motherboard?
The time required to make a motherboard can vary depending on the complexity of the design and your level of expertise. It can take anywhere from a few hours to a few days to complete the process.
What are the benefits of making your own motherboard?
Making your own motherboard gives you complete control over the design process, allowing you to create a motherboard that meets your specific needs and requirements. It can also be a fun and rewarding DIY project for electronics enthusiasts.