
Have you ever heard of the term Secure Boot? It’s a feature that allows your computer system to check if the operating system is genuine before it boots up, ultimately safeguarding against potential malware attacks. Gigabyte is one of the most popular motherboard manufacturers that have this feature in their BIOS. However, some users might face issues when trying to enable Secure Boot.
In this blog post, we’ll guide you on how to enable Secure Boot on Gigabyte Motherboard and ensure your system’s security. So, buckle up, and let’s get started!
Check Compatibility
If you’re wondering how to enable secure boot on your Gigabyte motherboard, the first step is to check if your hardware is compatible. Secure boot is a security feature that ensures your PC boots with only trusted firmware and OS loaders. To enable it on your Gigabyte motherboard, you first need to check if your PC supports UEFI firmware and has a compatible boot loader.
Secure boot requires a UEFI system, and if your motherboard is not UEFI-based, you won’t be able to enable secure boot. You can check if your Gigabyte motherboard has UEFI firmware by checking its documentation or by looking for the UEFI firmware option in the BIOS settings. Once you’ve confirmed that your Gigabyte motherboard is UEFI-compatible, you can then check the compatibility of your OS loader.
Secure boot requires a signed OS loader, and if your OS loader is not signed, you won’t be able to enable secure boot. You can check if your OS loader is signed by looking for a bootable USB drive with a digital signature. If your OS loader is not signed, you’ll need to sign it before enabling secure boot.
Enabling secure boot on your Gigabyte motherboard is an important security feature that protects your PC from malware and other security threats. By ensuring that only trusted firmware and OS loaders are allowed to boot, you can rest assured that your PC is secure and protected. So, if you’re wondering how to enable secure boot on your Gigabyte motherboard, make sure to check compatibility with your system first.
Ensure motherboard supports Secure Boot
Secure Boot When building or upgrading your computer system, one crucial factor to consider is whether your motherboard supports Secure Boot. Secure Boot is a feature that helps prevent unauthorized firmware, operating systems, and other malicious software from starting up on your device. However, not all motherboards support Secure Boot, so it’s essential to check compatibility before making a purchase.
If your motherboard does not support Secure Boot, you may leave your system vulnerable to security threats, which can be especially critical for businesses or individuals with sensitive data. Therefore, it’s vital to do your research and find a motherboard that supports Secure Boot to ensure your system’s security.
Enter BIOS Settings
If you’re looking to enable Secure Boot on your Gigabyte motherboard, the first thing you need to do is enter your BIOS settings. To do this, restart your computer and press the designated key (usually F2, DEL, or ESC) to enter the BIOS. Once inside, navigate to the boot tab and look for the Secure Boot option.
If it’s not already enabled, toggle it on. If you’re having trouble finding the option, consult your motherboard’s manual or check online for specific instructions. It’s important to note that enabling Secure Boot can provide an additional layer of security for your system, but it may also prevent your computer from booting up if any of the components or drivers are not signed or certified by Microsoft.
As long as you’re aware of this potential issue and take the necessary precautions, enabling Secure Boot can be a worthwhile measure to protect your system from unauthorized access and malware.
Restart computer and press key to enter BIOS
Entering the BIOS settings of your computer can be an intimidating task for many people. However, it is an essential step if you want to make changes to the way your computer operates. One of the first things to do is to restart your computer.
As it starts up, keep an eye out for the BIOS prompt which will usually say something like “Press F2 to enter setup”. This means that the BIOS settings can be accessed by pressing the F2 key. However, different computers may have different keys to press depending on the manufacturer and model.
Therefore, it’s important to check the user manual or research online for the specific key to press if F2 does not work. It’s also important to note that entering the BIOS menus and making changes to the settings can be risky, so be careful and make sure to save any changes before exiting. By accessing the BIOS settings, you can make adjustments to the hardware configuration, monitor system performance, and troubleshoot system issues.
So, keep calm, take your time, and don’t be afraid to explore.
Go to Boot Options
Getting into the BIOS settings of your computer might seem intimidating, but it’s actually quite simple if you know what to do. One of the first steps in accessing the BIOS settings is to enter the boot options menu. This menu allows you to select how your computer boots up, whether it be from a hard drive, CD, or USB device.
To access it, you’ll need to press a certain key during startup. Depending on your computer model and manufacturer, this key could be F2, F10, or even DELETE. Keep an eye out for a message on your screen during startup that indicates which key to press.
Once you’re in the boot options menu, you can navigate to the BIOS settings and make any necessary changes, such as resetting your BIOS password or adjusting hardware settings. By entering the BIOS settings, you’re able to take control of your computer and ensure that it’s running at its best.
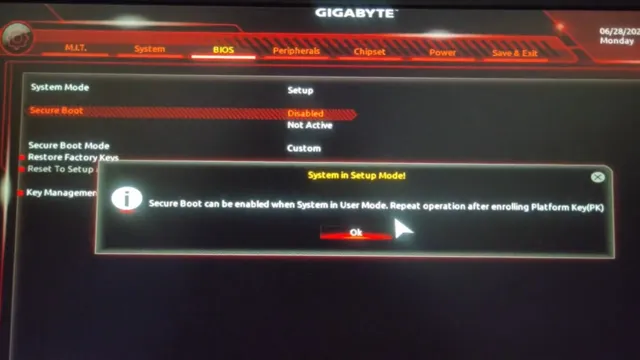
Enable Secure Boot Option
If you’re looking to enhance the security of your Gigabyte motherboard, enabling the Secure Boot option can be a helpful step. The Secure Boot option ensures that only trusted software is loaded during the boot process and protects against malware and other harmful software. To enable Secure Boot on your Gigabyte motherboard, access the BIOS settings by pressing the Delete key during system startup.
Then navigate to the Boot tab and locate the Secure Boot option. Change the setting to Enabled and save and exit the BIOS. Keep in mind that enabling Secure Boot may cause compatibility issues with older devices that rely on legacy BIOS installations.
Overall, enabling Secure Boot can provide added security to your system and help protect against potential threats.
Locate Secure Boot option in BIOS settings
When it comes to securing your computer, enabling the Secure Boot option on your BIOS settings can be crucial. But before you can enable this option, you need to locate it first. To do so, you’ll need to restart your computer and enter the BIOS settings by pressing the key indicated on your screen during startup.
Once you’re in the BIOS settings, navigate to the “Security” tab and look for the option labeled “Secure Boot.” Depending on your computer’s manufacturer, the exact location of this option may vary. Once you’ve found it, enable it and save your changes before exiting the BIOS settings.
Keep in mind that Secure Boot may interfere with older operating systems or hardware, so be sure to check for compatibility issues before enabling this option. By enabling Secure Boot, you can protect your computer from potential security threats and keep your data safe.
Change to Enabled
If you want to enhance the security of your computer or laptop, it is essential to enable the secure boot option. Secure boot is a feature that checks if the operating system and firmware are legitimate and not corrupt. It helps prevent the installation of malware, rootkits, and other malicious software that could damage your computer.
By enabling the secure boot option, you can ensure that only trusted software has access to your computer’s hardware. To enable secure boot, you will need to enter the BIOS or UEFI settings of your computer. The process may vary depending on your computer model and manufacturer, but typically, you can access the BIOS menu by pressing a specific key during startup.
Once you’re in the BIOS menu, look for the secure boot option in the boot or security settings. Change the option from disabled to enabled, save your changes, and exit the BIOS menu. It’s worth noting that enabling secure boot may cause compatibility issues with some older hardware or operating systems that don’t support it.
If you encounter any problems after enabling secure boot, you can disable it or update your hardware and software to resolve the issue. In summary, enabling the secure boot option is a simple and effective way to enhance the security of your computer or laptop. By preventing the execution of unauthorized code, you can protect your system from malicious software and hackers.
So, take the time to enable secure boot on your device, and enjoy added peace of mind while using your computer.
Save and Exit BIOS Settings
If you’re looking to enable Secure Boot on your Gigabyte motherboard, you’ll need to access the BIOS. The first step is to restart your computer and press the appropriate key to access the BIOS settings. This key can vary depending on the specific motherboard model, but it is usually F2 or Delete.
Once you are in the BIOS, navigate to the Boot tab and look for the option to enable Secure Boot. Make sure it is enabled and then save your changes before exiting the BIOS. Keep in mind that Secure Boot can help prevent malware from infecting your system by verifying the integrity of the operating system on bootup.
By enabling it, you’ll add an extra layer of protection to your computer’s security.
Press F10 to save changes and exit BIOS
If you’re someone who has tinkered around with the settings on your computer’s BIOS, then you know that it’s a bit of a maze to navigate. However, once you’ve made your desired changes, it’s essential to save them and exit the BIOS. This is where the trusty “F10” key comes in.
Pressing it will prompt a dialog box to appear, asking whether you want to save the changes you’ve made. Once you confirm that you do, your BIOS settings will be saved, and the computer will automatically exit the BIOS program. It’s important to note that if you don’t save your changes before exiting the BIOS, then all your hard work will be for nothing, and your changes won’t be saved.
So, always remember to hit “F10” before leaving the BIOS and make sure to save those settings!
Computer will restart with Secure Boot enabled
“If you’re experiencing issues with your computer restarting when Secure Boot is enabled, don’t worry! It’s an easy fix. Simply go into your BIOS settings and save the changes before exiting. This will ensure that your computer recognizes the new security settings, allowing you to boot up with Secure Boot enabled.
It’s important to enable Secure Boot because it provides an extra layer of protection against malware and other security threats. With Secure Boot, your computer will only boot up from trusted sources, ensuring that any potential threats are prevented from executing. So, next time your computer restarts unexpectedly with Secure Boot enabled, remember to save the changes in your BIOS settings before exiting.
This quick fix will give you peace of mind knowing that your computer is secure and protected from any potential cyberattacks.”
Conclusion
Enabling secure boot on your Gigabyte motherboard is like adding an extra layer of protection to your computer, just like how putting a lock on your front door adds an extra layer of security for your home. So, take the time to follow the necessary steps and enable secure boot to keep your computer safe from malicious attacks. After all, prevention is always better than cure.
“
FAQs
What is Secure Boot and why is it important to enable it on a Gigabyte motherboard?
Secure Boot is a feature that ensures only authenticated software is loaded during the boot process, which helps to prevent malware attacks. It is important to enable it on a Gigabyte motherboard to enhance system security.
How to enable Secure Boot on a Gigabyte motherboard?
To enable Secure Boot on a Gigabyte motherboard, first enter the UEFI BIOS settings and navigate to the “Security” or “Boot” tab. Next, locate the “Secure Boot” option and set it to “Enabled”. Save the changes and exit the BIOS.
Can I disable Secure Boot on a Gigabyte motherboard if I encounter compatibility issues with certain hardware or software?
Yes, you can disable Secure Boot on a Gigabyte motherboard if you encounter compatibility issues with certain hardware or software. However, note that disabling Secure Boot may decrease your system’s security.
Does enabling Secure Boot on a Gigabyte motherboard affect performance?
Enabling Secure Boot on a Gigabyte motherboard should not affect performance significantly. However, it may increase boot time slightly due to the additional security checks during the boot process.