
Have you ever been in a situation where you want to duplicate your screen on a projector, but you aren’t quite sure how? Well, you’re not alone. Duplicating a screen on a projector can seem daunting at first, but with a few simple steps, you’ll be presenting like a pro in no time. Whether you’re in a business meeting, giving a lecture, or simply want to watch your favorite show on a bigger screen, projecting your device’s screen onto a larger display can make all the difference.
In this blog, we’ll guide you through the process of how to duplicate your screen onto a projector, so you can confidently connect and present your device in any setting. So, grab your device, and let’s get started!
Check Projector Input
If you want to project your screen onto a projector, then the first step is to check the input on the projector. Depending on the model, your projector may have multiple input options, such as HDMI, VGA, or DVI. Make sure you know which input your device uses, and then check to see if the projector has a compatible input.
Once you have determined which input to use, you can connect your device to the projector using the appropriate cable. Keep in mind that some projectors may require additional software or settings adjustments, so it’s always a good idea to review the user manual or manufacturer’s website to ensure proper setup. With the input and connection established, you can now duplicate your screen and share your device’s display with the audience.
By following these simple steps, you can successfully duplicate your screen on a projector and share your content with ease.
Ensure HDMI Cable is Connected
A common issue when setting up a projector is the lack of image on the screen. One reason for this could be that the HDMI cable is not connected properly. Before double-checking the projector input, ensure that the HDMI cable is securely connected to the projector’s HDMI port and your device’s HDMI output.
If the cable is not fully plugged in, it can cause image loss or a distorted picture. Remember to check that the cable is not damaged or frayed. It’s an easy fix that can save you a lot of time and frustration.
By making sure your HDMI cable is connected, you can eliminate one potential cause of the problem and move onto investigating other issues if it persists.
Confirm Laptop/PC is Mirroring This Display
When we’re giving a presentation, it can be frustrating when we can’t get our laptop or PC to mirror the display on the projector. There could be several reasons for this, but one common issue is that the projector input may not be set correctly. Before we start tinkering with settings on the laptop or PC, we need to make sure that the projector is set to the correct input.
This can usually be done by pressing the “Input” or “Source” button on the remote control and selecting the appropriate input, such as “HDMI” or “VGA”. Once we’ve confirmed that the projector is set to the correct input, we can then check the laptop or PC settings to ensure they’re mirroring the display. This simple step can save us a lot of time and frustration, and help us deliver a successful presentation.
Keyword: projector input.
Access Display Settings
If you want to know how to duplicate your screen on a projector, the first step is to access your display settings. Once you have your projector and computer or device connected to each other, go to your settings and find the “display” option. From there, you can choose to duplicate your screen, which will display the same image on both your computer and the projector.
This is a great option if you’re giving a presentation or want to watch a movie on a larger screen. Just make sure your resolution is set correctly so that the image doesn’t appear stretched or distorted. By following these simple steps, you can easily duplicate your screen and enjoy a larger display in just a few clicks.
Press Windows Key + P
If you’ve ever needed to switch between different display settings, you know that it can be a hassle to navigate through the control panel to do so. But did you know that there’s a handy shortcut that can make this process much easier? If you press the Windows key and the letter P at the same time, you’ll bring up the display settings menu. This menu allows you to choose between different projection modes, such as duplicating your screen or extending it to a second monitor.
It’s a quick and simple way to switch between different display options, and it can save you a lot of time if you frequently need to adjust your settings. So the next time you find yourself struggling to change your display settings, remember the shortcut – press Windows key + P and make things a whole lot easier for yourself!
Select ‘Duplicate’ Option
When it comes to customizing your computer’s display settings, duplicating an existing display configuration can save you a lot of time and hassle. To do this, you first need to access the display settings menu in your operating system. Once you’ve done this, simply select the “duplicate” option to create a copy of your current display configuration.
This can be especially useful when you need to set up multiple displays with similar settings, such as in a work or gaming setting. By duplicating your existing settings, you can ensure that all displays are configured exactly the way you want them to be, without having to manually adjust each one individually. In order to access your display settings, you’ll need to first open the “Settings” menu for your particular operating system.
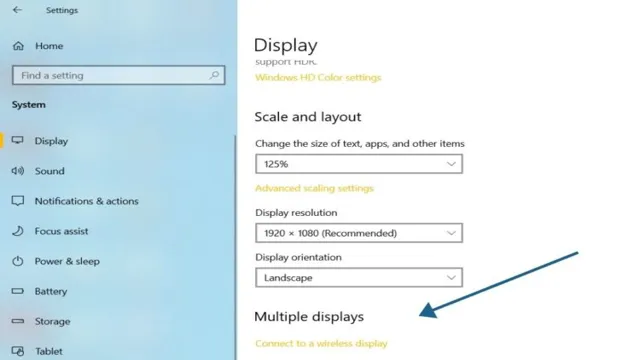
For Windows users, this can typically be found in the Start menu or by searching for “Settings” in the search bar. Once you’ve opened the Settings menu, look for the section labeled “System” and click on it. From there, you should see an option for “Display” – click on this to access your display settings.
Once you’re in your display settings menu, locating the “duplicate” option may vary depending on your operating system. For Windows 10 users, you should see a heading labeled “Multiple displays” – click on this and then select the option for “Duplicate these displays”. For MacOS users, you can find the option to duplicate your display by clicking on the “Arrangement” tab and then checking the box labeled “Mirror displays”.
Regardless of the operating system you’re using, duplicating your display configuration can be a great way to save time and ensure that all of your displays are set up in the exact same way. So next time you’re setting up multiple displays, consider using this handy feature to streamline the process and make sure everything looks just the way you want it to.
Adjust Resolution and Orientation as necessary
When it comes to adjusting the display settings on your device, there are a few things to consider. One of the most important is the resolution and orientation of your screen. To access these settings, simply go to your display settings menu, which can usually be found in the settings app.
From here, you can choose to adjust the resolution of your screen, which will affect the clarity and detail of the images on your device. You can also choose to adjust the orientation of your screen, which can be useful if you need to rotate your device for a specific task or activity. By taking the time to adjust these settings as needed, you can ensure that your device is always set up for optimal viewing and performance.
So go ahead and take a few minutes to explore your display settings and see what works best for you!
Final Steps
If you’re looking for a straightforward solution on how to duplicate your screen on a projector, the final steps are quite easy to follow. Firstly, make sure that both your laptop or computer and the projector are turned on and connected. Next, go to your computer’s display settings and choose the option to duplicate or extend your display.
If you select the duplicate option, your computer’s screen will mirror what’s shown on the projector, while extending your display will allow you to use the projector as a secondary screen. Once you’ve made your selection, check that your computer’s output resolution matches your projector’s input resolution to ensure the best possible display. Lastly, play any media or content you wish to display and adjust the volume accordingly.
With these steps, you’ll be able to effortlessly duplicate your screen on a projector and enjoy your content on a larger scale.
Ensure Both Screens are Displaying the Same Image
Now that you’ve connected your computer to an external display, it’s time to make sure that both screens are displaying the same image. This is important because if they’re not, you’ll have a hard time getting your work done, watching movies, or playing games. So, to avoid any confusion, you should check the display settings and adjust them accordingly.
One way to do this is by going to the settings menu and selecting “display.” From there, you can choose to mirror your display, which will make sure that the same image shows up on both screens at the same time. Alternatively, you can choose to extend your display, which allows you to use both screens separately.
However, if you want to ensure that both screens display the same image, choose the “mirror display” option. This will save you time and energy, allowing you to focus on the task at hand.
Make Necessary Adjustments for Presentation
As you finalize your presentation, make sure to make necessary adjustments to ensure a smooth experience for your audience. This could include checking the equipment you will be using, such as the projector or microphone, and making sure they are working properly. You should also consider the layout of the room and make adjustments to ensure that everyone can see and hear you.
Additionally, it’s important to go over your presentation materials and make sure that all of the content is accurate and relevant to your audience. If you notice anything that needs to be changed, take the time to make those edits before your presentation. By taking these steps, you can ensure that your presentation goes smoothly and successfully engages your audience.
So, double-check your equipment, confirm your message and content, and be confident in your delivery!
Conclusion
And there you have it, folks! Now you can easily duplicate your screen onto the projector for all to see. Whether it’s for work presentations, movie nights, or gaming marathons, you can now share all the fun and information with everyone in the room. So go forth and show off your skills, knowledge, and hilarious memes with confidence and ease.
Happy projecting!”
FAQs
What is screen duplication on a projector?
Screen duplication on a projector involves mirroring the display of a device onto the projector screen to make it visible to a larger audience.
How can I duplicate my screen on a projector?
There are multiple ways to duplicate your screen on a projector, such as using HDMI or VGA cables, wireless display adapters, or built-in screen mirroring features on your device and projector.
Why is screen duplication useful on a projector?
Screen duplication makes it easy to share presentations, videos, or other content with a larger audience without needing everyone to crowd around the device’s small screen.
What are some common issues with screen duplication on projectors?
Some common issues with screen duplication on projectors include incompatible cables, poor signal quality, resolution or aspect ratio mismatches, and outdated software or firmware versions.