
If you’re looking for an easy way to connect your Optoma projector to your Mac computer, you’re in the right place! Gone are the days where setting up a projector took hours of frustration and tech-savvy expertise. With a few simple steps, you’ll be ready to start your presentation or movie night in no time. Whether you’re a student needing to project a presentation for a class, or a filmmaker wanting to screen your latest project to a group, connecting your Optoma projector to your Mac is essential.
But don’t worry, you don’t need to be an expert to make it happen. In this blog post, we’ll cover all the steps necessary to get your Mac and Optoma projector connected, including what cords and adapters you’ll need, and any troubleshooting tips. So grab your popcorn (or notebook) and let’s get started!
Check Projector Compatibility
If you’re wondering how to connect your Optoma projector to your Mac, the first thing to consider is compatibility. Before making any connections, it’s important to check if your projector is compatible with your Mac model. Most Optoma projectors can be connected to your Mac through a VGA or HDMI cable.
However, some models may require a more specific cable or adapter. Once you have confirmed compatibility, you can connect your Mac to your Optoma projector. For Mac laptops, you’ll need to connect the appropriate cable to the Mini DisplayPort on your Mac, while for desktops, you can use the HDMI or VGA port.
With these simple steps, you’ll be able to seamlessly connect your Optoma projector to your Mac and enjoy your favorite media in larger-than-life format!
Review Projector Manual for Compatibility
If you’re planning to purchase a projector, one important thing you need to do is to check the manual for compatibility. While most projectors are designed for general usage, not all projectors are compatible with every kind of device. Before making your purchase, take the time to go through the projector manual carefully to see if it is compatible with your particular device.
This can save you a lot of time and hassle in the long run, as you won’t have to return the projector because it doesn’t work with your device. In addition to checking the manual for compatibility with your specific device, you should also look for other important features such as connectivity options, resolution, brightness, and contrast ratios. By taking the time to research and choose the right projector, you can ensure that you get the most out of your investment and enjoy high-quality images and videos.
Check Mac System Requirements
When setting up a presentation using a projector and a Mac computer, it’s essential to ensure that both devices are compatible with each other. The first step is to check the Mac system requirements to verify that the computer meets the necessary specifications for connecting to a projector. Some common requirements to keep in mind are the need for a specific operating system, video output capabilities, and available ports.
Once the Mac system requirements have been confirmed, the next step is to check the compatibility of the specific projector being used. Projectors may have different input requirements, such as HDMI, VGA, or Thunderbolt, so it’s crucial to ensure that the projector’s input matches the output capabilities of the Mac. By taking the time to check both the Mac system requirements and the projector compatibility, you can save valuable time and avoid any frustrating technical issues during your presentation.
Get the Right Cables
If you are wondering how to connect your Mac to an Optoma projector, the first step is to ensure you have the right cables. Your Mac will require a Mini DisplayPort to HDMI cable to connect to the projector. These cables can be easily found online or at your local electronics store.
Once you have the right cable, connect one end to your Mac’s Mini DisplayPort and the other end into the HDMI input on the projector. It’s crucial to note that if your Mac has a Thunderbolt port, you can use a Thunderbolt to HDMI cable instead. Once your cables are connected, turn on your projector and select the HDMI input as the source.
Your Mac screen should be mirrored on the projector, and you’re good to go! With the correct cables, connecting your Optoma projector to Mac will be a breeze.
Purchase HDMI or VGA cables
If you’re in need of a way to connect your computer or other device to a monitor or TV, you might be wondering whether to purchase an HDMI or VGA cable. The answer really depends on the specific devices you’re working with and the inputs they have available. HDMI cables are typically preferred for newer devices that support higher resolutions, while VGA cables are better for older devices or those with lower resolution outputs.
However, it’s always a good idea to check the specifications of both your device and the display you’re connecting to in order to make sure you’re selecting the right cable for your needs. So, next time you’re in the market for a cable, make sure to do your research and get the right one for your devices!
Ensure the Cables are Compatible with Both Devices
When it comes to connecting devices, such as a smartphone or laptop to a TV or projector, it’s crucial to ensure that the cables are compatible with both devices. Getting the right cables can make all the difference in the quality of the connection, as well as the overall experience. It’s essential to do some research before purchasing any cables to determine which type of ports and connectors the devices have.
For example, some devices may have USB-C ports, while others may have HDMI or VGA ports. You may need to use an adapter or converter to connect the devices if they have different types of ports. By getting the right cables, you can avoid the frustration of a poor connection or a damaged device.
So before making any purchase, double-check the compatibility of the cables with both devices for a seamless and high-quality connection.
Connect Mac to Projector
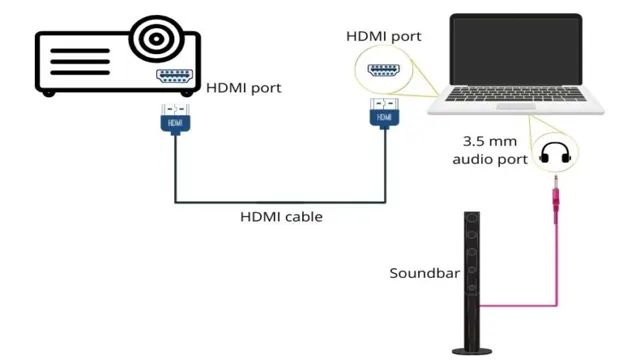
Do you need to connect your Optoma projector to your Mac? It’s surprisingly easy! Here’s how to get started. First, make sure that both your Mac and projector are turned off. Then, grab your HDMI cable and plug one end into the projector and the other into your Mac.
Once everything is connected, turn on the projector and switch to the HDMI input. Turn on your Mac, and you should see your computer’s screen projected. If you’re having trouble seeing your computer’s display, go to System Preferences, then Displays, and make sure it’s set to mirror your desktop.
With these simple steps, you’ll be set up in no time.
Plug in Cables into Both Devices
Connecting a Mac to a projector is a straightforward process that requires a few simple steps. The first step is to find the appropriate cable that will connect the Mac to the projector. Usually, this is a VGA or HDMI cable, depending on the model of your Mac and the projector.
Once you have found the right cable, plug one end into the Mac’s port, usually located on the side or back of the computer, and the other end into the projector. The ports on the projector might be located near the lens or on the back of the device. Make sure to check the cable connections on both devices to ensure that they are inserted properly.
Projectors often have multiple input sources, so don’t forget to select the appropriate input source. Once the connection is established, you should see your Mac’s screen displayed on the projector. By following these steps, you can easily connect your Mac to any projector and start presenting in no time!
Select Projector Input Source
If you’re looking to connect your Mac to a projector, the first step is to select the appropriate input source. Before doing this, you’ll need to make sure that your projector is set up and ready to go. Once it’s plugged in and powered on, you can connect your Mac to the projector using a compatible cable, such as HDMI or VGA.
To choose the correct input source, you’ll need to locate the “Input” or “Source” button on your projector’s remote control. Pressing this button will bring up a list of available input sources, such as HDMI, VGA, or USB. Simply use the remote to select the input source that corresponds to the cable you’re using to connect your Mac.
Once you’ve selected the correct input source, your projector should automatically display your Mac’s screen. If it doesn’t, you may need to adjust your Mac’s display settings. This can usually be done through the “Displays” or “System Preferences” menu on your Mac.
By following these steps, you can connect your Mac to a projector and start sharing your screen in no time. Whether you’re giving a presentation at work, watching a movie with friends, or playing a game on the big screen, a projector can be a great addition to your tech setup.
Adjust Mac Display Settings
Connecting an Optoma projector to your Mac can be a seamless process if you follow some simple steps to adjust your Mac display settings. First, connect your projector to the Mac using either an HDMI or VGA cable. Once it’s connected, navigate to the Apple menu and select “System Preferences” and then click on “Displays.
” From there, you can select the projector and adjust various settings such as screen resolution, refresh rate, and the arrangement of multiple displays. Make sure to set the resolution to match the projector’s native resolution for the best quality image. With these adjustments, you’ll be able to enjoy your Mac’s content on the big screen for an immersive viewing experience.
Go to System Preferences on the Mac
If you’re looking to tweak your Mac display settings, the first step is to head to System Preferences. From there, you’ll have a multitude of options to adjust your display, from the resolution and brightness to the color profile and text size. One useful feature to be aware of is Night Shift, which helps reduce blue light emissions from your display at night, making it easier on your eyes and potentially improving sleep quality.
You can schedule Night Shift to turn on automatically during specific hours or toggle it on manually in your display settings. Plus, if you have an external display connected to your Mac, be sure to dive into the settings for that display as well to optimize its performance. Overall, taking a few minutes to explore your Mac display settings can greatly enhance your computing experience and even benefit your health.
Select Displays and Adjust Resolution
Adjusting your Mac display settings is crucial for creating a comfortable and clear viewing experience. When selecting your display, it’s important to consider factors such as size, resolution, and color accuracy. You can adjust these settings by going to the “Displays” option in System Preferences.
From there, you can choose the display you want to adjust, and then select the desired resolution. A higher resolution means more pixels, resulting in a sharper and more detailed image. However, keep in mind that a higher resolution can also make text and icons smaller and harder to read.
To find the perfect balance, try different resolutions until you find the one that works best for you. Additionally, you can adjust the color profile to your liking by selecting the “Color” tab. This allows you to adjust the brightness, contrast, and saturation levels to enhance your viewing experience.
By taking the time to adjust your Mac display settings, you can create a personalized and optimized visual experience that allows you to work, browse, and enjoy media with clarity and comfort.
Start Projecting
Connecting your Optoma projector to your Mac is a simple process that can be done in just a few steps. First, make sure your Mac has a compatible video output. If it doesn’t, you may need an adapter to connect it with the projector’s input.
Once this is settled, turn on your projector and connect it to your Mac using an HDMI cable or VGA cable. After this, select the input source on your projector that corresponds to the cable you have used. Your Mac will automatically detect the projector and display the image.
If it doesn’t, you may need to adjust the display settings on your Mac to mirror or extend the display onto the projector. With these simple steps, you can enjoy projecting your Mac’s screen onto a larger surface using your Optoma projector. Always remember to double-check the compatibility of your devices to avoid any hurdles in the process.
Play a Video or Presentation on Mac
Starting a video or presentation on your Mac can be a breeze once you’ve got the hang of it. The first step is to connect your Mac to the display or projector you’ll be using. Once you’re connected, select the Apple icon in the top left corner of the screen and choose System Preferences.
From there, select Displays and choose the display you’ll be using. In the Arrangement tab, you can choose how you want your displays to be set up. To start projecting your video or presentation, simply open up the file and hit the full-screen button.
Alternatively, you can use presentation software like PowerPoint or Keynote to create and run your presentation. With these tools, you can easily add animations, transitions, and multimedia elements to your presentation to make it more engaging. So, whether you’re presenting for work, school, or just for fun, starting a video or presentation on your Mac is a simple process that can make a big impact.
Enjoy the Optimized Display on Projector
Are you ready to start projecting on a big screen? With optimized display technology, you can now enjoy the best quality visuals on projectors. Say goodbye to pixelated images and welcome crisp, clear visuals. It’s like having your own cinema experience at home! Whether you’re hosting a movie night or presenting important business presentations, projectors are a great option.
By incorporating the latest display technology, projectors can produce images in high resolution and bring your content to life. So what are you waiting for? Start projecting and elevate your viewing experience to the next level.
Conclusion
In a world where technology is constantly evolving, connecting an Optoma projector to a Mac can seem like a daunting task. But fear not, for with a little know-how and some simple steps, you can dazzle your audience with brilliant presentations and mesmerizing movie nights. So, let the magic begin and connect your devices for an experience that will leave you wondering how you ever lived without it!”
FAQs
What type of cable do I need to connect my Optoma projector to my Mac?
You will need a Mini DisplayPort to HDMI cable to connect your Optoma projector to your Mac.
Why is my Optoma projector not displaying anything when I connect it to my Mac?
There could be several reasons for this, including incorrect input settings on the projector, a faulty cable, or a compatibility issue between your Mac and the projector. Make sure to check all of these factors before attempting to connect again.
Can I connect my Optoma projector to my Mac wirelessly?
Yes, you can use a wireless dongle or adapter to connect your Optoma projector to your Mac without the need for cables.
How do I adjust the resolution settings when connecting my Optoma projector to my Mac?
You can adjust the resolution settings in the Display preferences on your Mac. Make sure to select the appropriate resolution that is compatible with your Optoma projector for optimal display quality.