
Cleaning your motherboard may seem like a daunting task, but it’s an essential step to ensure the long-term health and optimal performance of your computer. Neglecting to clean your motherboard can lead to the accumulation of dust and debris that can cause your computer to overheat and potentially even damage your hardware. Fortunately, cleaning your motherboard isn’t as difficult as it sounds, and with a little bit of elbow grease and patience, you can have your motherboard looking as good as new.
In this step-by-step guide, we’ll walk you through everything you need to know to clean your motherboard properly, so you can keep your computer running smoothly for years to come. Let’s get started!
Gather Your Supplies
When it comes to cleaning your motherboard, it’s important to have all the necessary supplies before you get started. Firstly, you’ll need a can of compressed air to remove any dust or debris that may have accumulated on the motherboard. This is especially important if your computer is placed in a dusty environment or hasn’t been cleaned in a while.
Next, you’ll need a lint-free cloth to wipe down the motherboard gently. Avoid using any harsh chemicals or abrasive materials that could damage the sensitive components on the board. Lastly, you’ll need isopropyl alcohol and a microfiber cloth for cleaning any stubborn stains or grime.
The alcohol is great for removing dirt and oils that may have accumulated on the board over time. With these supplies on hand, you’ll be ready to safely and effectively clean your motherboard in no time.
Rubbing Alcohol
Rubbing Alcohol Gathering your supplies before using rubbing alcohol is essential to ensure a safe and effective process. For starters, you will need rubbing alcohol, which can be found at most drug stores or online retailers. Be sure to choose a concentration of 70% or higher for best results.
You will also need a clean and dry cotton ball or cotton swab to apply the rubbing alcohol onto the desired surface or skin. It’s important to avoid using rubbing alcohol on open wounds or broken skin as it can be painful and slow down the healing process. Additionally, gloves or other protective gear may be necessary if you are working with large amounts or using rubbing alcohol as a cleaning solvent.
Overall, gathering your supplies and taking safety precautions before using rubbing alcohol can make all the difference in achieving its intended benefits.
Cotton Swabs
When it comes to using cotton swabs, it’s essential to gather your supplies. While it may seem like a simple task, you don’t want to be caught without everything you need in the middle of cleaning your ears or applying makeup. First and foremost, make sure you have the right type of cotton swabs for the task at hand.
For example, if you’re cleaning your ears, you’ll want to use specialized ear swabs rather than regular ones that can push earwax further into your ear canal. Additionally, make sure you have any additional products you might need, such as rubbing alcohol or makeup remover. It’s also important to have a clean and stable surface to work on, such as a table or countertop, and a mirror to help with precision.
Once you have everything you need, you’ll be able to efficiently and effectively use cotton swabs for a variety of tasks.
Prep Your Work Area
If you’re going to clean your motherboard, you need to prepare your work area properly. First, make sure you have a clean, flat surface to work on. You don’t want to accidentally drop your motherboard onto something hard and damage it.
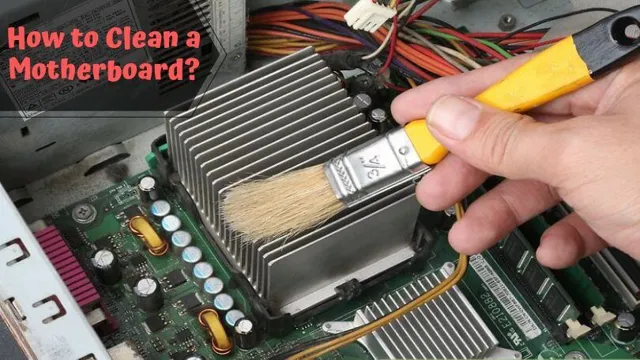
Next, gather all the tools you will need for the job. You’ll likely need a can of compressed air, some rubbing alcohol, and a soft-bristled brush. I like to use a small paintbrush for this task.
Finally, you should make sure you are working in a well-ventilated area. Cleaning your motherboard can create a lot of dust and fumes, which you don’t want to be breathing in. By taking a few minutes to prep your work area, you can ensure your cleaning task goes smoothly and you don’t accidentally damage your motherboard.
When you’re ready to start cleaning your motherboard, make sure to follow the proper steps to avoid harming your hardware in any way.
Disconnect All Power Sources
When it comes to cleaning a motherboard, the first step is to disconnect all power sources. This includes unplugging the computer from the wall, turning off the power supply (if applicable), and removing any batteries or other power sources. This is crucial to prevent any electrical damage to the motherboard during the cleaning process.
Once all power sources have been disconnected, you can begin to clean the motherboard using a soft, dry, lint-free cloth or an anti-static brush. It’s important to be gentle and avoid using any liquid cleaners or abrasive materials as this can cause damage to the motherboard. By following these steps, you can safely and effectively clean your motherboard without causing any harm.
Turn Off Your Computer and Unplug It
When it comes to computer maintenance, one of the most important things you can do is to turn off your computer and unplug it. This not only saves power but also helps prevent any potential damage that could occur due to power surges or lightning strikes. But it’s not enough to simply turn off your computer; you also need to disconnect all power sources.
This means unplugging the power cord, as well as any other cords or cables that are attached to your computer, such as the Ethernet cable or external hard drive. By doing this, you can ensure that your computer is completely disconnected from the electrical grid, which is important in the event of a power outage or other electrical issue. So, next time you’re done using your computer for the day, make sure to turn it off and unplug it to keep it running smoothly and prevent any unwanted damage.
Remove Your Motherboard from the Case
When it comes to removing your motherboard from the case, it’s important to disconnect all power sources first. This means shutting down your computer and unplugging it from the wall. You should also turn off the power supply switch located on the back of your computer’s tower.
Once you’ve done this, you can begin opening up the case and removing any screws or clips that hold the motherboard in place. It’s important to be gentle when removing the motherboard to prevent any damage to the delicate components. Remember to also detach all cables connected to the motherboard, including the power cables, data cables, and fan cables.
By following these steps, you can safely and effectively remove your motherboard for upgrades or repairs.
Cleaning Your Motherboard
Cleaning your motherboard may not seem like a vital task, but neglecting it can lead to various issues that can affect your computer’s performance. The first step in cleaning your motherboard is to unplug all the cables and power supply. Then, remove the motherboard from the computer case, and use a soft-bristled paintbrush or compressed air to get rid of the dust and debris.
After that, use an electronics-safe solvent and a lint-free cloth to clean the motherboard’s surface gently. Make sure to avoid using too much pressure or moisture when cleaning the motherboard as it can cause damage to the components. Additionally, pay attention to cleaning the tiny components that are often overlooked, like the RAM slots, CPU socket, and expansion slots.
Once you’ve finished cleaning your motherboard, return it to the computer case and plug the cables back in. With a clean motherboard, your computer is less likely to experience hardware problems, and you can avoid costly repairs. So, make it a habit to clean your motherboard regularly to ensure smooth and efficient computing.
So, if you want to know how to clean a motherboard, follow the steps mentioned above and do it yourself without any hassle.
Start with Dry Cleaning
When it comes to cleaning your motherboard, starting with dry cleaning is a smart move. This means using a soft bristled brush, like a toothbrush, to gently remove any dust or debris that may have collected. However, it’s important to note that you should never use water or cleaning solutions directly on your motherboard as this could cause damage.
If you need to remove grime or dirt that won’t come off with dry cleaning, try using isopropyl alcohol and a lint-free cloth. Simply dampen the cloth with the alcohol and gently wipe down the affected area. Just make sure you allow enough time for the alcohol to fully evaporate before powering up your machine.
Remember, a clean motherboard is essential for proper functioning and longevity, so don’t neglect this important maintenance task!
Use Cotton Swabs and Rubbing Alcohol for Deeper Cleaning
If you’ve built your own computer or have owned one for some time, you know just how important it is to keep your motherboard clean and free of dust and debris. Over time, dirt and grime can build up on your motherboard’s surfaces, causing it to overheat and malfunction. One of the best ways to deep clean your motherboard is by using cotton swabs and rubbing alcohol.
This combination can easily remove even the toughest dirt and grime buildup, and it can be done quickly and easily. Simply soak a cotton swab in rubbing alcohol and gently rub it over the motherboard’s surfaces, paying close attention to the crevices and hard-to-reach areas. Be sure to let the rubbing alcohol evaporate before turning your computer back on.
This simple process can help keep your motherboard running smoothly and protect your investment in your computer. So, the next time you notice that your computer is overheating or not working as well as it used to, try deep cleaning your motherboard with cotton swabs and rubbing alcohol.
Be Gentle and Avoid Scratching Your Motherboard
Motherboard cleaning Cleaning your motherboard is an essential part of maintaining your computer’s health, but you need to be careful not to cause any damage. The first step is to power down your computer and unplug all cables. Once you have opened the computer, use a soft-bristled brush or a can of compressed air to remove any dust or debris from the motherboard surface.
Be sure to avoid contact with the delicate components, as they are easily damaged. You can also use a small amount of rubbing alcohol and a soft cloth to gently wipe away any grime or smudges. Just be sure not to apply too much pressure or scrub too hard, as you could easily scratch the motherboard.
When you’re finished cleaning, put everything back in its place and power up your computer. It’s a good idea to clean your motherboard periodically to keep everything running smoothly.
Reassembling Your Computer
When it comes to maintaining your computer, cleaning the motherboard is a crucial yet delicate task. Before disassembly, equip yourself with antistatic gear to avoid any static electricity that could damage the components. Begin by unplugging all cables and removing the front panel.
Next, carefully remove the motherboard by unscrewing it from the case and disconnecting any attached cables. Lay it on a clean surface and use a soft-bristled brush to gently sweep dust and debris from the surface. You may also use compressed air to blast away any remaining particles.
Once clean, reattach the cables and screw the motherboard back into place. Be sure to double-check all connections and cables before powering up your computer. Remember, cleaning your motherboard can help extend the lifespan of your computer and prevent damage from overheating.
Allow Your Motherboard to Dry Completely Before Reconnecting
Motherboard drying When it comes to reassembling your computer after cleaning it, it’s important to remember to allow your motherboard to dry completely before reconnecting everything. A wet motherboard can lead to corrosion and damage, so it’s crucial to make sure it’s completely dry before turning your computer back on. To dry your motherboard, you can use a soft, dry cloth to remove any excess moisture.
Then, leave your motherboard out in a warm, dry location for at least 24 hours to ensure it’s completely dry before reassembling your computer. It’s important to be patient during this process, as reconnecting your computer before your motherboard is completely dry can lead to expensive damage and the need for replacement parts. Remember to always double-check that all connections are secured and that you haven’t forgotten any screws before powering on your computer.
By taking the necessary steps to ensure your motherboard is fully dry before reassembling your computer, you can prevent costly and time-consuming damage.
Double Check All Connections
When it comes to reassembling your computer, double-checking all connections is key to ensuring that everything is working correctly. It’s easy to get caught up in the excitement of putting everything together, but taking the time to carefully retrace your steps and make sure that all wires and cables are properly connected can save you a lot of headaches down the line. Don’t assume that because everything fits together that it’s necessarily in the correct spot – take a moment to double-check before powering on the computer.
Trust us, it’s much easier to fix an issue now than to try and troubleshoot a problem further down the line. So take your time, be diligent, and double-check all connections before turning your computer back on.
Troubleshooting Common Issues
When it comes to troubleshooting common issues with your computer, one problem that may arise is the need to reassemble it. Whether you’re attempting to upgrade a component or have had to disassemble it to fix an issue, putting everything back together can be a daunting task. The key to success is to take your time and be methodical.
Start by laying out all of the parts and tools you will need. Then, refer to any documentation or guides you have to ensure you understand the proper order in which everything needs to be reassembled. Take note of any screws or connectors that may need to be replaced.
Once you’re ready to begin, work slowly and carefully, double-checking each step as you go. Don’t force anything – if something isn’t fitting, take a step back and make sure you have all of the pieces in the correct orientation. With patience and attention to detail, you’ll have your computer up and running again in no time.
Conclusion
In conclusion, cleaning your motherboard may seem like a daunting task, but with a few simple steps and precautions, it can be done easily and effectively. Remember to take your time, use appropriate tools and cleaning solutions, and always unplug your device before starting the cleaning process. Your motherboard will thank you for the TLC, and you’ll be left with a clean and efficient system that’s ready to tackle whatever challenges come its way.
Happy cleaning!”
FAQs
What tools are needed to clean a motherboard?
A soft-bristled brush, microfiber cloth, isopropyl alcohol, and compressed air canister are the basic tools you need to clean a motherboard.
Can alcohol damage the motherboard during cleaning?
High-concentration isopropyl alcohol can damage the motherboard during cleaning, so it is advisable to use a lower concentration or diluted solution to prevent damage.
How often should you clean your motherboard?
It is recommended to clean your motherboard every 6 to 12 months, or more often if you have a dusty environment or smoke around your computer.
Should I remove the motherboard from the computer before cleaning?
It is not necessary to remove the motherboard from the computer before cleaning, but you should ensure that the computer is turned off and unplugged from the power source before cleaning. Also, ensure that you don’t wet any parts of the motherboard, especially the sockets and connectors.