If you’re a tech enthusiast or a gamer, knowing your graphics card is essential. A graphics card is responsible for rendering and displaying all of the visual information that your computer produces. Without a graphics card, your computer would not be able to render images or play video games.
However, many people may not know how to check their graphics card and may struggle to understand whether they have a dedicated or integrated graphics card. In this blog post, we will go over some simple steps on how to check your graphics card and help you determine which type you have. So, let’s get started!
Step One: Open Device Manager
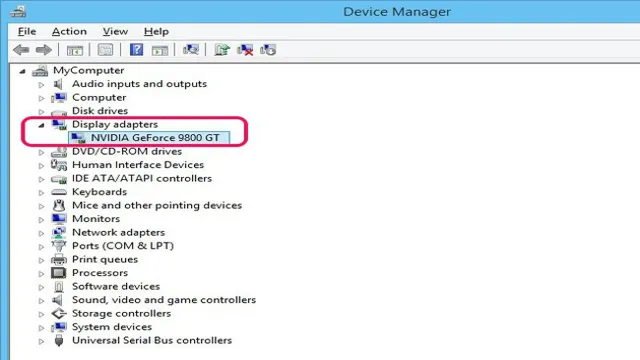
If you’re wondering how to check your graphics card, the first step is to open Device Manager. This utility is built into Windows and can be accessed by typing “Device Manager” into the search bar. Once opened, look for the “Display adapters” category and click the arrow next to it to expand it.
There, you’ll see the name of your graphics card listed. If it says “Standard VGA Graphics Adapter” or something similar, it means that your computer is not recognizing your graphics card properly and you may need to update your drivers. Knowing what graphics card you have is important because it determines your computer’s ability to handle graphics-intensive tasks like gaming, video editing, and graphic design.
Checking your graphics card is a quick and easy process that can help you troubleshoot any performance issues you may be experiencing.
Press Windows + X and select Device Manager
Opening Device Manager on your Windows computer is an essential step in managing your hardware devices. To ensure that all of your devices are working properly, you need to access the Device Manager. You can do this by pressing the Windows key and X key simultaneously.
A menu will appear on your screen, and from there, you can select the Device Manager. This will open a window where you can view all of the hardware devices installed on your computer. You can use Device Manager to update their drivers, check for any issues, and disable or uninstall any devices that are causing problems.
So, with just a few simple clicks, you can take control of your computer’s hardware and easily troubleshoot any issues that arise.

Step Two: Locate Display Adapters
If you’re wondering how to check your graphics card, the second step is to locate display adapters. On a Windows computer, you can do this by going to the Device Manager. To access the Device Manager, right-click on the Start menu and select “Device Manager” from the pop-up menu.
Once in the Device Manager, look for the “Display adapters” category and expand it. Your graphics card should be listed under this category. If you have multiple graphics cards, they will all be listed here as well.
Take note of the make and model of your graphics card so you can determine if it meets the requirements for your gaming or other graphics-intensive tasks. Remember, having an up-to-date and powerful graphics card can greatly enhance your computer’s performance and improve your overall experience.
Expand Display Adapters to access the graphics card
When it comes to gaming and other graphics-intensive tasks, having a dedicated graphics card can greatly enhance your computer’s performance. To access your graphics card, you’ll need to navigate to the Display Adapters section in your Device Manager. To do this, simply click on the Start Menu, then search for “Device Manager” and open it.
From there, click on the arrow next to “Display Adapters” to expand the section and reveal your graphics card. If you don’t see your graphics card listed, it could be that it’s not properly installed or there’s a driver issue. Either way, it’s important to make sure your graphics card is functioning properly to get the most out of your computer’s performance.
By locating the Display Adapters section in your Device Manager, you’ll be able to access and troubleshoot any issues with your graphics card.
Step Three: View Graphics Card Properties
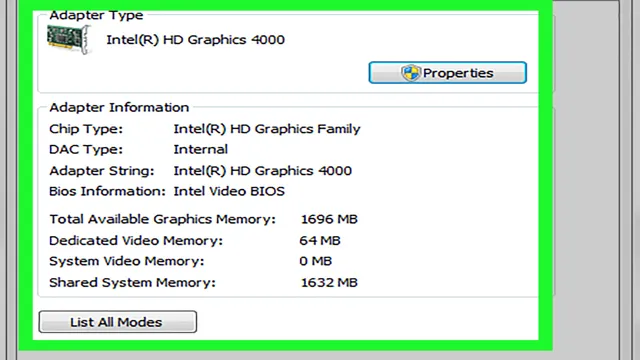
If you’ve ever wondered how to check your graphics card for information like model and memory size, it’s actually quite easy. One way to do this is by viewing your graphics card properties. To access this information, right-click on your desktop and select “Display settings.
” From there, click on “Advanced display settings” and you’ll see a link to “Display adapter properties.” Clicking on this will bring up a window with multiple tabs, one of which is “Adapter.” This tab will provide you with information like the name of your graphics card, how much VRAM it has, and what driver version it’s currently using.
If you need to update your graphics card driver, this is also a great place to do it. So, whether you’re a gamer looking to ensure your computer can run the latest games or just curious about what kind of hardware you have, checking your graphics card properties is an easy way to get started.
Right-click on the graphics card and select Properties
When it comes to troubleshooting graphics card issues, it’s important to know how to view its properties. One way to access this information is by right-clicking on the graphics card and selecting Properties. This will bring up a window that displays important details about your graphics card, such as the manufacturer, model, driver version, and more.
You can use this information to determine if your graphics card is up-to-date or if you need to install new drivers. Additionally, you can check the properties of your graphics card to see if it meets the minimum requirements for gaming or other demanding applications. By knowing how to view graphics card properties, you can better understand your system and ensure that it’s running optimally.
So, the next time you encounter graphics card issues, be sure to right-click on it and select Properties to get more information and insight into what’s going on.
Click on the Details tab and select Hardware IDs
When it comes to checking the properties of your graphics card, there is an easy three-step process that you can follow. Firstly, go to your Device Manager and select the Display Adapters tab. This will reveal all the devices that are currently maintaining your display performance.
Secondly, right-click on the graphics card you want to check and select Properties. This will open a new window with various tabs that provide detailed information about your device. Finally, click on the Details tab and select Hardware IDs to view your graphics card properties.
These properties can include the name of the manufacturer of your graphics card, the model number, and other specifications. It is important to know your graphics card properties so that you can ensure that your device performs optimally. By taking the time to follow these steps, you can quickly and easily view the properties of your graphics card and stay informed about the capabilities of your device.
Step Four: Identify Graphics Card Model
If you’re wondering how to check your graphics card, the fourth step is to identify the graphics card model. This information is crucial in determining compatibility with computer games and software. To find out the graphics card model, start by opening the Device Manager on a Windows computer.
You can access this by typing “Device Manager” into the search bar and selecting the relevant option. Once you have opened the Device Manager, look for the “Display adapters” option. Click on it to expand the menu and find your graphics card.
You’ll be able to see the model and manufacturer of the card. If you’re using a Mac, click on the Apple icon on the top left corner of the screen, select “About This Mac” and then click on “System Report.” Look for the “Graphics/Displays” section to identify the graphics card model.
Remember to record this information as you’ll need it in the future for troubleshooting and updates.
Locate the Hardware ID and search online to determine the model
When it comes to identifying your graphics card model, finding the hardware ID is the key. This might sound intimidating, but it’s actually quite simple. First, press the Windows key and the R key at the same time to open the Run dialogue box.
In the box, type “dxdiag” and press Enter. Next, click on the “Display” tab, which will reveal all the information related to your graphics card. The fourth line down is where you’ll find the hardware ID, which is typically formatted as four sets of numbers and letters.
Once you have the hardware ID, use your preferred search engine to locate the graphics card model that corresponds to it. This will give you all the information you need to ensure you have the latest drivers, optimize your gaming experience, and troubleshoot any issues you may encounter. So, what are you waiting for? Get out there and discover the wonders of your graphics card today!
Conclusion: Checking Your Graphics Card Made Easy
So there you have it, folks – checking your graphics card is easier than picking your favorite flavor of ice cream. With a few simple steps, you’ll be on your way to knowing your GPU like the back of your hand. And who knows – you might even impress your tech-savvy friends with your newfound knowledge.
So go forth and check those graphics cards with confidence, my friends – the GPU world is your oyster!”
FAQs
What is a graphics card and what does it do?
A graphics card, also known as a video card, is a hardware component in a computer that is responsible for rendering images, videos, and animations. It processes data from the CPU and sends it to the computer’s display device. It helps to improve the overall performance and visual quality of the computer.
How can I check what graphics card my computer has?
To check what graphics card your computer has, you can follow these steps:
1. Click on the Start button and type “Device Manager” in the search bar.
2. Click on “Device Manager” from the search results.
3. Expand the “Display adapters” section.
4. The name of your graphics card will be listed.
How can I update my graphics card driver?
To update your graphics card driver, you can follow these steps:
1. Click on the Start button and type “Device Manager” in the search bar.
2. Click on “Device Manager” from the search results.
3. Expand the “Display adapters” section.
4. Right-click on your graphics card and select “Update driver”.
5. Choose “Search automatically for updated driver software”.
6. Follow the instructions on the screen to complete the driver update.
What is the difference between a dedicated and integrated graphics card?
A dedicated graphics card is a separate hardware component from the computer’s CPU that is designed to handle graphic-intensive tasks. It has its own memory and processor, which makes it ideal for playing games, video editing, and running demanding software. An integrated graphics card, on the other hand, is built into the computer’s CPU and shares the system’s memory and processing power. It is more suited for basic tasks like web browsing and office work.


