
Have you ever faced the frustration of a Brother printer drum replacement issue? You are not alone. Many users have experienced difficulty in replacing the drum on their Brother printer. This crucial component is responsible for transferring toner to the paper, making it a critical part of the printing process.
A malfunctioning drum can result in poor print quality or no printing at all. In this blog post, we will discuss some common issues that users face when replacing the drum on their Brother printer and provide some helpful tips and tricks to make the process smoother. Whether you are a beginner or an experienced user, read on to learn how to avoid the common pitfalls of Brother printer drum replacement.
Common Reasons for Drum Replacement Error
If your Brother Printer keeps saying “replace drum,” there could be several reasons why drum replacement error is occurring. One possible cause could be the use of non-branded or counterfeit toner cartridges. These cartridges may not be compatible with your Brother printer and may cause the printer to display error messages.
Another common cause of drum replacement error is a dirty or damaged drum unit. Overuse of the drum unit or allowing it to become dirty can greatly impact the quality of your printouts and cause your Brother printer to misread the drum unit as needing replacement. Furthermore, if the drum unit is not installed correctly, it can also cause the printer to give you a “replace drum” message.
To avoid these issues, make sure to always use genuine Brother toner cartridges, clean your drum units thoroughly, and double-check the installation of the drum unit to ensure it is correctly installed.
Wear and Tear on Drum Unit
If you’re experiencing drum replacement errors in your printer, there are a few common reasons that could be causing the problem. One issue is wear and tear on the drum unit. Over time, the drum can become worn down and damaged from regular use, which can cause printing problems and lead to the need for a replacement.
Additionally, drum units can be sensitive to environmental factors like temperature and humidity, which can further contribute to wear and tear. If you’re noticing printing issues like streaks or blotches on your pages, it’s worth checking the drum unit to see if it needs to be replaced. By taking proactive steps to identify and address issues like these, you can ensure that your printer is functioning at its best and avoid unnecessary downtime and expenses.
Low-Quality Toner Cartridge
One common reason for the “Drum Replacement” error message on your printer is using a low-quality toner cartridge. When you buy a cheap or counterfeit toner cartridge, it may not be compatible with your printer, causing the drum to malfunction or wear out faster. When you see the “Drum Replacement” error, your printer is telling you that the drum has reached the end of its useful life and needs to be replaced.
This can be frustrating, but it’s important to invest in a high-quality toner cartridge that is designed to work with your printer. By doing so, you can avoid premature wear and tear on your drum and ensure that your prints come out looking sharp and professional. Don’t fall for the temptation of a cheap cartridge – it may end up costing you more in the long run.
Invest in a quality cartridge and avoid the headache of frequent drum replacements.
Printer Firmware Update Needed
If you’ve encountered a drum replacement error on your printer, there are a few common reasons that could be causing the issue. Firstly, it could be due to the printer firmware needing an update. Firmware updates often include bug fixes and can help improve the performance of your printer.
Secondly, it could be a result of using non-original manufacturer drums or toners. Using third-party products can damage your printer and cause various errors. Lastly, it could be a result of a faulty drum unit itself.
It’s important to inspect and replace the drum unit regularly to prevent any issues. Overall, these are some common causes for drum replacement errors, and by taking preventative measures, such as updating firmware and regularly inspecting and replacing drum units, you can keep your printer functioning optimally.
Sensor or Contact Issues
When it comes to replacing a drum in a printer, there are several common reasons why the process may not work correctly. One of these reasons could be due to sensor or contact issues. Sensors within a printer are responsible for detecting when a new drum has been installed and properly calibrating it for use.
If these sensors are not functioning correctly, they may not properly communicate with the printer, resulting in errors during the drum replacement process. Additionally, contact issues can arise if the drum is not properly installed or if there is debris or damage to the contacts themselves. This can result in poor connectivity between the drum and the printer, leading to errors or other problems.
It is important to properly troubleshoot these issues before attempting to replace the drum to ensure a smooth and successful replacement.
Troubleshooting Brother Printer Drum Error
Dealing with the persistent “replace drum” message on Brother printers can be frustrating, especially when you’ve already replaced the drum unit and the issue persists. There could be several reasons behind this error message, including a dirty sensor, incorrect installation, or even a faulty drum unit. One potential solution is to clean the drum and the surrounding area, making sure there is no debris or toner residue.
If that doesn’t work, double-check the installation process and ensure that everything is properly aligned and engaged. In some cases, replacing the drum unit with a brand new one might be necessary to fix the problem. It’s important to note that using a non-genuine or low-quality drum unit can also cause this error to occur more frequently.
By using genuine parts and following the manufacturer’s instructions carefully, you can resolve the Brother printer drum error and get back to printing efficiently.
Reset Drum Replacement Counter
One of the most common issues with Brother printers can be the drum error. A Brother printer drum error is usually caused due to a faulty drum unit or excessive usage, indicating that the printer’s drum needs to be replaced. However, resetting the drum counter may solve this error without having to replace the drum unit.
To reset the drum counter, follow these simple steps. On the printer control panel, press the “Options” button, then select “Machine Info” and finally “Reset Menu.” Next, select “Drum” and press “Yes” to confirm.
This should reset the drum counter, allowing you to continue using the printer without any further issues. It’s important to note that resetting the drum counter only applies if you are using the original drum unit and not a third-party replacement. In such cases, replacing the drum may be the only solution to the error.
Check for Update and Firmware
If you’re consistently facing Brother printer drum errors, it’s essential to troubleshoot the cause of the problem to get your printer back to operating normally. One of the primary reasons for this issue is an outdated printer firmware. Checking for firmware updates periodically can resolve the problem and ensure the printer’s smooth functioning.
You can frequently check for updates and firmware from the Brother printer’s official website or use the control panel for finding updates. In addition, it’s also recommended to conduct routine maintenance by cleaning the drum, replacing damaged components like the toner cartridges, and aligning the printer heads. When it comes to Brother printer drum errors, these can be incredibly frustrating, causing disruption to your daily workflow.
Nevertheless, by following some basic troubleshooting steps and performing routine maintenance, you can easily resolve this issue. By keeping your printer updated by performing regular checks, you can ensure that your printers function correctly and avoid costly repairs in the future. So, the next time you face this problem, try these simple troubleshooting methods before calling a technician.
Clean Drum Unit and Contact Points
Brother printer drum error, troubleshoot, clean drum unit, contact points. If you frequently use a Brother printer, then you might come across a drum error message at some point. This error usually indicates a problem with the drum unit, which is responsible for transferring toner from the cartridge to the paper.
However, before you go ahead and panic, there are a few troubleshooting tips you should try. One of the first things you can do is clean the drum unit and contact points. Over time, dust, toner, and other debris can accumulate on the drum unit and affect its performance.
To clean it, remove the unit and wipe it down with a clean, dry cloth. You can also use compressed air to blow off any loose particles. Next, clean the contact points that connect the drum unit to the printer.
These points can also become dirty and prevent proper communication. By taking the time to clean the drum unit and contact points, you can potentially resolve the Brother printer drum error and get back to your printing tasks.
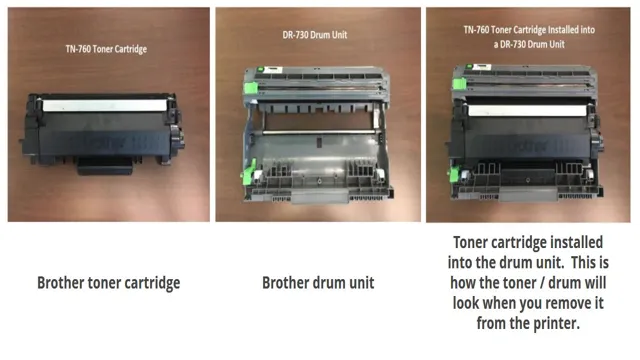
Replacing the Drum Unit in Brother Printer
If your Brother printer keeps saying “Replace Drum,” it’s time to replace the drum unit. Fortunately, replacing it is a straightforward process that you can easily do on your own. First, turn off your printer and unplug it from the power source.
Then, locate the drum unit by opening the front cover. Remember the location before you remove it. Next, press the release button on the toner cartridge and gently pull it out of the drum unit.
Then, slowly slide the drum unit out and dispose of it properly. Now, take out the new drum unit and remove its protective cover. Carefully slide it into the printer until it clicks into place.
Finally, reinsert your toner cartridge and close the front cover. You’re ready to turn on your printer and start printing again! By replacing the drum unit, you can keep your printer running efficiently and avoid any errors.
Step by Step Guide to Replace Drum
Replacing the drum unit in your Brother printer is a simple process that can be completed in just a few easy steps. The drum unit is an essential component in the printing process, responsible for transferring the toner onto the paper. If your printer is producing inconsistent or poor quality prints, it may be time to replace the drum unit.
Begin by turning off your printer and opening the front cover. Gently pull out the drum unit and toner cartridge assembly. Separate the toner cartridge from the drum unit by pressing the lock lever and pulling it out.
Next, slide the old drum unit out of the assembly and insert the new one. Finally, reattach the toner cartridge and reinsert the assembly into your printer. Turn it on and perform a test print to ensure everything is working properly.
With this simple guide, you can easily replace the drum unit in your Brother printer and get back to producing high-quality prints.
Wrap Up and Final thoughts
If your Brother printer keeps saying “replace drum,” it’s time to take action. Ignoring this message could lead to poor print quality and even damage to your printer. The drum unit is a critical component of your printer that helps transfer toner from the cartridge onto the page.
Over time, the drum will wear out and need to be replaced. The good news is that this is a relatively simple process that you can do yourself, and replacement drum units are readily available online or from your local office supply store. Just be sure to follow the manufacturer’s instructions carefully, and replace the drum unit when you see the warning message on your Brother printer display.
Doing so will keep your printer running smoothly and enable you to produce high-quality prints every time.
Conclusion
Well, it looks like our dear Brother printer is suffering from a severe case of identity crisis – it keeps insisting that it needs a new drum, when all it really needs is a good therapist and some self-esteem boosting. Jokes aside, it’s important to understand that printers, like humans, can sometimes be a bit confused and need some maintenance and troubleshooting. So, next time your printer keeps repeating the same message, try giving it some TLC before shelling out for a new drum – a little encouragement can go a long way in keeping your printer happy and productive!”
FAQs
What does it mean when my brother printer says “replace drum”?
When your brother printer says “replace drum,” it means that the imaging drum inside the printer has reached the end of its lifespan and needs to be replaced.
How often do I need to replace the drum in my brother printer?
The frequency at which you need to replace the drum in your brother printer depends on how often you use it. Generally, the drum should be replaced every 12,000 to 15,000 pages.
Can I continue to use my brother printer if it’s saying “replace drum”?
While it is possible to continue using your brother printer even when it’s saying “replace drum,” it’s not recommended. Continued use of the printer with a worn-out drum can lead to poor print quality and other issues.
How do I replace the drum in my brother printer?
To replace the drum in your brother printer, first, turn the printer off and unplug it. Then, open the printer’s front cover, and locate the drum and toner assembly. Press down the lock lever to release the old drum and toner, and then slide it out. Finally, insert the new drum and toner assembly and push it until it clicks into place. Close the front cover, plug in your printer, and turn it on.