
If you’re an avid gamer or a graphic designer, you know how important it is to have a reliable graphics card that can handle the demands of your work or play. But what happens when your computer uses the wrong graphics card, causing lag and slow performance? Setting your graphics card as default might just be the solution you need to optimize your computer’s performance. In this blog, we’ll discuss how to set your graphics card as default, why it’s important, and what to do if you encounter any issues along the way.
So let’s dive in and get your graphics card working for you.
Introduction
If you’re a gamer, graphic designer, or video editor, you know how important having a good graphics card is for your work. Sometimes, your computer might use the wrong graphics card instead of the better one. Luckily, you can manually set your graphics card as default.
Doing this will force your computer to use the better graphics card every time, making your work more efficient. To set your graphics card as default, you’ll need to go to your computer’s settings and locate the graphics card settings. From there, you can select your desired graphics card and make it the default option.
By doing this, you should see an improvement in your computer’s performance and overall functionality.
Why you Should Set Your Graphics Card as Default?
graphics card, default, benefits If you’re a PC gamer or someone who works with graphic-intensive applications, having a dedicated graphics card is essential. However, many users tend to overlook the importance of setting the graphics card as the default option in their system. By doing so, you can unlock the full potential of your graphics card and enjoy a range of benefits that come with it.
Not only will your system run smoother, but you’ll also see a significant improvement in graphics performance, allowing you to run even the most demanding applications with ease. So if you haven’t done so already, it’s high time that you set your graphics card as the default option and unleash its true power.
Checking Your Graphics Card
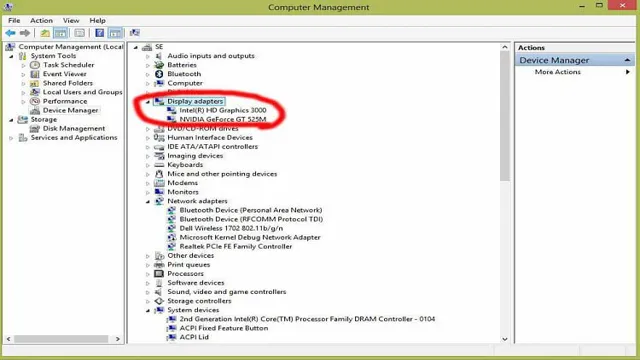
If you’re experiencing choppy graphics or errors while running games or specific software, it may be due to your graphics card. To check whether your graphics card is functioning correctly, you can use device manager by right-clicking on the start menu, then select device manager, and underneath the display adapters option, you’ll see your graphics card listed. If there seems to be an issue, you may need to update your graphics card driver.
Additionally, you may want to set your graphics card as the default option for your system to enhance your experience while gaming or using specific software. You can do this by visiting Graphics Settings on Windows 10, which will allow you to select individual apps or games, then choose the specific graphics card you want to be used by default. By setting your graphics card as the default option, you’ll ensure that you’re getting the best experience when using software that requires high-quality graphics.
How to Check Your Graphics Card?
graphics card, check graphics card If you want to know the model and specifications of your graphics card, there are a few ways to check it out. One simple method is through the Device Manager in Windows. To access it, right-click the Start button and choose Device Manager.
Once the window pops up, look for Display adapters and expand it. Here, you will find the name and model of your graphics card. Another way to check is by using a third-party software like CPU-Z or GPU-Z.
These programs provide in-depth information about your graphics card, including clock speed, memory size, and more. You can also check your graphics card using the DirectX Diagnostic Tool through the Run dialog box. Just hold down the Windows key and press R to open it.
Then type in dxdiag and hit enter. This will display information about your graphics card, including driver version and RAM size. By following these simple steps, you can quickly determine what graphics card you have and its specific details.
Setting Your Graphics Card as Default
If you’re someone who frequently uses graphic-intensive software or games on your computer, then you need to ensure that your dedicated graphics card is being used by default. To do this, you’ll have to navigate to your computer’s graphics settings and set your preferred GPU as the default option. Setting your graphics card as default helps to ensure that your computer uses the dedicated GPU rather than the integrated graphics card, which can significantly slow down performance.
It also ensures that your computer doesn’t use unnecessary resources when they aren’t required. By following a few simple steps, you can set your graphics card as the default option without any hassle. Just remember to restart your computer once you’ve made the changes, so that they can take effect.
With this adjustment, you’ll be able to enjoy seamless, lag-free graphics experience and get the most out of your computer system.
Step-by-Step Guide to Set Graphics Card as Default
Setting your graphics card as default can be a bit tricky if you’re not familiar with how to do it. But don’t worry, I’ll guide you through the steps to make it easier! Firstly, go to the BIOS settings on your computer and look for the option to change your primary graphics. Usually, it’s under the Advanced Settings tab and will be labeled with the name of your integrated graphics card.
Once you find it, change the settings to your dedicated graphics card, making it the default. After saving the changes, restart your computer, and your graphics card should be set as default. It’s important to note that some computers might have different BIOS settings, so it’s best to consult your computer manual or motherboard website for specific instructions.
With this simple step-by-step guide, you can ensure your graphics card is running at its best and giving you the best performance possible.
Testing Your Graphics Card
If you’re a gamer or a designer, you might want to set your graphics card as the default. This will ensure that all your programs use the graphics card’s power, producing the best possible performance and quality. In order to test your graphics card, there are a few things you can do.
Firstly, you can use benchmarking software to measure your graphics card’s performance. This will give you a score that you can use to compare with other graphics cards. You can also run stress tests, which will push your graphics card to its limits and see how it handles the load.
Another way to test your graphics card is to run games or demanding applications. If you notice any stuttering or lag, your graphics card might not be able to handle the job. Finally, you should always keep your graphics card drivers up to date to ensure smooth operation.
By doing so, you’ll be able to enjoy the full power of your graphics card. So go ahead and set your graphics card as default, and enjoy the best possible experience!
How to Test Your Graphics Card?
Testing your graphics card is an important process to ensure your computer’s optimal performance. One way to test your graphics card is through benchmarking software, which tests performance and stability by running various graphics tests. Another way to test your graphics card is through stress testing software, which puts your graphics card through a rigorous workload to see if it can handle heavy usage without overheating or crashing.
Additionally, you can run games and other graphic-intensive programs to see how your graphics card handles real-world usage. It’s important to regularly test your graphics card to catch any potential issues before they can cause serious problems. By doing so, you can enjoy smooth gaming and other graphic-intensive activities without worrying about your computer’s performance.
Conclusion
In the world of computer graphics, setting your graphics card as the default option is like giving your car keys to Vin Diesel before a race. It’s a simple task, but it can make all the difference in the world when it comes to performance. So, don’t settle for a sluggish and lackluster gaming experience, take control of your graphics settings and unleash the full potential of your computer.
With just a few clicks, you’ll be on the road to a faster and more enjoyable gaming experience. Happy gaming!”
FAQs
How do I set my graphics card as the default option on my computer?
To set your graphics card as the default option, open the control panel and navigate to the display settings. From there, select the graphics card you want to use as the default and click “set as default.”
What if I have multiple graphics cards on my computer?
If you have multiple graphics cards on your computer, you can choose which one to use as the default by following the same steps as outlined in the previous answer. Simply select the graphics card you want to use as the default and click “set as default.”
Will setting my graphics card as the default option improve my computer’s performance?
Yes, setting your graphics card as the default option can help improve your computer’s performance, especially when it comes to video playback, gaming, and other graphics-intensive tasks.
How do I know if my computer is using the right graphics card?
You can check which graphics card your computer is currently using by opening the task manager and navigating to the performance tab. Look for the GPU section and you should see which graphics card is listed as active.