
If you’re a gamer or someone who uses high-performance applications, having a dedicated graphics card is essential for smooth-running operations. However, sometimes Windows 10 may not recognize your graphics card, and you might have to set it as the default manually. It can be frustrating trying to tweak settings and get the desired output.
But don’t worry! This blog post is here to guide you through the steps to set your graphics card as the default in Windows We’ll cover all the necessary details and provide you with a simple, step-by-step process that anyone can follow. Whether you’re an experienced user or a novice, you’ll find this guide helpful in ensuring your graphics card is running correctly.
We’ll explain the different types of graphics cards available and how to set yours as the default, so you get the best performance out of your system. By the end of this blog post, you’ll be able to set your graphics card as the default in Windows 10, and you’ll be well on your way to an enhanced graphics experience. So let’s get started!
Check Currently Installed Graphics Card
If you’re looking to set your graphics card as the default in Windows 10, the first step is to check which one is currently installed. This can be done by opening the Device Manager and expanding the Display adapters category. Here, you’ll see the name of your graphics card.
Once you’ve identified the card you want to set as the default, you can proceed with the next steps. It’s important to note that setting a default graphics card can improve the performance of your computer, especially if you’re using graphics-intensive applications or playing games. By designating a default card, you ensure that your system will use it instead of relying on integrated graphics from your CPU.
This can lead to smoother gameplay, faster performance, and better overall system stability. So, if you’re looking to get the most out of your computer, consider setting your graphics card as the default in Windows
Open Device Manager and Expand Display Adapters
If you’re looking to upgrade your graphics card or troubleshoot any display issues, the first step is to open up Device Manager on your Windows computer. It’s a handy tool that allows you to manage your hardware devices, including your graphics card. To get started, simply type “Device Manager” into the search bar on your Windows taskbar, and click on the first result.
Once inside, navigate to the Display Adapters section and expand it to see what graphics card is currently installed on your system. This information is important if you want to upgrade your graphics card or download the appropriate drivers. Knowing the make and model of your graphics card is also useful for troubleshooting if you’re experiencing any display issues, such as blurry images or flickering screens.
With a bit of knowledge and the right tools, you can easily maintain and upgrade your graphics card to improve your computer’s performance and display capabilities.
Note the Name of Installed Graphics Card
If you want to update or upgrade your graphics card, the first step you need to take is to check what you currently have installed. To do this, you need to note the name of the installed graphics card in your computer. This will help you identify the compatibility of your system with new hardware and software.
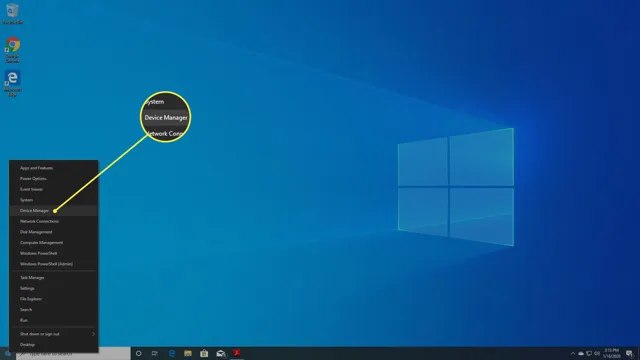
Checking the currently installed graphics card is not a complex task and can be done quickly. To begin with, on your Windows operating system, you need to right-click on the Start menu button and select “Device Manager” from the drop-down menu. In the Device Manager window, navigate to “Display Adapters” and check the graphics card model name.
The graphics card will be listed under the Display Adapters category. If you have an NVIDIA graphics card, you can access the information by going to the NVIDIA Control Panel, and if you have an AMD graphics card, you need to go to the AMD Radeon Settings. By taking note of the graphics card you have installed, you’ll be aware of the current specifications and potential upgrade possibilities.
This simple step is crucial for any graphics card upgrade or driver update you may be planning.
Download and Install Latest Graphics Card Driver
If you want to set your graphics card as default on Windows 10, you need to ensure that you have the latest drivers installed. This can be done by downloading and installing the latest driver from the manufacturer’s website. It is important to note that outdated drivers can cause performance issues and may even result in system crashes.
To download the latest driver, you need to identify your graphics card model and select the version compatible with your operating system. Once downloaded, you can run the installer and follow the on-screen instructions to complete the installation. After installing the latest driver, you can set your graphics card as default by accessing the display settings and selecting your preferred graphics card.
This will ensure that your computer utilizes the full potential of your graphics card and provides optimal performance for graphic-intensive tasks such as gaming and video editing. So don’t overlook the importance of having the latest graphics card driver installed, as it could significantly enhance your computing experience.
Visit Graphics Card Manufacturer’s Website
If you’re experiencing issues with your computer’s graphics, one of the first things you should do is check if there is an updated graphics card driver available. You can do this by visiting the manufacturer’s website of your graphics card. Look for the “support” or “downloads” section, and enter the model number of your graphics card to find the latest driver.
It’s important to keep your graphics card driver up-to-date because it can improve performance and fix bugs or issues. Upgrading drivers can also allow your graphics card to better utilize new features or programs. Once you have downloaded the latest driver, follow the installation instructions provided and restart your computer if necessary.
Remember to check for graphics card driver updates regularly to keep your system running at its best.
Download and Install Latest Graphics Card Driver
Are you experiencing graphical glitches or poor performance while gaming or working on your PC? The solution is simple – download and install the latest graphics card driver! Graphics card drivers are essential software that communicates with your hardware to render images on your screen. Without the latest drivers, you might experience graphical anomalies and low frame rates, which can be frustrating. To get the latest driver, visit the website of your graphics card manufacturer and enter your GPU model and operating system details.
Once you download the driver, run the setup file and follow the on-screen instructions to complete the installation. With the latest driver, you can expect improved graphical fidelity, increased stability, and better performance from your graphics card. So, what are you waiting for? Update your drivers and enjoy a smooth visual experience while gaming or working on your PC.
Set Graphics Card as Default
If you’re experiencing poor graphics performance on your Windows 10 machine, you might need to set your graphics card as the default. By default, Windows uses the integrated graphics processor of the CPU, which can’t handle high-end graphics applications like games or video editing software. To set your graphics card as the default option, you’ll need to open the Device Manager and uninstall the integrated graphics driver.
Once it’s done, restart your PC and install the graphics driver for your dedicated graphics card. Finally, open your graphics card software and make sure that it’s set as the default option. With these steps, your PC will be able to run graphics-intensive applications smoothly without any lag or performance issues.
So, why wait? Try these easy steps and enjoy an enhanced graphics experience on your Windows 10 device!
Right-click Desktop and Select Display Settings
If you’re trying to improve your computer’s graphics performance, setting your graphics card as default can make a big difference. To do this, simply right-click on your desktop and select “display settings.” From there, scroll down to “advanced display settings” and click on “display adapter properties.
” This will open up a window where you can select your graphics card and set it as the default. Doing so will ensure that all graphics-intensive applications use your graphics card, resulting in smoother performance and better visuals overall. Think of it like driving a car.
If you’re trying to go fast but your car’s engine isn’t powerful enough, you’ll struggle to keep up with other drivers on the road. But if you upgrade to a high-performance engine, you’ll be able to accelerate quicker, maintain higher speeds, and take on more challenging terrain. Similarly, setting your graphics card as default is like upgrading your computer’s engine, allowing it to handle more demanding tasks and deliver a smoother, more enjoyable experience.
By following these simple steps, you can ensure that your graphics card is being utilized to its full potential, making your computer faster and more efficient. So why not give it a try and see what a difference it can make?
Scroll Down to Multiple Displays and Select Graphics Card
When it comes to setting up your multiple displays, it’s important to select the right graphics card. This will ensure that your displays work seamlessly together and provide the best possible performance. To do this, you need to scroll down to the display settings and select your graphics card as the default.
Once you’ve done this, your computer will automatically use your graphics card whenever it detects multiple displays. Keep in mind that different graphics cards may have different settings, so you’ll need to check the manufacturer’s instructions to make sure you’re doing things correctly. So, there you have it – setting up multiple displays with the right graphics card is easy to do and can greatly enhance your computing experience.
Restart Computer to Apply Changes
If you’ve recently upgraded or installed a new graphics card on your Windows 10 computer, you may need to set it as the default in order to fully enjoy its performance benefits. To do this, you’ll need to navigate to the Display settings in your Control Panel, select the “Advanced Display Settings” option, and then choose the graphics card you’d like to set as the default. Once you’ve made this change, it’s important to remember to restart your computer in order for the changes to take effect.
Failure to do so may result in performance issues or other problems. Additionally, it’s a good idea to periodically check your default settings to ensure they’re still configured correctly and to make any necessary updates or adjustments. So, if you want to get the most out of your graphics card, make sure to set it as the default and restart your computer to apply the changes.
Conclusion
After all the searching and tweaking, setting your graphics card as default in Windows 10 can be a daunting challenge. But fear not, dear reader, for you are now armed with the knowledge and skills to make the switch! By following these steps, your trusty graphics card will once again reign supreme, providing you with a smooth and visually stunning user experience. So go forth, my friend, and enjoy your newfound graphics prowess!”
FAQs
How do I set my graphics card as the default in Windows 10?
Right-click on your desktop and select “Display Settings.” Scroll down to “Multiple Displays” and click on “Graphics Settings.” Select “Classic App” and click on “Browse.” Choose the .exe file for the application you want to use your dedicated graphics card for and click on “Options.” Here, you can choose whether to use your “System Default,” “Power Saving,” or “High Performance” graphics card.
Why won’t my computer automatically switch to my dedicated graphics card?
Make sure your graphics card is properly installed and updated with the latest drivers. Check your BIOS settings to ensure your dedicated graphics card is selected as the primary graphics adapter. You may also need to select the application you want to use your dedicated graphics card for in your graphics settings.
Can I set different graphics cards for different applications in Windows 10?
Yes, you can set different graphics cards for different applications in Windows 10 using the “Graphics Settings” menu. Simply select the “Classic App” option and browse for the .exe file of the application you want to use your dedicated graphics card for. Then, select the graphics card you want to use for that application.
How do I know which graphics card my computer is currently using?
Right-click on your desktop and select “Display Settings,” then click on “Advanced Display Settings” and “Display Adapter Properties.” Here, you can see the name and model of your current graphics card. To see which graphics card is being used for a specific application, open the “Task Manager,” go to the “Performance” tab, and click on “GPU.” This will show you which graphics card is being used for each application currently running on your computer.