
Are you tired of seeing streaks, smudges, or faded prints on your documents and photos? It might be time to replace your Brother printer’s drum unit! The drum unit is an essential component of a laser printer that transfers toner onto paper. Over time, it can wear out or become damaged, resulting in poor print quality. However, replacing the drum unit is a simple procedure that can dramatically improve your printer’s performance.
It’s just like changing the oil in your car – it’s a routine maintenance task that ensures your printer stays in top shape. In this blog post, we’ll guide you through the steps of replacing a Brother printer drum unit, explaining everything you need to know to get high-quality prints again.
Introduction
Replacing the drum unit of your Brother printer is an essential maintenance task to ensure high-quality and efficient printing. The drum unit is responsible for transferring the toner to the paper, and after a certain number of pages, it will start to wear out, resulting in poor print quality and even paper jams. To replace the drum unit, you need to first locate it, which is typically behind the toner cartridge.
Once you identify it, you can remove it by gently pulling it out, and then insert the new drum unit. It’s important to follow the manufacturer’s instructions to ensure proper installation and avoid potential damage to your printer. In summary, if you notice your prints are becoming faded or blurry, or if the printer is frequently jamming, it might be time to replace your drum unit.
By doing so, you can extend the life of your Brother printer and enjoy high-quality prints.
What is a drum unit?
Drum unit is an essential component of a laser printer responsible for transferring toner onto the paper. It is also referred to as an imaging unit and comprises the photoconductor, developer roller, and cleaning blade. The photoconductor is a light-sensitive material that holds the electrostatic charge, while the developer roller applies the toner onto the photoconductor.
The cleaning blade removes any excess toner or debris left after printing to ensure print quality. A drum unit needs to be replaced after a certain number of pages printed, depending on the printer model and usage. If you notice any smudging or streaking in your prints, it may be a sign of a worn-out drum unit.
Replacing the drum unit can help restore the print quality and extend the life of your printer. Make sure to consult your printer’s manual for guidelines on replacing the drum unit.
Why should you replace it?
If you’re wondering whether or not you should replace an item, the first thing to consider is its effectiveness. Is the item still performing as it should, or has it started to degrade over time? Another factor to consider is safety. If the item involves anything electrical or mechanical, it’s vital to consider whether the safety features are still in working order and whether there’s any risk of injury or damage if the item malfunctions.
Age is also something to factor in, as even the most well-maintained items can deteriorate over time. Keeping an eye on wear and tear can help you identify when it’s time to look for a replacement. But ultimately, your decision to replace will come down to how much you rely on the item and whether you’re willing to risk the consequences of it failing entirely.
With all of these factors in mind, replacing an item can give you peace of mind knowing that you have a reliable and safe solution, whatever the item may be.
How to Replace Drum Unit
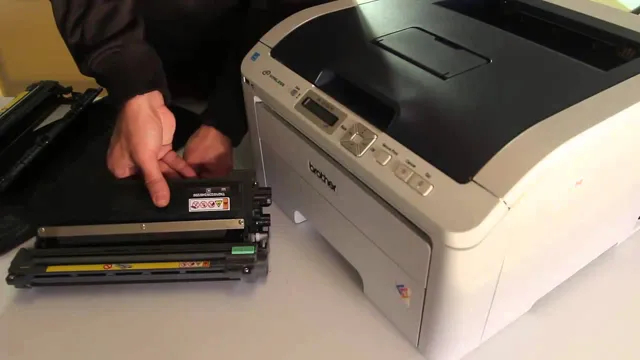
If you have a Brother printer and notice that your prints look faded or have streaks, it may be time to replace the drum unit. Fortunately, this is a relatively simple process that can be done in just a few steps. First, turn off the printer and open the front cover to access the drum unit.
Carefully remove the old drum unit by pulling it straight out and dispose of it properly. After inserting the new drum unit by sliding it into place, be sure to reset the drum counter by holding down the “Go” button until all of the LEDs light up. Once all the lights have stopped flashing, release the button and close the front cover.
Voila! Your printer should now be ready to produce high-quality prints once again. Remember, keeping your printer maintained is crucial to its longevity and performance, so don’t hesitate to replace the drum unit as needed.
Step-by-step guide
Replacing the drum unit of your printer is not a difficult task, but it requires careful attention to ensure that the printer continues to produce high-quality prints. The first step is to turn off the printer and unplug it from the power source. Then, you must locate the drum unit – this varies depending on the printer model, so refer to your printer’s manual if you are unsure.
Once you have located it, open the front cover and carefully remove the old drum unit by pulling it towards you. Take care not to touch the drum surface, as this can cause smudging or other issues. Next, unwraps the new drum unit from its packaging and remove any protective tape or cardboard.
Make sure you remove all protective material completely. Then, insert the new drum unit into the printer and push it back until you hear a click, which indicates that it has locked into place. Close the front cover and plug the printer back in, then turn it on.
Finally, you will need to reset the drum counter to ensure that the printer recognizes the new unit. This process may vary depending on your printer model, so consult your manual or manufacturer’s website for instructions. Overall, replacing the drum unit is a simple process, but it is essential to follow the steps carefully to ensure that your printer continues to function properly.
With a bit of patience and attention to detail, you can ensure that your prints stay sharp and clear. Remember to keep your printer manual or manufacturer’s website handy for reference, and always follow safety precautions when handling any electronic devices.
Important things to consider before replacement
Replacing the drum unit in your printer can be a daunting task, but with the right information, it can be done with ease. Firstly, it’s important to consider the type of printer you own and the specific drum unit model it requires. Always refer to the manufacturer’s instructions for guidance before starting the replacement process to avoid any damage to the printer.
Next, make sure to turn off the printer and unplug it from the power source before starting the process. This step ensures your safety and prevents any electrical damage to the printer. Afterward, locate the drum unit and remove it from the printer according to the manufacturer’s instructions.
Be careful not to touch the drum roller during the removal process, as it is sensitive and could be easily damaged. Finally, when replacing the drum unit, make sure the new unit is properly aligned and securely placed back into the printer. Turn on the printer and run a test print to ensure the new drum unit is functioning correctly.
In conclusion, replacing the drum unit in your printer involves careful consideration, following the manufacturer’s instructions, and being aware of safety measures. By taking these steps, you can ensure a smooth replacement process and prolong the life of your printer. Remember, always use the right drum unit model for your specific printer to avoid any future complications.
Common mistakes to avoid while replacing
Replacing a drum unit may seem simple, but it can become complicated if you’re not careful. One of the most common mistakes people make is not properly preparing for the replacement process. Before you begin, make sure you have the correct replacement drum unit for your printer.
Comparing the model number to the one on the old drum will determine this. Another mistake is forgetting to remove the protective cover from the new drum unit. Once you’ve installed it, this can cause problems.
It’s also important to make sure you properly align the new drum with the printer. Improper alignment can cause printing problems. Lastly, don’t throw away the old drum unit just yet.
It can be recycled or used to troubleshoot future problems. By avoiding these mistakes, your drum unit replacement process should go smoothly and your printer performance restored.
Choosing the Right Drum Unit
If you need to replace the drum unit on your Brother printer, it’s important to choose the right one for your needs. The first thing you should consider is whether you need a standard yield or high yield drum unit. Standard yield models are designed for low to moderate printing volume, while high yield models are ideal for businesses or individuals with high printing demands.
It’s also important to verify that the drum unit is compatible with your specific Brother printer model. Some models require specific types of drum units, so it’s wise to check your printer’s documentation or online resources before making a purchase. Brother offers drum units that are designed to work seamlessly with their printers, providing users with high-quality and consistent output.
By taking the time to select the correct drum unit, you can ensure that your Brother printer continues to deliver reliable performance over the long term.
Compatibility with your Brother printer model
When it comes to choosing the right drum unit for your Brother printer, there are a few factors you should consider. One of the most important is compatibility with your specific printer model. Not all drum units are created equal, and using an incompatible unit can lead to poor print quality, damage to your printer, and even void your warranty.
So, before making a purchase, be sure to check that the drum unit you’re considering is listed as compatible with your Brother printer model. This will ensure that you get the best possible performance from your printer, and avoid any potential headaches down the line.
Genuine vs. third-party drum units
When it comes to choosing drum units for your printer, there are two main options: genuine or third-party. Genuine drum units are those that come directly from the printer manufacturer, while third-party units are made by other companies. It can be tempting to go with a cheaper third-party option, but it’s important to consider the potential downsides.
While third-party units may save you money in the short-term, they may not be as reliable or long-lasting as genuine units. This could lead to more frequent replacements and ultimately, a higher overall cost. On the other hand, genuine drum units are specifically designed to work with your printer model and are tested for quality and performance.
While they may be more expensive upfront, they offer peace of mind and can prevent potential issues down the line. Ultimately, the choice comes down to your individual needs and budget, but it’s worth considering the benefits of investing in a genuine drum unit.
Conclusion
In conclusion, replacing the drum unit in your Brother printer is like replacing the wheels on your car. You wouldn’t want to drive with flat or worn out tires, just as you wouldn’t want to print with a worn out drum. So, don’t drum up any unnecessary headaches and swap out that old drum unit for a fresh one today!”
Summary of key points
When it comes to choosing the right drum unit for your printer, there are a few key points to keep in mind. First and foremost, it’s important to make sure that the drum unit you select is compatible with your specific printer make and model. This will ensure that you get optimal performance and quality from your printer.
Additionally, it’s important to consider the expected yield of the drum unit and the cost per page, as these factors can impact your overall printing costs over time. Finally, it’s worth considering factors like drum unit brand, quality construction, and third-party vs. OEM options.
By keeping these factors in mind, you can choose the right drum unit to meet your needs and help you get the most out of your printer.
Where to find a replacement drum unit?
If you are looking for a replacement drum unit for your printer, the first step is to ensure you choose the right one. It can be overwhelming to choose from a variety of options in the market. However, you need to consider several factors when making your decision.
First and foremost, you need to check the printer manufacturer’s guidance on the type of drum unit to get. Some printers are designed to work with specific drum units and using a different one can lead to issues such as poor print quality or hardware damage. Additionally, you need to check the yield capacity of the drum unit.
This refers to the number of pages the unit can print before requiring replacement. Getting a drum unit with a higher yield capacity will save you money in the long run. Another factor to consider is the price of the drum unit.
You don’t want to spend exorbitantly on a drum unit that does not suit your printer’s needs. Researching and comparing prices from different stores can help you find a suitable option that is affordable. By keeping these factors in mind, finding the right drum unit for your printer should be an easy task.
Final thoughts
In conclusion, when it comes to choosing the right drum unit, there are several factors to consider. It’s important to ensure that you select a drum unit that is compatible with your printer model and that meets your printing needs. Keep in mind that drum units are an essential component in the printing process and need to be replaced periodically to maintain print quality.
Additionally, opting for high-quality drum units can save you money in the long run by reducing the need for frequent replacements. By taking the time to carefully evaluate your options, you can find the right drum unit for your printer and enjoy high-quality prints for years to come. So, go ahead and make the right choice that fits your printer and your printing needs perfectly.
FAQs
What is a drum unit in a Brother printer?
A drum unit is an essential component of a Brother printer that transfers toner onto paper during the printing process.
Why would I need to replace the drum unit in my Brother printer?
The drum unit in a Brother printer may need replacement if it is damaged or worn out due to prolonged usage, which can result in poor print quality.
How often should I replace the drum unit in my Brother printer?
The recommended replacement interval for a drum unit in a Brother printer varies based on the model and usage. However, it is generally recommended to replace the drum unit after every three to four toner cartridge replacements.
Is it possible to replace the drum unit in a Brother printer by myself?
Yes, replacing the drum unit in a Brother printer is a simple task that can be done by following the instructions provided by the manufacturer. It usually involves opening the printer, removing the old drum unit and replacing it with the new one.