
Greetings, tech enthusiasts! If you’re looking for a fun and exciting DIY project, you’re in the right place. Why settle for a boring, run-of-the-mill projector when you can build your own Raspberry Pi laser projector? With a Raspberry Pi computer and a few other components, you’ll be able to project colorful laser light shows onto any surface you please. Plus, the process of building it yourself adds an extra level of satisfaction and pride to the finished product.
Not only will you have a unique and attention-grabbing piece of tech, but you’ll also have the knowledge of how it works and the skills to make modifications and adjustments. So, are you ready to light up your room and impress your friends? Let’s get started on building the ultimate Raspberry Pi laser projector!
Introduction
Have you ever heard of the Raspberry Pi laser projector? It is an exciting project that combines the power of Raspberry Pi with the fun of laser projectors. It is a perfect blend of hardware and software that creates amazing light shows. This project is achievable with minimal time and resources and requires some basic programming knowledge.
With Raspberry Pi, you can control the laser beam’s colors, shapes, patterns, and movements, allowing you to create an infinite number of designs. You can do this by connecting the Raspberry Pi to the laser projector and writing a simple program to control the laser beams. In conclusion, if you’re looking for a fun and creative Raspberry Pi project, then a laser projector might be the perfect one for you.
What is a Raspberry Pi Laser Projector?
A Raspberry Pi Laser Projector is an innovative technology that merges a Raspberry Pi with a laser module to create a powerful laser projector. In its simplest form, a laser projector is a device that projects beams of laser light onto a surface such as a wall or ceiling. A Raspberry Pi, on the other hand, is a small computer that can be programmed to perform various functions.
When combined, the Raspberry Pi and laser projector create a versatile device that can be used for a wide range of functions including light shows, signages, and even presentations. The Raspberry Pi Laser Projector can be used to create stunning visual displays and effects using software such as LightshowPi, which enables users to control the laser projector using music. With so many possibilities, the Raspberry Pi Laser Projector is a must-have device for anyone looking to create unique and dynamic visual displays.
Why Build Your Own?
“Build Your Own” Are you tired of constantly buying new electronics that don’t fit your specific needs? It’s time to consider building your own! Not only does building your own electronics give you the freedom to customize and select specific features, but it can also save you money in the long run. Imagine having a computer that is tailored to your specific needs rather than a generic model that may not meet your exact requirements. The same applies to other electronics such as smartphones and gaming consoles.
Building your own allows you to have the exact features and specifications that you want without paying for unnecessary add-ons. It’s time to take control of your electronics and start building your own!
Getting Started
If you’re ready to embark on an exciting journey into building your very own laser projector with a Raspberry Pi, there are a few things you should know before getting started. First and foremost, the Raspberry Pi is an excellent platform for DIY enthusiasts, and it’s compatible with many types of laser projectors. You’ll need to gather the necessary materials for the projector, such as a laser module, mirrors, and a power supply.
Next, you’ll need to install the appropriate software on the Raspberry Pi, such as the Raspbian operating system and openFrameworks. Once you’ve assembled your projector and installed the necessary software, the fun part begins: programming your Raspberry Pi and customizing your laser projections! With a bit of creativity and some technical know-how, your laser projector can be a truly unique work of art. So why not give it a try and see what kind of amazing images and designs you can create with your Raspberry Pi laser projector?
What You’ll Need
If you’re looking to start a new project, there are a few things you’ll need before diving in. First and foremost, you’ll need an idea. This can come from anywhere – inspiration can strike at any time.
Once you have an idea, it’s important to do some research to make sure it’s feasible and hasn’t been done before. Next, you’ll need to gather any necessary materials or tools. This will vary depending on the project, but it’s important to have everything you’ll need ahead of time to avoid any delays or setbacks.
Additionally, if you’re working on a big project, you might need some help. Consider reaching out to friends or family members to assist you, or hire a professional if necessary. Finally, don’t forget to have a positive attitude and approach the project with excitement and enthusiasm.
With these tools and a can-do attitude, you’ll be well on your way to completing your project successfully.
Setting Up Your Raspberry Pi
If you’re new to the exciting world of Raspberry Pi devices, the first thing you need to do is set up your Raspberry Pi. This might seem daunting at first, but don’t worry – it’s actually quite simple! The first step is to gather all of the necessary equipment. You’ll need a Raspberry Pi board, an external monitor or TV, a keyboard, a mouse, and a power supply.
Once you have all of these items, you’re ready to get started! The next step is to download the operating system you want to use onto a microSD card. This is a crucial step as your Raspberry Pi will not work without an operating system. There are plenty of operating systems to choose from, such as Raspbian, Ubuntu, and many more.
Once you have the operating system on your microSD card, insert it into the Raspberry Pi and connect all the peripherals. Finally, turn on your Raspberry Pi and follow the prompts to install the operating system. It’s that easy! With just a little bit of preparation, you can have your Raspberry Pi up and running in no time.
Building Your Laser Projector
If you’re looking to build a fun and interactive laser projector, a Raspberry Pi is a great place to start! With its small size and powerful processing capabilities, the Raspberry Pi is perfect for controlling a laser and creating stunning visual displays. To get started, you’ll need a laser module and a Raspberry Pi, as well as some basic electronics knowledge. You’ll also need to download and install the LaserWeb software, which will allow you to control your laser projector and create custom designs.
Once you have everything set up, you can start experimenting with different laser colors, patterns, and movements to create a unique and mesmerizing display. Whether you’re using it for a party, a performance, or just for fun, a Raspberry Pi laser projector is sure to impress!
Choosing a Laser Diode
When it comes to building a laser projector, choosing the right laser diode is crucial. Laser diodes come in various wavelengths, colors, and output powers, which can greatly affect the overall performance of your projector. Different diodes have their own strengths and weaknesses, and selecting the one that suits your project needs can be challenging.
However, by considering factors such as brightness, visibility, and cost, you can narrow down your options and make a well-informed decision. It’s also important to consider safety measures, such as proper cooling and protection against eye damage. Overall, taking the time to choose the right laser diode is essential in building a successful laser projector that meets your desired specifications.
Building Your Laser Module
Building Your Laser Module Building your laser projector may seem daunting at first, but it can be a rewarding and educational experience. The first step is choosing the right laser module for your needs and budget. Consider factors such as power output, wavelength, and beam quality.
Once you have your module, you’ll need to assemble the rest of the projector, including a power supply, optics, and control circuitry. It’s important to follow safety guidelines and wear appropriate protective gear, as lasers can be dangerous if mishandled. As you build your projector, you’ll learn about optics, electronics, and circuitry, and develop skills that can be applied to other projects.
With patience and perseverance, you’ll have a unique and impressive laser projector that you can use for entertainment or scientific purposes.
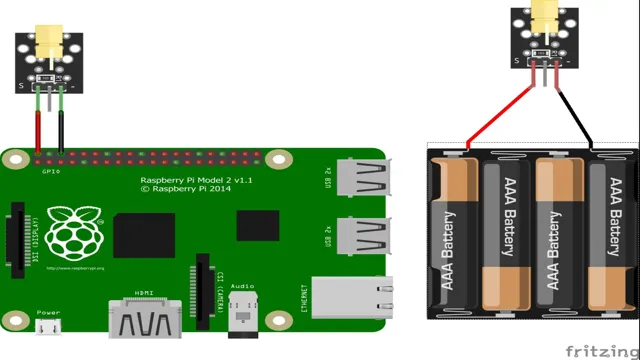
Connecting Your Laser to Your Raspberry Pi
If you’re looking to build your own laser projector with a Raspberry Pi, you’ll need to know how to connect your laser to the system. First, you’ll want to make sure you select a laser that is compatible with your Raspberry Pi and that has the power output to achieve the effects you want. Once you have your laser, connect it to the Raspberry Pi using the appropriate cables and ensure that the control board is set up correctly.
From there, you can use coding software to program your laser projector and create dazzling light shows. Remember to take safety precautions when working with lasers, and have fun exploring the limitless possibilities of laser projection technology.
Programming Your Projector
A raspberry pi laser projector is an exciting DIY project that opens up a world of possibilities, from creating a home theater to projecting artwork on the walls of your home. To program your projector, you’ll first need to choose the right software. Popular options include Raspberry Pi OS, Raspbian, and LibreELEC, which are all preloaded with the necessary drivers and libraries for your projector.
Next, you’ll need to connect your USB controller to your Raspberry Pi and configure it using the software’s settings. Once your controller is set up, you can use it to control the speed, direction, and intensity of your laser beams. You can also use programming languages such as Python or C++ to create custom animations and effects, allowing you to truly make your laser projector your own.
With the right software and a little programming know-how, you can create a mesmerizing laser show that will amaze and impress your friends and family.
Using Python to Control Your Laser
Python to Control Your Laser If you’re a hobbyist or a professional laser light display artist, you might be interested in learning how to program your projector using Python. This powerful programming language makes it easy to control your laser projector and create stunning visual effects. Python provides an interactive environment that allows you to experiment with different programming ideas in real-time, making it perfect for artists and creators.
With Python, you can write scripts that automate your laser light shows or even create generative art that evolves over time. Whether you’re new to programming or an experienced coder, Python is an excellent tool for working with lasers.
Creating Your First Laser Projection
Once you’ve selected your graphics or images, it’s time get your projector programmed and ready for projection. This step is vital to ensure your laser projection matches your designs and is aligned correctly. Most projectors come with software that allows you to easily program the projected content.
Some of the popular programs include QuickShow, Mamba, and Lasergraph DSP. Once you have opened your software, create a new project and import your graphics. You will then be able to arrange and customize your projection.
Depending on the software, you can also add special effects, transitions, and sound to enhance your presentation. After your projection is programmed, it’s time to align your projector to the projected surface. Ensure your projector is at the correct distance and angle for optimal projection.
With your programming and alignment set, you are ready to bring your first laser projection to life!
Conclusion
In conclusion, the raspberry pi laser projector is a blazing combination of technology and creativity. With this remarkable device, you can turn any surface into a stunning display of art, information, or entertainment. And the best part? It’s all controlled by a tiny computer smaller than a deck of cards.
So whether you’re a fan of laser shows, a tech enthusiast, or just someone who loves to experiment with new gadgets, the raspberry pi laser projector is guaranteed to light up your life (or at least your room). Just be careful not to blind yourself with all that awesomeness!”
Why Build It Yourself?
Have you ever thought about programming your own projector? While it may seem daunting, building your own projector can be a rewarding and fun experience. Not only will you have complete control over the specifications and functionalities of the projector, but you can also save money by sourcing the parts and building it yourself. Additionally, programming your own projector allows you to customize it to your specific needs and preferences.
Whether you want to create a home theater system or a high-quality projector for your business presentations, building it yourself gives you the flexibility to design it the way you want. So why not try it out? With some research, patience, and determination, you can build a one-of-a-kind projector that meets all your needs.
What Can You Do with Your Laser Projector?
If you’re the proud owner of a laser projector, you’re probably already familiar with its ability to project mesmerizing laser light shows. But did you know that you can program your projector to create custom graphics and animations? With laser show software, you can easily create your own graphics and animations by defining the movement and colors of the laser beams. Whether you want to create a custom logo for your business or design a unique backdrop for a music performance, the possibilities are endless with laser projectors.
Programming your projector may seem daunting at first, but with a little patience and experimentation, you can unleash its full creative potential. So why not give it a try and see what amazing visuals you can create with your laser projector?
FAQs
What is a Raspberry Pi laser projector?
A Raspberry Pi laser projector is a DIY project that uses a Raspberry Pi computer and a laser diode to create laser projections on a surface.
What are some possible applications for a Raspberry Pi laser projector?
A Raspberry Pi laser projector can be used for art installations, home theater setups, interactive displays, and educational purposes.
What kind of laser diode is required for a Raspberry Pi laser projector?
A laser diode of at least 5mW power is required for a Raspberry Pi laser projector to work.
Can a Raspberry Pi laser projector be dangerous?
Yes, a Raspberry Pi laser projector can be dangerous if not handled properly. The laser diode can cause eye damage and should be used with caution. Protective eyewear should also be worn when working with laser diodes.