Brother printers are among the most popular and reliable printers available on the market today. Whether you are using them at home or in the office, they offer advanced printing technology and excellent performance. However, setting up a Brother printer can be a bit overwhelming if you are doing it for the first time.
In this Brother Printer Setup Guide, we will walk you through everything you need to know to get your Brother printer up and running. From connecting your printer to your computer or mobile device to installing drivers and software, we will cover all the essential steps to help you set up and use your Brother printer efficiently. So, let’s dive in and get started.
Unboxing and Assembly
If you’re excited about getting your new Brother printer up and running, then you’re in luck because the setup process is easy and straightforward. The first step is unboxing your printer and checking that all the components are included. Typically, you should find the printer itself, power cord, ink cartridges, manual, and any additional cables.
Once you’ve confirmed that everything is in order, the next step is to assemble the printer. Start by connecting the power cord to the printer and plugging it into an electrical outlet. You’ll then need to insert the ink cartridges according to your printer model’s instructions.
Once you’ve done this, you’re ready to turn on your printer and begin printing. Remember that if you run into any issues with your setup, the Brother website has an extensive help center that can assist you in resolving any technical difficulty. With this quick setup guide, Brother printers can be up and running in no time.
Check contents of the box
As soon as your eagerly awaited package arrives, the first thing you want to do is check the contents of the box. Unboxing and assembly is one of the most exciting parts of receiving a new shipment. You might be wondering what is included in your package and how you can put everything together.
It’s important to take a few minutes to properly handle and examine the items inside. Carefully cut the tape or remove any stickers to reveal the contents. Check the instruction manual to ensure you have everything you need and that nothing is missing.
Take inventory of the individual pieces and determine how they fit together. With a little patience and attention to detail, you’ll be able to quickly and easily assemble your new purchase. Whether it’s a piece of furniture, a new appliance, or even a toy, taking the time to thoroughly check and properly assemble your items will ensure a stress-free and enjoyable experience.
Remove all packaging materials
When unboxing and assembling a new product, it is important to remove all of the packaging materials. This includes any plastic covers, foam inserts, and tape that may be wrapped around the product. Not only does leaving packaging materials on the product make for an unsightly display, but it can also lead to potential hazards if they are left unattended.
Sharp pieces of plastic or metal may injure someone or damage the product during transit. In order to ensure that your product is safe and presents well, always take the time to remove every piece of packaging material. Doing so will give you the peace of mind that everything looks, works, and functions as it should without any obstructions.
So, whether it’s a new gadget, piece of furniture, or home appliance, take extra time to carefully unbox and remove all of the packaging materials before diving into the assembly process.
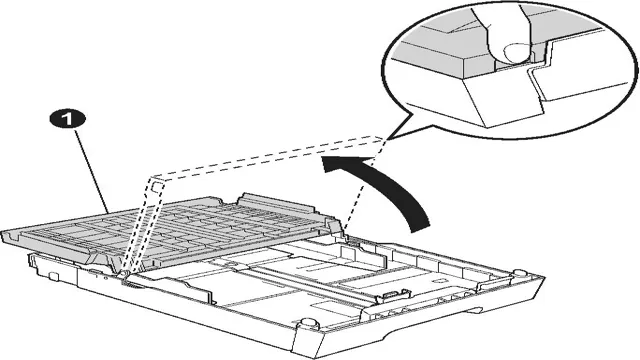
Attach paper tray and ink cartridges
Unboxing a new printer can be exciting and overwhelming at the same time. The first step in assembling your printer is to attach the paper tray and ink cartridges. The paper tray usually comes separate from the printer and needs to be securely snapped into place.
Before installing the ink cartridges, it’s important to read the user manual to ensure that you are using the correct cartridges for your printer model. Most printers will have labeled slots for the cartridges, indicating which colored cartridge goes where. It’s important to carefully insert each cartridge until you hear a clicking sound, which indicates that it’s locked in place.
Failure to properly install ink cartridges can result in poor print quality or even damage to your printer. Once both the paper tray and ink cartridges are installed, you’re ready to power up your printer and start printing. Remember to recycle your old ink cartridges properly to reduce waste and be environmentally friendly.
Connecting to Power and Wi-Fi
If you’re looking for a quick setup guide for your Brother printer, connecting it to power and Wi-Fi is an essential step. To begin, locate your printer’s power cord and plug it into an outlet near the printer. Next, turn on the printer by pressing the power button located on the control panel.
Once your printer is powered on, navigate to the Wi-Fi settings on the control panel and choose your network from the list of available options. Enter your Wi-Fi password and wait for your printer to connect to the network. Depending on your printer’s model and connectivity options, you may also be able to connect via a USB cable or Ethernet connection.
With these simple steps, your Brother printer should be ready to print wirelessly on your home or office network.
Plug in the printer and turn on
When it comes to setting up a new printer, connecting to power and Wi-Fi are two crucial steps to get started. The first thing you need to do is plug in your printer and turn it on. Make sure you have all the necessary cables and power cords ready before getting started.
Once you have connected the printer to a power source, you can turn it on and let it start up. The next step is to connect your printer to Wi-Fi. This process can vary depending on the type of printer you have, but generally, you will need to access the printer’s settings menu and select the Wi-Fi option.
You will then need to select your home network from the list of available networks, enter your Wi-Fi password, and wait for the printer to connect. Once your printer is connected to Wi-Fi, you can start printing wirelessly from your computer or mobile device. Don’t forget to test your printer to make sure everything is working correctly before getting started.
By following these simple steps, you can quickly and easily set up your new printer and start printing in no time.
Connect to Wi-Fi network
Connecting to a Wi-Fi network can seem daunting, especially if you’re not tech-savvy. But with a few simple steps, you’ll be able to get connected in no time. First, ensure that your device is within range of your Wi-Fi router.
Then, turn on your device and go to the Wi-Fi settings. You should see a list of available networks; select the one you want to connect to. If the network is secured, you’ll be prompted to enter a password.
Make sure you enter the correct password, or you won’t be able to connect. Once you’ve entered the password, your device should connect automatically. If it doesn’t, try restarting your device and repeating the process.
And that’s it! You’re now connected to your Wi-Fi network and can start enjoying all it has to offer. Whether you’re streaming movies, browsing the web, or catching up on work, having a reliable Wi-Fi connection is essential. So don’t be afraid to give it a try, and remember that practice makes perfect!
Installing the Printer Drivers
If you have just purchased a Brother printer and are looking for a quick setup guide, one of the essential steps is installing the printer drivers. Printer drivers are software that allow the printer and your computer to communicate effectively, enabling you to print documents. To install the Brother printer drivers, you first need to connect your printer to your computer using a USB cable.
Then you need to visit the Brother website and download the appropriate drivers for your printer model. Once the download is complete, simply run the installer program and follow the prompts to complete the installation process. It is important to ensure you download the correct drivers for your printer and operating system to avoid any compatibility issues.
With the printer drivers installed, you can enjoy high-quality printing from your Brother printer.
Download/install drivers from Brother website
If you recently purchased a Brother printer and need to install the drivers, don’t worry, it’s a straightforward process. The first thing you need to do is visit the Brother website and go to the downloads section. From there, you can search for your specific printer model and operating system and download the corresponding driver.
Once you have the driver downloaded, run the installation file and follow the prompts to complete the installation process. It’s crucial to ensure you download the correct driver for your printer and operating system to avoid any compatibility issues. If you encounter any difficulties during the installation process, Brother provides helpful resources, including guides and videos, to assist you in troubleshooting.
With these simple steps, you’ll be able to install the necessary drivers and start using your Brother printer with ease.
Follow on-screen instructions
When it comes to installing printer drivers, following the on-screen instructions is essential. These instructions are designed to guide you through every step of the installation process, ensuring that the software is properly installed and configured on your computer. Typically, the instructions will ask you to connect the printer to your computer, then turn it on and wait for it to be detected.
Once the printer is recognized, you will be prompted to download and install the appropriate drivers. This is where the main keyword comes in: be sure to search for the correct drivers for your specific printer model, as using the wrong drivers can lead to compatibility issues and other problems down the line. The on-screen instructions will typically guide you through this process as well, but it’s always a good idea to double-check to make sure you’re downloading the right drivers.
Once the drivers are installed, you should be able to use your printer without any further issues. Overall, following the on-screen instructions is important to ensure a smooth and hassle-free installation process.
Printing a Test Page
If you’ve just got a new Brother printer and need a quick setup guide, don’t worry, it’s very straightforward. Once you have unpacked and installed the printer cartridges, you’ll need to connect your printer to your computer using a USB cable or connect to it over Wi-Fi. Next, you can download the necessary software from the Brother website to ensure your computer can communicate with the printer.
Once that’s done, you can print a test page to confirm that everything is working as it should. Printing a test page is essential to ensure that your printer is correctly installed and set up and that you don’t face any issues while printing larger documents. So, if you want to avoid any problems and frustrations, don’t forget to print a test page.
With the quick setup guide, you’ll have no problem setting up your Brother printer and getting it up and running in no time!
Conclusion
And there you have it! Your Brother printer is now ready to print, scan, and do all sorts of technological magic. It’s like having a trusty sidekick by your side, always ready to assist you in your printing needs. So next time you need to print that important document or hilarious meme, your Brother printer will be there to save the day.
Now, go forth and print with ease!
FAQs
What are the steps for quick setup of a Brother printer?
The quick setup guide for Brother printer includes unpacking the printer, connecting it to the power source, loading the paper, installing the ink or toner cartridges, and installing the drivers.
How can I connect my Brother printer to a Wi-Fi network during setup?
During the quick setup of a Brother printer, you can connect it to a Wi-Fi network by selecting the network from the printer’s control panel and entering the password.
What should I do if my Brother printer doesn’t respond after the quick setup?
If your Brother printer doesn’t respond after the quick setup, make sure it’s properly connected to the power supply and the computer. You can also check if the drivers are installed correctly and try resetting the printer and the computer.
What are the system requirements for installing a Brother printer driver?
The system requirements for installing a Brother printer driver include the operating system of the computer, the connection type (USB or wireless), and the printer model. You can check the compatibility of the driver on the Brother website.