
Mounting your HP B300 PC can seem like a daunting task, but it doesn’t have to be. With the right tools and a little bit of know-how, you can easily secure your PC to any surface, whether it’s your desk or the underside of a shelf. Not only will this save you valuable desk space, but it also increases airflow to your computer, preventing overheating and extending its lifespan.
Imagine your HP B300 PC as a prized possession, like a valuable painting or photo, that you want to proudly display for all to see. With the right mount, that dream becomes a reality. In this blog, we’ll guide you through the process of mounting your HP B300 PC, step by step, and show you just how easy it can be.
Why Use a Mounting Bracket?
If you’re looking for a way to securely and conveniently mount your HP B300 PC, then a mounting bracket is an excellent option. Mounting brackets provide a sturdy and stable platform for your device, preventing it from accidentally falling or being knocked off a surface. They also help to save valuable desk space by allowing you to mount your PC to the underside of your desk or against a wall.
Additionally, some mounting brackets come with adjustable arms, which allow you to position your device at the perfect height and angle for comfortable use. By using an HP B300 PC mounting bracket, you can increase your productivity, reduce clutter, and ensure the long-term safety of your computer.
Better Space Management
If you’re looking to optimize the space in your home or office, using a mounting bracket can be a game-changer. Mounting brackets are perfect for securing things like TVs, monitors, and even shelves, so they don’t take up valuable floor space. By mounting your devices on the wall or ceiling, you can create more room for other furniture or appliances.
Plus, mounting brackets give you the flexibility to adjust the height or angle of your devices for better viewing or accessibility. Best of all, using a mounting bracket is a smart investment that can help to protect your devices from accidental damage or theft. So, if you’re tired of cluttered spaces, consider using a mounting bracket and enjoy all the benefits that come with better space management.
Improved Aesthetic Appeal
If you are looking to improve the aesthetic appeal of your home or workspace, using a mounting bracket is a great place to start! Not only do they offer a practical solution for mounting items securely, but they also add a touch of elegance and style. With a mounting bracket, your items will appear more organized and visually appealing. Plus, it’s a great way to keep your belongings off the floor while freeing up valuable space.
Mounting brackets are perfect for displaying picture frames, paintings, mirrors, and shelves. They offer a sleek and modern look that will complement any interior design. So why not add a little sophistication to your space with a mounting bracket? It’s an easy and affordable way to enhance your decor!
Features of HP B300 PC Mounting Bracket
The HP B300 PC Mounting Bracket is the perfect solution for anyone who wants to mount their desktop PC on the wall or under the desk. This sturdy bracket is made of high-quality materials and designed with a user-friendly interface. The bracket comes equipped with adjustable sliders that fit most PCs, removing the need to worry about compatibility.
Moreover, it comes with a manual that offers simple step-by-step instructions on how to install the bracket, ensuring that you have your PC mounted safely and securely in no time at all. Additionally, the HP B300 PC Mounting Bracket is designed to help you keep your workspace clutter-free, providing a neat and tidy solution that maximizes your available space. Whether you’re looking to free up desk space, or simply want to create a better working environment, the HP B300 PC Mounting Bracket is an ideal choice.
So, if you’re in search of a sturdy and reliable mounting bracket that is built to last, look no further than the HP B300 PC Mounting Bracket!
Durable Material for Longevity
One of the key features of the HP B300 PC mounting bracket is its durable material. Made with high-quality steel, this bracket is built to last and withstand even the toughest conditions. Whether you are mounting your PC in a busy office space or a rugged industrial environment, the HP B300 bracket provides a secure and stable base for your computer.
Its heavy-duty design ensures that your PC will stay in place, protecting it from damage caused by accidental bumps or falls. Additionally, the bracket’s powder-coated finish offers resistance to rust and corrosion, further extending its lifespan. Overall, the HP B300 PC mounting bracket is a reliable choice for anyone looking for a durable and long-lasting solution to their PC mounting needs.
Compatibility with Multiple VESA Patterns
The HP B300 PC Mounting Bracket is a versatile piece of hardware that works with multiple VESA patterns, making it compatible with a wide range of displays. With its adjustable arm and clamp design, you can easily mount your PC, monitor, or all-in-one system on any flat surface. The bracket is made from high-quality materials that offer stability and durability for long-lasting use.
The HP B300 is designed to fit the needs of any user, whether you have a small workspace or a large office. Plus, with its easy installation process, you can save time and get back to work faster. So, if you’re looking for a reliable and efficient mounting bracket, the HP B300 PC Mounting Bracket is definitely worth considering.
Easy Installation Process
The HP B300 PC Mounting Bracket boasts an easy installation process that even the technologically-challenged can handle. Unlike other mounting brackets that require a lot of fuss and complicated instructions, the HP B300 bracket can be installed effortlessly with just a few basic steps. It comes with pre-installed screws, which eliminates the need for additional hardware and allows for a quick and seamless experience.
In addition, the HP B300 bracket is compatible with VESA mounting patterns, meaning that it can be used with a wide range of monitors and displays. Whether you are looking to attach your PC to a wall or a monitor arm, the HP B300 PC Mounting Bracket is a versatile and user-friendly option that can meet all your needs. Experience the convenience of easy installation with the HP B300 bracket!
Step-by-Step Guide to Install Your Mounting Bracket
If you’ve recently purchased an HP B300 PC, you may be wondering how to install the mounting bracket to securely affix your PC to a desk or wall. The good news is that the process is relatively straightforward and can be accomplished in a few quick steps. First, gather all the necessary tools such as a screwdriver and the mounting bracket itself.
Next, find the appropriate place to mount the bracket, making sure it’s within reach of all necessary cords and plugs. Once the location is determined, use the screwdriver to affix the mounting bracket to the desired surface, ensuring it’s flush and secure. Finally, carefully slide the PC into the bracket, making sure it’s seated properly and securely.
With these simple steps, you can enjoy a securely-mounted HP B300 PC in no time.
Tools you’ll need
If you’re planning on mounting something, such as a TV or a shelf, you’ll likely need a mounting bracket to do the job. To install your mounting bracket, you’ll need a few tools, including a drill, screws, and a level. You’ll also want to make sure you have a stud finder to locate the studs in your wall to ensure a secure mount.
Once you have your tools, follow these simple steps to install your mounting bracket: First, mark where you want your bracket to go on the wall. Use a stud finder to locate the studs in the wall and mark where they are. Then, drill pilot holes into the wall where you marked your bracket to go.
Next, attach the bracket to the wall using screws and a drill. Finally, use a level to ensure that the bracket is straight and secure. By following these steps and taking your time, you can successfully install your mounting bracket and enjoy your newly mounted item.
Locate the VESA pattern on your PC and bracket
To install a mounting bracket for your PC, the first thing to do is locate the VESA pattern on both your PC and the bracket. The VESA pattern refers to the measurement system used to ensure that the bracket will fit securely onto the PC. It’s important to ensure you have the right pattern to avoid damaging your PC or the bracket.
To find the VESA pattern on your PC, look for four screws on the back of your monitor. These screws form a square or rectangular shape that represents the VESA pattern. Once you have located the pattern on your PC, match it with the corresponding pattern on the bracket.
You can then use screws to attach the bracket to your PC. With the bracket properly installed, you can now attach your PC to a wall mount or desk stand. Remember that each PC model has a unique VESA pattern, so be sure to double-check before making any installations.
Applying these steps ensures that your PC is installed securely and is less prone to damage.
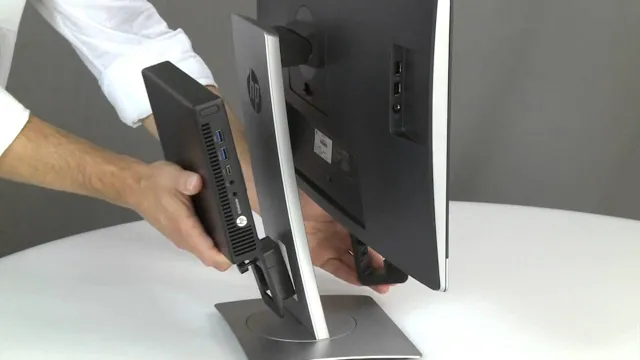
Attach bracket to the PC
Attaching the bracket to your PC can seem daunting, but it’s actually a simple process. First, start by ensuring that all cords are unplugged from the back of your PC. Next, locate the area where the bracket will be attached.
This is typically on the back of the PC near the bottom. Hold the bracket up to the designated area and align the screw holes with the holes on your PC. Once aligned, secure the bracket in place with screws.
It’s important to tighten the screws enough so that the bracket is securely attached to your PC. Congratulations! You’ve successfully attached the bracket to your PC. Now it’s time to mount your monitor and enjoy your elevated setup experience.
Mount the bracket on the wall
Mounting bracket Mounting a bracket on the wall may seem like a daunting task, but it can be a fairly straightforward process with the right tools and a bit of patience! First, choose a location on the wall where you want to mount the bracket. Use a level to ensure the bracket will be straight. Once you have your location selected, hold the bracket up to the wall and mark the precise location of the screw holes with a pencil.
Next, use a drill to create pilot holes at each of the marked locations. Once the pilot holes are complete, attach the bracket to the wall using screws and wall anchors according to the manufacturer’s instructions. Finally, ensure that the bracket is level by using the level again.
Congratulations, you have successfully mounted your bracket onto the wall! Remember, it is crucial to safely secure the bracket to avoid any potential hazards, so be sure to double-check your work before hanging any heavy objects on the bracket.
Conclusion
In conclusion, the HP B300 PC Mounting Bracket is like the superhero of computer accessories. It may not have flashy powers or wear a cape, but its ability to securely mount your PC provides peace of mind and frees up valuable desk space. It’s the sidekick you never knew you needed, ensuring your computer stays safe and sound while you focus on saving the world (or at least finishing that report).
So, to all the tech-savvy heroes out there, add the HP B300 PC Mounting Bracket to your utility belt and let it come to your rescue!”
FAQs
What is an HP B300 PC Mounting Bracket?
An HP B300 PC Mounting Bracket is a device used to securely mount an HP desktop PC to a wall or under a desk.
Is the HP B300 PC Mounting Bracket compatible with all HP desktop PCs?
No, the HP B300 PC Mounting Bracket is only compatible with specific models of HP desktop PCs. It is important to check compatibility before purchasing.
How can I install an HP B300 PC Mounting Bracket?
Installation of the HP B300 PC Mounting Bracket typically involves attaching it to a wall or surface, and then securing the desktop PC to the bracket using screws. It is recommended to refer to the installation manual for specific instructions.
Can the HP B300 PC Mounting Bracket support other devices besides desktop PCs?
No, the HP B300 PC Mounting Bracket is designed specifically for HP desktop PCs and may not be suitable for other devices.