
Have you ever wondered how to test a motherboard? The motherboard is the central hub of your computer system, connecting all the other components together. A faulty motherboard can cause serious issues, such as system crashes, blue screens of death, and even hardware damage. Therefore, it’s essential to test your motherboard regularly to ensure it’s functioning correctly.
In this blog, we’ll share some practical tips and tricks on how to test a motherboard to detect any underlying issues before they cause significant damage to your system. So, let’s dive in and explore the world of motherboard testing!
Gathering Materials
When it comes to testing a motherboard, gathering all the necessary materials is key to ensuring a successful outcome. You will need tools such as a screwdriver, a multimeter, and a testing device. It is also essential to have your motherboard manual handy, as this will guide you through the process of identifying the various ports and components.
Before you begin, ensure that you have a clear workspace and that the motherboard is not connected to any other components such as the power supply or hard drive. This will help to prevent any damage or interference during testing. With the right materials and a clear workspace, you can proceed with testing your motherboard and determining any issues that may need to be addressed.
Remember to approach the testing process with both caution and confidence, and don’t be afraid to seek additional support or guidance if needed.
Motherboard Manual
Gathering Materials for Motherboard Manual If you’ve recently purchased a motherboard, it may be overwhelming trying to figure out how to install it, especially if you’re not familiar with the technical jargon. The motherboard manual is your best friend in this situation, and gathering the necessary materials is the first step in getting started. To begin with, make sure you have the motherboard itself and any necessary screws or bolts required for installation.
You’ll also need to find the appropriate power supply unit (PSU), which needs to be compatible with your motherboard. Additionally, make sure you have a processor, a heatsink, and a fan, as well as thermal paste to put between the processor and the heatsink. Taking the time to gather these materials will make the process of assembling your motherboard go much more smoothly.
Screwdrivers
When it comes to working on household projects, a good set of screwdrivers is a must-have. But before you dive into your project, it’s important to gather all of the necessary materials. First and foremost, you’ll need a set of screwdrivers in various sizes and types.
Phillips and flathead screwdrivers are the most commonly used, but it’s also helpful to have specialty screwdrivers for specific projects. You’ll also want to have a magnetic tray or mat to keep all of your screws and small parts organized and easily accessible. A pair of safety glasses is important to protect your eyes from flying debris, and gloves can provide additional protection for your hands.
Lastly, consider having a power drill on hand to help make the job easier and more efficient. By gathering all of the necessary materials before starting your project, you can ensure a smoother and more successful DIY experience.
Multimeter
When preparing to use a multimeter, it’s important to gather all of the necessary materials. First and foremost, obviously, is the multimeter itself. Make sure it’s in good working condition and has new batteries if required.
You’ll also need test leads, which are the wires that plug into the multimeter and are used to touch the object being tested. Some multimeters come with these included, but if not, you can purchase them separately. Additionally, you may want to have some probes on hand, which are small pointed devices that can be attached to the end of the test leads to penetrate the surface of the object being tested.
Other items that may be helpful to have include a notepad and pen for jotting down measurements, and possibly a clamp meter if you plan to test electrical currents. By taking the time to gather all of these materials before starting, you’ll be able to work efficiently and accurately.
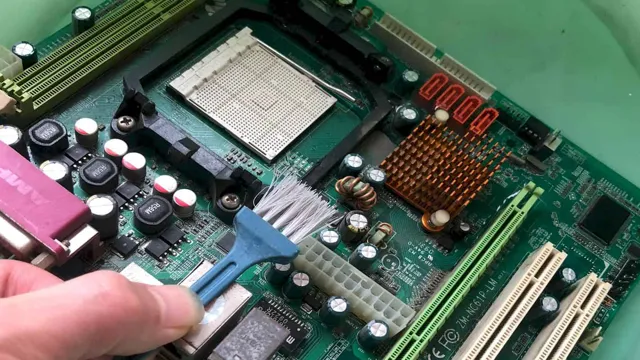
Visual Inspection
When it comes to testing a motherboard, visual inspection plays a crucial role in determining any potential issues. The first step in visually inspecting a motherboard is to look for any physical damage, such as bent pins or burn marks. Next, check all of the ports and connectors to ensure that they are clean and not damaged.
It’s also essential to inspect the capacitors on the motherboard, as they can be a common failure point. Look for any capacitors that are bulging or leaking, as this can indicate a potential issue. Additionally, inspect the BIOS battery to ensure that it’s securely in place and not leaking.
By performing a thorough visual inspection, you can identify any potential issues with the motherboard before proceeding with further testing.
Check for Physical Damage
When it comes to maintaining your electronics, a simple visual inspection can go a long way in detecting any physical damage. Whether you’re dealing with a laptop, phone, or any other electronic device, check for any cracks, scratches, or dents. Even small damages can be a cause for concern, as they can lead to more severe issues down the road.
Don’t forget to inspect the ports and connectors, as they can also be prone to damage. For example, a bent charger cord or a loose headphone jack can cause damage to the device if left untouched. By taking a few minutes to inspect your electronics, you can catch physical damage before it becomes a larger problem.
So, take a closer look at your devices and keep them in top shape for longer.
Check for Burnt or Leaking Capacitors
When it comes to checking for burnt or leaking capacitors in your electronics, visual inspection is crucial. Start by looking for capacitors that appear swollen or bulging on the top or bottom. If you see any signs of corrosion, leakage, or burning, these are all indications that the capacitor needs to be replaced.
But what causes capacitors to burn or leak in the first place? In many cases, it could be due to a power surge or overheating. It’s also possible that the capacitor was not installed correctly, or that it has simply reached the end of its lifespan. Whatever the cause may be, it’s important to catch these issues early on.
Otherwise, they could lead to further damage to your device or even pose a safety hazard. By conducting a visual inspection and addressing any issues as soon as possible, you can ensure that your electronics remain functional and safe for use.
Testing the Power Supply
If you suspect that there is an issue with your motherboard, the first step is to test the power supply. This will ensure that the core of your computer system is functioning properly. To test your motherboard’s power supply, you will need a multimeter, which can measure voltage and resistance.
Start by disconnecting the power supply from the motherboard and any other components. Then, set your multimeter to DC voltage and touch the probes to the pins where the power supply connects to the motherboard. You should see a reading of approximately 12 volts.
If the reading is significantly lower, it may indicate a problem with your power supply. Additionally, you can check the resistance of your power supply with your multimeter. If the reading is significantly higher than what is expected, it may also indicate that your power supply is faulty and needs to be replaced.
Remember, testing your power supply is an important first step in diagnosing any issues with your motherboard.
Check Power Supply Voltage
One of the first things you should check if you’re experiencing power issues with your electronic device is the power supply voltage. The voltage level determines if the device is receiving adequate power to function properly. Testing the power supply is relatively easy and can be done with a multimeter.
First, unplug the device and open the power supply unit. Look for any visible signs of damage, such as burn marks or bent components. Next, turn the multimeter to the DC voltage setting and connect the red probe to the positive terminal and the black probe to the negative terminal.
Turn the power supply on and check the readings on the multimeter. If the voltage reading doesn’t match the manufacturer’s specifications, then the power supply needs to be replaced. Checking the power supply voltage regularly can help prevent power-related issues from occurring and prolong the life of your electronic device.
Check Power Supply Cables
When it comes to testing your power supply, one important step is to check all power supply cables. Make sure that they are properly connected, and that there are no loose or damaged wires. If the power supply cables aren’t working correctly, your computer won’t be able to get the power it needs to function properly.
In fact, faulty or damaged cables can be a common cause of power supply problems. So, before you start troubleshooting other components, it’s always a good idea to make sure your power supply cables are in good working order. Think of it like checking the pipes in your house for leaks – you wouldn’t want a slow drip to turn into a huge water damage problem, right? Similarly, checking your power supply cables can help prevent larger issues down the line.
Testing the RAM
Testing the RAM is an essential step in troubleshooting issues with your motherboard. Faulty RAM can lead to a multitude of problems, such as system crashes and freezes. There are several ways to test RAM, but one of the most reliable methods is to use memory diagnostic software.
Windows 10 comes with its own built-in memory diagnostic tool, which you can access by searching for “Windows Memory Diagnostic” in the Start menu. This tool will scan your RAM for errors and provide a detailed report on any issues found. Another option is to use third-party software, such as Memtest8
This software is specifically designed to thoroughly test your RAM and can detect even the smallest of errors. It’s important to note that RAM testing can take some time, especially if you have a large amount of memory installed. However, taking the time to properly test your RAM can save you from potentially more significant issues down the line.
So, if you’re experiencing problems with your motherboard, testing your RAM should be one of the first steps you take in resolving the issue.
Remove and Reinsert RAM
If you’re experiencing frequent crashes, freeze-ups, and other performance issues, your computer’s RAM might be to blame. RAM, or random access memory, is a vital component of your device that stores and retrieves data quickly. Over time, RAM modules can develop faults that cause system instability.
But don’t worry, testing your RAM is a relatively straightforward process that doesn’t require any expensive tools or technical expertise. One quick fix that often works wonders is to remove and reinsert your RAM modules. This simple act can dislodge any dirt or debris that may accumulate over time, interfere with your RAM’s connections, and cause data errors.
If you’re still experiencing problems after reseating your RAM, you may want to try running comprehensive diagnostic software like Memtest8 Memtest86 is a powerful tool that can identify and fix any RAM issues, helping you get your device back in tip-top shape in no time. So, the next time you’re experiencing significant computer issues, don’t jump to conclusions right away—test your RAM first!
Test RAM with Memory Diagnostic Tool
If you are experiencing random crashes or frequent system errors, testing your RAM with a Memory Diagnostic Tool can help you determine if the issue is related to your RAM. This tool runs a series of tests on your RAM and can detect any errors or issues that may be causing the instability in your system. The Memory Diagnostic Tool comes pre-installed on most Windows operating systems, and it is easy to use.
Just follow the step-by-step instructions, and the tool will do the rest. Once the test is complete, you will be able to view the results and determine if your RAM is faulty. In case it is, consider replacing it as it can potentially cause further issues in your system.
By testing your RAM with a Memory Diagnostic Tool, you can ensure that your system runs smoother and more efficiently, without any unexpected crashes or errors.
Testing the CPU
If you’re wondering whether your motherboard is performing properly, it’s important to test it out for any potential issues. One way to do this is by testing the CPU. This can be done by running a stress test on your computer.
A stress test will push your CPU to its limits, and if there are any issues with your motherboard, they will likely show up during this test. Running a stress test can be done with various programs such as IntelBurnTest or Prime9 It’s important to note that stress tests can be quite taxing on your CPU, so it’s best to ensure that your computer is running within safe temperature limits before starting the test.
If you notice any issues during the stress test, it could be an indication of a problem with your motherboard, and you may need to seek professional help to resolve it. Overall, testing the CPU can tell you a lot about the health of your motherboard, and taking steps to diagnose and fix any issues can improve the overall performance of your computer.
Remove and Reinstall CPU
If you’re experiencing issues with your CPU, it may be time to test it by removing and reinstalling it. This process can be a bit challenging, so it’s important to take it slow and be cautious. Before getting started, make sure your computer is turned off and unplugged from any power source.
Then, carefully remove the heatsink and fan from the CPU. Gently lift the lever to release the CPU from its socket and set it aside. Inspect the CPU for any damage or discoloration.
If everything looks good, you can proceed with cleaning the CPU and reinstalling it into the socket. Once it’s securely in place, reattach the heatsink and fan and turn your computer back on to test the CPU. If you’re still experiencing issues, it may be time to consider replacing the CPU, but testing it first can save you time and money.
Check CPU Temperature
Checking the temperature of your CPU is an essential step in testing its overall performance and ensuring its longevity. As the CPU is the central processing unit of your computer, it generates a considerable amount of heat during operation, which, if not monitored, can lead to performance issues and even hardware failure. There are various methods to check your CPU temperature, including using the built-in diagnostic tools of your computer or downloading third-party software specifically designed for this task.
Regardless of the method you choose, it’s crucial to regularly check your CPU temperature, especially when running demanding applications or tasks that require prolonged usage. By doing so, you can prevent overheating and protect your device from potential damage. So, don’t neglect this essential step and make sure you regularly test your CPU temperature to ensure a smooth and steady performance from your computer.
Final Thoughts
In conclusion, testing a motherboard is not a daunting task as long as you follow the right procedures. The first step is to ensure that the system is unplugged from the power source. Then, carefully remove the motherboard from the case and check for any visible defects.
Afterward, connect the essential peripherals such as the CPU, RAM, and GPU to the motherboard. You can then power on the system and perform various BIOS tests to determine the stability and performance of the motherboard. Additionally, you can run hardware diagnostic tools such as CPU-Z or GPU-Z to check the system’s functionalities.
By following these steps, you can effectively test your motherboard and ensure that it is functioning optimally. Remember to pay attention to the manufacturer’s specifications, and if you encounter any issues, seek professional help to avoid damaging the system.
Conclusion
Congratulations! You now possess the knowledge and skills needed to test a motherboard like a pro. By following these simple steps, you can diagnose any issues and ensure your motherboard is functioning at optimal levels. Just remember to exercise caution and never overlook any small detail, as it could mean the difference between success and failure.
So, go forth and test those motherboards with confidence and let your troubleshooting skills shine!”
FAQs
What are the steps to test a motherboard?
To test a motherboard, you should first ensure that all components are properly connected and that there are no loose connections. Then, you can use diagnostic tools to check for any errors or faults.
What tools are needed to test a motherboard?
To test a motherboard, you may need a multimeter, a PSU tester, and diagnostic software. You could also use a loopback plug to test the serial and parallel ports.
Can you test a motherboard without power?
No, you cannot test a motherboard without power. The power supply is necessary to provide electricity to the motherboard and its components.
What are common signs of a faulty motherboard?
Common signs of a faulty motherboard include a system that won’t power on, random shutdowns or freezes, and unusual beeping or error messages. You may also experience hardware issues such as errors with USB or PCIe devices.
How can you identify the cause of a motherboard failure?
To identify the cause of a motherboard failure, you should first troubleshoot the system using diagnostic software and testing methods. If the issue does not appear related to any specific component, it may be due to a faulty or damaged motherboard. In this case, you may need to replace the motherboard to fix the issue.