
Has the toner in your Brother printer run out and you need to replace it ASAP? Don’t worry, we’ve got you covered! As printer users, we know how frustrating it is to have to halt your printing tasks just because the toner ran out. But fear not, replacing your Brother printer’s toner is a straightforward process that can be completed in a few simple steps. First, you will need to purchase the correct toner cartridge for your Brother printer model.
Once you have your new cartridge, turn off your printer and wait for it to cool down. Then, open the printer cover and locate the toner cartridge. Gently remove the old cartridge by pulling it out and dispose of it properly.
Next, unpack your new cartridge and shake it gently to distribute the toner evenly inside. Carefully remove the protective covering and insert the new cartridge into the printer, ensuring it is securely in place. Close the printer cover and turn the printer on.
That’s it! Your Brother printer is now ready to print with its new toner cartridge. Remember to properly dispose of your old cartridge, either by recycling it or through specific toner disposal services. Not only can replacing your toner save you time and frustration, using fresh toner can also improve the quality of your prints.
So don’t let a toner problem slow you down. Follow these easy steps to replace your Brother printer’s toner and get back to printing in no time!
Check Printer Model
If you want to replace the toner in your Brother printer but you’re not sure how to go about it, don’t worry! The process is actually quite simple. The first step is to check your printer model to make sure you have the correct toner cartridge. You can usually find this information on your printer’s manual or on the Brother website.
Once you know which toner cartridge you need, you can purchase it from a reputable retailer. To replace the toner, you will need to open the printer’s front cover and remove the old cartridge. Then, insert the new cartridge and make sure it is securely in place.
Finally, close the front cover and run a test print to make sure everything is working properly. By following these steps, you’ll be able to replace the toner in your Brother printer in no time!
Locate Toner Cartridge
When it comes to replacing toner cartridges, the first step is to ensure you have the right cartridge for your printer model. Checking your printer’s manual or the manufacturer’s website is essential to avoid any confusion. Using the incorrect cartridge can cause damage to your printer or produce poor quality outputs.
It’s also essential to ensure that the cartridge has the correct printer series, model, and type. Once you’ve verified this information, locate the toner compartment cover on the printer and open it to access the cartridge. Some printers may require an additional access panel to be removed, so be sure to check the manual for specific instructions.
With the cover removed, carefully slide out the old cartridge, recycle it according to the manufacturer’s instructions, and insert the new cartridge the same way. Once replaced, double-check that the cover is properly secured before resuming printing. Always keep a spare toner cartridge on hand to avoid running out of toner when you need it most.
Remember, using the right cartridge for your printer model is essential for achieving optimal results.
Remove Empty Toner
If you’re wondering how to remove empty toner from your printer, the first thing you need to do is check the model of your printer. Different printers have different mechanisms for removing empty toner, so it’s vital to know which model you’re dealing with before taking any action. You can typically find your printer’s model number on the front or back of the printer, or in the printer’s manual.
Once you’ve confirmed your printer’s model, you can then begin the process of removing the empty toner. Make sure to follow the manufacturer’s instructions carefully to avoid damaging your printer or the new toner cartridge you plan to install. By taking the time to conduct this simple step, you can ensure that you remove empty toner from your printer effectively and without hassle.
Prepare New Toner Cartridge
Replacing the toner in your Brother printer is a necessary task that can be easily accomplished with a bit of preparation. First, it’s important to purchase the correct toner cartridge for your printer model. Once you have the new cartridge, turn off your printer and unplug it from the power source.
Locate the toner compartment, which is typically located on the side or front of the printer. Open the compartment by pulling down on the handle or pressing a release button. Gently remove the old toner cartridge from the compartment and discard it.
Take your new cartridge and remove any packaging or protective tape. Insert the new cartridge into the compartment and push it firmly until you hear a click or feel it lock into place. Close the compartment and plug the printer back in.
Turn on the printer and print a test page to ensure that the new toner is working properly. By following these easy steps, you can quickly and easily replace the toner in your Brother printer.
Remove Packaging
Removing the packaging from a new toner cartridge might seem like a straightforward task, but it’s essential to do it carefully. Start by finding a flat surface where you can place the new cartridge. Gently remove it from the packaging, being mindful not to touch the surface or any of the contact points.
If you accidentally touch the surface or contact points, use a clean, dry cloth to wipe away any oils or dirt that might have transferred. Then, take the protective cover off the new toner cartridge. It’s the plastic piece that covers the toner dispenser, and you’ll see it clearly marked with a pull tab.
Remember to keep the protective cover since you’ll need it later when you remove the depleted cartridge. Once it is removed, you can go ahead and insert the new toner cartridge into the printer.
Gently Shake Cartridge
If you’re getting ready to replace your toner cartridge, it’s important to prepare it properly to ensure the best possible print quality. Before you install the new cartridge, gently shake it to distribute the toner evenly throughout the cartridge. This helps to prevent streaks, blank spots, and other printing issues that can occur when the toner is not evenly distributed.
You can shake the cartridge back and forth a few times to ensure that the toner is evenly distributed. Once you’ve shaken the cartridge, you can install it into your printer and start printing. By taking this simple step, you’ll be able to enjoy high-quality prints every time without any frustrating printing issues.
So next time you’re replacing your toner cartridge, don’t forget to give it a gentle shake before installing it in your printer.
Peel Off Protective Tape
When replacing a toner cartridge in your printer, one of the most important steps is to properly prepare the new cartridge before installation. This includes peeling off the protective tape that covers the toner cartridge’s contact points. This tape helps to preserve the toner’s quality and prevent leaks during shipping and storage.
To remove the protective tape, locate the tab on the side of the cartridge and gently pull it away from the cartridge. Be careful not to touch the contact points with your fingers, as oils from your skin can interfere with the cartridge’s performance. Once the tape has been removed, the toner cartridge is now ready for installation into your printer.
Remember to also properly dispose of the used cartridge in accordance with your local recycling guidelines. By properly preparing your new toner cartridge, you can ensure that your printer will produce high-quality prints with no issues.
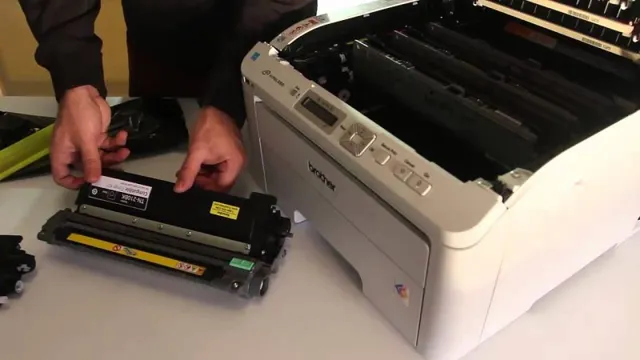
Install New Toner Cartridge
If you own a Brother printer, replacing the toner cartridge is a task you’ll need to do at some point. It’s a quick and easy process that won’t take much time, but it’s important to do it correctly to ensure the best quality prints. Firstly, turn off the printer and open the front cover to access the toner cartridges.
Next, remove the current toner cartridge by gently pulling it out of the machine. Grasp the new toner cartridge and gently shake it from side to side to allow the toner to distribute evenly. Remove the plastic protective cover from the new toner cartridge and insert it into the printer until it clicks into place.
Once the unit is installed, close the front cover and turn the printer back on. Your Brother printer is now ready to print high-quality documents with your new toner cartridge. As you can see, replacing the toner in a Brother printer is straightforward, and it’s something everyone can do.
Insert Cartridge Into Slot
If you’re experiencing a decline in print quality from your printer, there’s a good chance you need to install a new toner cartridge. Replacing the toner cartridge is a simple process that can be done easily and quickly. First, turn off the printer and disconnect it from the power source.
Next, open the printer’s cartridge compartment and remove the old cartridge. Carefully unpack the new cartridge and shake it gently from side to side to ensure even distribution. Then, insert the cartridge into the designated slot, making sure it’s securely in place.
Finally, close the compartment and turn the printer back on. The printer should recognize the new cartridge and be ready to print again. Remember to dispose of the old cartridge appropriately and don’t hesitate to contact customer support for further assistance.
By following these steps, you’ll have a smoothly running printer in no time.
Lock Cartridge In Place
Installing a new toner cartridge is a simple process, but it’s essential to take care when doing it. Once you’ve got the new cartridge ready, it’s time to lock it in place securely. To do this, locate the cartridge’s opening on your printer, usually located at the top or the side.
Gently slide the cartridge into the socket, being careful not to force it. If it doesn’t insert easily, try reversing the cartridge and trying again. Once the toner cartridge is inserted, lock it in place by pushing it firmly until you hear a snap.
This means the cartridge is firmly attached, and you can start printing again. By installing the toner cartridge correctly, you will get the most out of your printer and avoid any potential damage or errors. So take time when installing your new toner cartridge and follow these steps carefully.
Test Print and Troubleshooting
If you own a Brother printer, then you know how important it is to replace the toner regularly to maintain the best quality prints. To replace the toner in a Brother printer, start by opening the printer’s front cover and pressing down on the blue lock lever to release the toner cartridge. Carefully remove the empty cartridge and discard it according to your local recycling guidelines.
Next, remove the new toner cartridge from its packaging and gently shake it from side to side to distribute the toner evenly. Now, insert the new cartridge into the printer and press firmly until you hear a click. Finally, close the front cover and print a test page to ensure that the toner is properly installed and your printer is functioning smoothly.
If you experience any issues, refer to your printer’s troubleshooting guide or contact Brother customer support for assistance. By following these simple steps, you can easily replace the toner in your Brother printer and keep your machine running smoothly for many more prints to come!
Conclusion
Replacing the toner in a Brother printer is like changing the batteries in a flashlight – it may seem daunting at first, but with a little bit of know-how, you’ll be shining bright in no time. So don’t let that blinking indicator light give you the blues – follow these steps and show that printer who’s boss!”
FAQs
What is the process of replacing the toner in a Brother printer?
The process of replacing the toner in a Brother printer varies depending on the model but generally involves opening the printer cover, locating the toner cartridge, removing it from the printer, and inserting the new one. It’s important to refer to your printer’s manual for specific instructions.
How do I know when it’s time to replace the toner in my Brother printer?
The easiest way to know when it’s time to replace the toner in a Brother printer is when you start to notice that the print quality is decreasing or there are streaks and lines appearing on your printed pages. Additionally, some printers have a low toner warning indicator that will alert you when it’s time to replace the cartridge.
Can I use third-party toner cartridges in my Brother printer?
While it may be tempting to use third-party toner cartridges because they are often cheaper, it’s not recommended by Brother as they can potentially damage the printer and void the warranty. It’s better to use genuine Brother toner cartridges for the best performance and longevity of your printer.
Are there any precautions I should take when handling toner cartridges during the replacement process?
Yes, handling toner cartridges can be messy and potentially harmful as the toner powder is harmful if inhaled or ingested. It’s recommended to wear gloves and a mask when replacing toner cartridges, and to carefully follow the instructions provided in the manual to avoid spilling toner powder or damaging the cartridge. Be sure to dispose of the used cartridge properly according to your local regulations.