
Have you ever struggled to open the top cover of your HP printer? Whether you need to replace ink cartridges or clear a paper jam, opening the top cover is a crucial step in many printer maintenance tasks. However, it can sometimes be tricky to figure out how to open the cover without breaking anything. In this step-by-step guide, we’ll explore the easiest and safest way to open an HP printer top cover, so you can confidently perform any necessary maintenance tasks without fear of damaging your printer.
By the end of this guide, you’ll be a pro at opening your HP printer top cover, and you’ll wonder how you ever managed without these simple yet effective tips. So, grab your HP printer and let’s get started!
Check Your Printer Model
If you’re looking to open the top cover of your HP printer, the first thing you should do is check your printer model. Different models have different ways of opening the top cover, so it’s important to make sure you’re following the right instructions. Once you know your printer model, the process should be relatively straightforward.
In most cases, all you need to do is locate the tabs or clips that hold the top cover in place and gently release them. Some printers may require you to press a specific button or lever to release the top cover. It’s important to be gentle when opening the cover, as you don’t want to damage any of the components inside.
With a little bit of patience and care, you should be able to open the top cover of your HP printer without any issues.
Ensure your printer has a top cover that can be opened.
When looking for a printer, it’s important to ensure it has a top cover that can be opened. This allows you to easily change ink cartridges, clear jams, and perform routine maintenance without having to reach inside the printer. Be sure to check your printer model to ensure it has this feature as some printers may have a fixed top cover that cannot be opened.
This simple feature can save you time and frustration in the long run, making it easier to keep your printer running smoothly. So next time you’re shopping for a printer, don’t forget to check for a top cover that can be opened to make your life easier.
Turn off Printer
If you are wondering how to open the top cover of your HP printer, you’re in luck as it is a simple process. Firstly, turn off your printer and disconnect any cables from it to avoid any electric shock. Locate the small button or latch at the top of the printer near the cover.
Press this button or lift the latch to release the cover and gently lift it open. Some printers may have additional locks that need to be disengaged before the cover can be opened. Always consult your printer’s user manual for any specific instructions.
Once you have access to the top cover, you can easily replace or clean the printhead or cartridges. Remember to always handle your printer with care and use caution when opening any parts.
Make sure the printer is switched off and disconnected from any power source.
As obvious as it may seem, one of the critical steps you need to undertake before attempting any maintenance procedures on your printer is to switch it off and disconnect it from any power source. This step is essential in ensuring your safety while carrying out the maintenance activities. Leaving the printer connected to a power source exposes you to potential electrical hazards, and it can also damage your printer if a power surge occurs.
Additionally, switching off the printer before opening it up to look for faulty parts protects it from further damage. It also helps prevent any accidental spills that could occur due to printer ink and could lead to a permanent stain on your carpets or furniture. So, before you start troubleshooting your printer, always remember to turn it off and disconnect it from the power source.
Locate the Top Cover
If you’re wondering how to open the top cover of your HP printer, you’re in the right place. The first step is to locate the top cover. Depending on your model of printer, you may need to refer to the user manual or check online for instructions on how to locate it.
Once you’ve located the cover, you’ll need to lift it up to access the interior of your printer. This is handy for changing ink cartridges, performing routine maintenance, or troubleshooting any issues that might arise. Just be sure to follow proper safety precautions, such as turning off the printer and unplugging it before attempting to open the top cover.
With a little practice, you’ll find that opening your HP printer’s top cover is a quick and easy process that can be done in just a few simple steps. So don’t be afraid to get in there and take a closer look at your printer’s inner workings!
Identify the place where the top cover is located.
The first step in removing or accessing the inner components of your device is locating the top cover. The top cover is generally found at the uppermost part of your device and can either be screwed into place or locked in with clips. Some devices have top covers that are made of plastic while others are made with metal.
To locate the top cover, look at the device’s manual for instructions or try following any visible arrows or marks that could guide you towards it. Once you have located it, you can remove the screws or clips that hold it in place and access the components of your device. It’s important to note that not all devices have a removable top cover, so make sure to double-check before proceeding.
Overall, identifying the top cover is an essential first step in gaining access to the inner workings of your device.
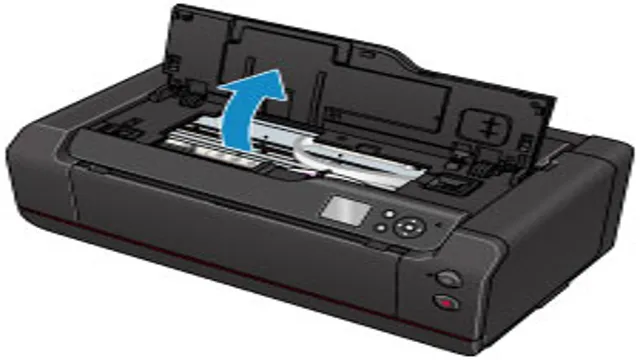
Open the Top Cover
If you’re wondering how to open the top cover of your HP printer, don’t worry – it’s a lot simpler than you might think! The first step is to locate the top cover of your printer – usually, it’s the part that lifts up to reveal the ink cartridges or toner. Once you’ve found it, there should be a small tab or button near the back that you can press or pull to release the cover. Depending on the model of your printer, you might need to hold down the button or slide the tab over to fully open the cover.
Make sure to lift the cover gently and support it with your other hand, as it may be heavy or have delicate components inside. Once the cover is open, you’ll have access to the inside of your printer and be able to replace cartridges, clear out paper jams, or perform any other necessary maintenance. So if you’re ever in need of opening up your printer’s top cover, just remember to locate the release button or tab and handle the cover with care!
Gently lift the cover upwards until it opens.
Opening the top cover of a device may seem like a simple task, but it is important to do it correctly to avoid any damage to the mechanism. First, you need to locate the top cover and make sure the device is turned off. Then, grasp the cover firmly and gently lift it upwards until it opens.
Be cautious not to use too much force, as this may break or damage the hinges. Once you have successfully opened the top cover, you will have access to the internal components of the device. This is useful if you need to clean, repair or upgrade the device.
By following these simple steps, you can easily open the top cover of your device without any issues.
Close the Top Cover
If you’re wondering how to open the top cover of an HP printer, don’t worry, it’s actually quite simple. To start, locate the top cover of the printer and gently push down on it until you hear a clicking sound. This means that the cover is now unlocked and ready to be lifted.
Before you lift the cover, it’s important to make sure that all of your printing tasks are complete, since lifting the cover will interrupt any ongoing jobs. Once you’ve ensured that there are no more printing tasks in progress, grasp the top cover on both sides and lift it up and away from the printer. This will give you access to the inside of the printer, allowing you to remove or replace ink cartridges, clear paper jams, or perform other maintenance tasks.
When you’re finished, simply lower the top cover back down onto the printer until it clicks into place. That’s it! With just a few simple steps, you can easily open and close the top cover of your HP printer.
Lower the top cover until it snaps back into place.
Closing the top cover is a crucial step in using a device that has a removable cover. The top cover protects the internal components of the device from dust and other harmful particles that may cause damage to the device. It also keeps the device looking neat and attractive.
So, after you have carried out any maintenance activity that requires you to remove the top cover, you must ensure that you properly close it. To do that, lower the top cover until it snaps back into place. That snap sound indicates that the cover is firmly in place and won’t accidentally open or become loose.
By closing the top cover correctly, you’re guaranteeing that the device will function correctly, and you’re keeping it looking good and well maintained. So, always make sure that you take the time to properly close the top cover after any maintenance activity.
Turn on Printer
If you’re wondering how to open the top cover of your HP printer, don’t worry – it’s easier than you might think! To turn on your printer, simply locate the power button on the front panel of the printer and press it. Once the printer is on, you can go ahead and lift the top cover to access the cartridges or paper tray, depending on your printer model. It’s important to note that you should only open the top cover when the printer is powered on and not in the middle of a printing job, as this can cause damage to the printer or your documents.
Taking care to properly handle your printer will help ensure that it lasts for years to come and continues to provide high-quality prints for all of your needs. So, whether you’re printing out a report for work or a fun photo for your family scrapbook, simply turn on your HP printer and you’re good to go!
Connect to the power source and switch the printer back on.
When experiencing issues with your printer, one of the first things to try is turning it off and on again. To do this, you’ll need to connect your printer to a power source and switch it back on. This may seem like a simple solution, but it can often rectify common printing problems.
A printer that won’t turn on may have a lack of power, so it’s important to ensure it’s connected to a working outlet. Once it’s connected, press the power button to switch it on and wait for it to finish its startup process. If the printer still isn’t functioning correctly, it’s worth consulting the user manual or contacting technical support for further troubleshooting.
By turning your printer off and on again, you can often resolve issues and get back to printing with minimal fuss. Just remember to perform regular maintenance tasks, like cleaning the ink cartridges and paper feed rollers, to keep your printer in top condition.
Conclusion
After navigating the twists and turns of your trusty HP printer, cracking open the top cover may seem like an insurmountable feat. But fear not, intrepid printer owners, for with a little finesse and perhaps a gentle coaxing, the inner workings of your device will be exposed and ready for tinkering. So take a deep breath, focus your printer prowess, and get ready to crack open that top cover like a tech-savvy detective breaking into a case.
“
FAQs
What are the steps to open the top cover of an HP printer?
Firstly, turn off the printer and unplug it. Then, locate the top cover and look for the release button or lever. Press or lift it to release the top cover. Gently lift the top cover and it should open easily.
Why is it important to open the top cover of an HP printer?
Opening the top cover of an HP printer provides access to the ink cartridges, which can be replaced or cleaned. It also allows for the removal of any paper jams that may be affecting the printer.
What do I do if I am unable to open the top cover of my HP printer?
If you are unable to open the top cover of your HP printer, ensure that the printer is turned off and unplugged. Then, check the user manual or online guides for specific instructions on opening the top cover. If the issue persists, seek technical assistance.
Can I open the top cover of my HP printer while it is printing?
No, you should never attempt to open the top cover of an HP printer while it is printing. This can cause damage to the printer, injure the user, or interfere with the printing process. Always wait until the printer is turned off and unplugged before opening the top cover.