
Have you recently upgraded your WiFi setup and are looking for a way to connect your new antenna to your motherboard? Then look no further, as in this blog, we’ll be discussing all the ins and outs of connecting a WiFi antenna to your motherboard. Firstly, acquiring an antenna that is compatible with your motherboard is crucial. Be sure to check the specifications of both the antenna and motherboard to ensure that they are compatible and have a fitting connector.
Once you have the correct equipment, it’s time to connect them. Depending on the antenna, you may need to attach an adapter to make it compatible with your motherboard. Once this is done, simply plug the antenna into the designated WiFi port on your motherboard.
It’s essential to remember to install the necessary drivers for the antenna to function correctly. These can usually be found on the manufacturer’s website or included in the packaging that the antenna came in. Connecting your WiFi antenna to your motherboard may seem like a daunting task, but with some careful research and the right equipment, it’s a straightforward process that can significantly increase your internet speed and stability.
Check compatibility and choose appropriate antenna
If you’re looking to connect a wifi antenna to your motherboard, there are a few steps you’ll need to take to ensure compatibility. First, you’ll want to check the type of connector on your motherboard. Most wifi antennas use either an RP-SMA or U.
FL connector, so you’ll need to make sure that your motherboard has a matching connector type. Additionally, you’ll want to choose an antenna that is appropriate for your specific use case. This may vary depending on factors such as the distance between your device and the wifi source, as well as the type of wifi signal you’re connecting to.
By taking the time to check compatibility and choose an appropriate antenna, you can ensure that you get the best possible wifi signal for your needs.
Research motherboard and antenna specifications
When it comes to building a new computer, choosing the right antennas can make all the difference in ensuring optimal connectivity. To choose the right antennas, it’s important to research the motherboard and antenna specifications to ensure compatibility. Look for antennas that are compatible with your motherboard’s Wi-Fi and Bluetooth capabilities, as well as the frequency bands they support.
For example, some motherboards only support 4GHz Wi-Fi bands, while others support both 4GHz and 5GHz bands.
It’s also important to consider the type of antenna, such as omnidirectional or directional, and their gain levels. Higher gain antennas can offer better signal strength but may not be necessary in all situations. By doing your research and choosing the appropriate antennas, you can ensure optimal wireless connectivity for your computer.
Select antenna type that matches motherboard connector
When it comes to selecting the right antenna for your motherboard, it’s crucial to check the compatibility and choose the appropriate one. Not all antennas will work with all motherboards, so it’s essential to ensure a perfect match. One of the first things to consider is the connector type on your motherboard.
It’s essential to choose an antenna with a connector that matches your motherboard to avoid any compatibility issues. The antenna connector can either be a male or a female type, depending on the motherboard, so it’s crucial to verify this before making a purchase. Furthermore, antennas come in various shapes and sizes, and some motherboards have limited space for antennas.
So, before selecting an antenna, make sure to measure the available space in your system to avoid any space-related issues. By ensuring compatibility and choosing the appropriate antenna, you can improve your system’s overall performance and signal strength.
Insert antenna into motherboard
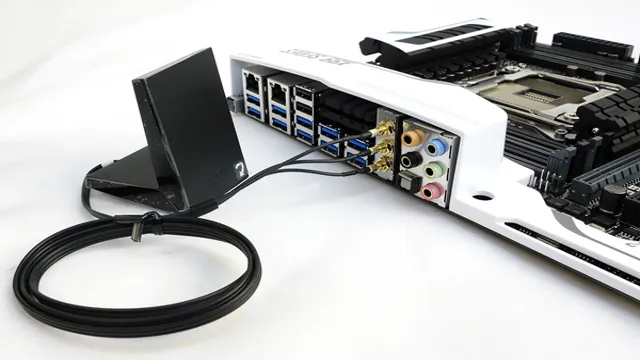
Connecting a WiFi antenna to your motherboard is crucial if you want to enjoy high-speed internet without any interruptions. The process is fairly simple, and you don’t need to be a tech expert to do it. First, identify the antenna connector on your motherboard.
It is usually located near the back I/O ports or near the PCIe slots. Once located, remove the cover and gently insert the antenna into the connector. Most antennas come with a screw-on mechanism that secures the antenna in place, so make sure you tighten it properly.
It’s always good to inspect the connection and ensure that everything is tightened correctly. Once connected, make sure you fix the antenna in a position that provides the best signal strength. In conclusion, connecting a WiFi antenna to your motherboard isn’t complicated, and it’s a must-do if you want seamless wireless internet connectivity.
Locate antenna headers on motherboard
When setting up a PC, it’s important to locate the antenna headers on the motherboard to ensure proper connectivity. These headers can typically be found near the edge of the board and are labeled as such. Once you’ve located the headers, it’s time to insert the antenna.
Carefully align the connector with the header and apply gentle pressure until it clicks into place. Be sure not to use too much force or you could damage the motherboard or antenna. With the antenna securely in place, you should be able to enjoy strong, reliable wireless connectivity.
So, if you’re experiencing spotty or slow internet, double-check your antenna connection and make sure it’s properly inserted into the motherboard antenna headers.
Securely attach antenna to the connector
When it comes to setting up your motherboard, it’s essential to ensure that the antenna is securely attached to the connector. Before inserting the antenna, make sure that the connector is clean and free of any debris. Once that’s done, align the antenna with the connector and gently push it in until it clicks into place.
It’s crucial to note that not all antennas are created equal. The type of antenna you choose will depend on the type of motherboard you have and the frequency band that you want to use. If you’re unsure which antenna is right for you, consult the manufacturer’s instructions or do some online research.
When inserting the antenna, try to avoid applying too much pressure as this could damage the connector or the antenna itself. If you encounter any resistance, stop and double-check that you have aligned the antenna correctly. In conclusion, attaching the antenna to the motherboard is a simple process that requires careful attention to detail.
By taking your time and following the instructions, you can ensure that your antenna is securely attached and ready to transmit and receive data at high speeds.
Test the connection
If you’re looking to connect a WiFi antenna to your motherboard, it’s important to first identify the correct port. This will typically be a small, gold-colored port labeled “WiFi” or “Antenna” on your motherboard. Once you’ve found the port, connect the antenna cable to it and attach the other end to your antenna.
Make sure to fasten the antenna securely in place to prevent any unwanted disconnections. To test the connection, access your computer’s network settings and look for any available WiFi networks. If you see networks listed, try connecting to one to confirm that the antenna is properly connected and working.
With this simple process, you’ll be able to get your antenna up and running in no time, and enjoy all the benefits of a strong and stable WiFi connection!
Ensure network adapter driver is installed and up to date
When troubleshooting a network connection issue, it’s important to ensure that the network adapter driver is installed and up to date. This small piece of software acts as a bridge between your network hardware and your operating system, so if it’s outdated or missing, you may experience issues with your internet connection. To check if your driver is up to date, simply go to your device manager and look for any yellow exclamation points next to your network adapter.
If you see one, right-click on the adapter and select “Update Driver” to ensure you have the latest version. Additionally, you can test your connection by running a network diagnostics tool, which can help identify any issues with your adapter or connection settings. By taking these simple steps, you can quickly diagnose and resolve network connection issues, ensuring that you can stay connected to the internet without any interruptions.
Confirm network connection on device
In today’s digital world, having a reliable network connection is essential. Whether you’re browsing the web, streaming movies, or gaming online, a stable internet connection can make all the difference. However, even the most advanced devices can experience connectivity issues at times.
That’s where the importance of confirming your network connection comes in. Simply put, testing your connection ensures that your device can establish a successful connection to your network and enjoy seamless internet access. To confirm your network connection, you can start by checking your device’s settings.
Most devices come with a dedicated network settings menu that allows you to view your connection status and troubleshoot any issues. You can also try resetting your device’s network settings and reconnecting to your network to eliminate any potential glitches. It’s also essential to ensure that your device is within range of your network’s Wi-Fi signal.
Walls, obstacles, and thick materials can interfere with your network’s signal strength, making it challenging for your device to establish a reliable connection. By positioning your device closer to your router, you can improve signal strength and enjoy faster internet speeds. In conclusion, confirming your network connection on your device is crucial for reliable and seamless internet access.
By testing your connection, updating your device’s settings, and ensuring a strong Wi-Fi signal, you can avoid connectivity issues and enjoy a better online experience. So, don’t hesitate to check your network connection today and stay connected all day, every day!
Final tips & troubleshooting
Connecting a wifi antenna to your motherboard can be a great way to improve your internet connection. To do so, first, you need to ensure that your motherboard has a wifi antenna port. Once confirmed, you can connect the wifi antenna to your motherboard by locating the ports and attaching them.
Make sure to follow the manufacturer’s instructions when connecting the antenna. Additionally, ensure that your wifi adapter drivers are up to date, and you’ve connected the antenna correctly. If you experience issues, check to make sure that the antenna is compatible with your motherboard or try troubleshooting by restarting your computer or checking for any loose connections.
And that’s how you can successfully connect a wifi antenna to your motherboard.
Ensure antenna is visible and with no obstructions
When it comes to ensuring clear transmission of radio signals, having an unobstructed, visible antenna is key. While it may seem straightforward, there are a few things to keep in mind to ensure optimal performance. First, make sure that the antenna is positioned vertically – if it’s leaning to the side, it can cause issues with signal strength and quality.
Additionally, keep the antenna away from any metal objects or other obstructions that could interfere with the signal. For example, if you’re using a handheld radio, don’t hold it near your body or lean it against a metal surface. Finally, if you’re experiencing issues with a weak signal or poor audio quality, double-check the position of the antenna.
You may need to adjust it slightly to find the optimal angle for clear communication. By keeping these tips in mind, you can help ensure that your radio signals are clear and reliable, no matter where you are.
Try resetting the router and modem or rebooting the computer
If you’re experiencing internet connectivity issues, one of the simplest and most effective troubleshooting tips is to try resetting your router and modem or rebooting your computer. Sometimes, these devices just need to be refreshed to get things back up and running. To reset your router and modem, simply unplug them from the power source, wait a few moments, and then plug them back in.
If you’re rebooting your computer, make sure to save any important files or documents before shutting it down. Once it’s off, wait a few moments and then power it back on. This often solves the problem and gets you back to browsing the web, streaming movies, or whatever else you need to do.
So, the next time you’re faced with internet troubles, remember to give these simple troubleshooting tips a try and see if they do the trick!
Conclusion
In conclusion, connecting a WiFi antenna to your motherboard may seem daunting at first, but with the right tools and a little bit of know-how, it’s actually quite simple. Just remember to carefully follow the instructions and secure all connections tightly. And if all else fails, just channel your inner MacGyver and improvise with some aluminum foil and duct tape.
Happy surfing!”
FAQs
What tools are required to connect a WiFi antenna to a motherboard?
In order to connect a WiFi antenna to a motherboard, you will typically need a screwdriver and possibly pliers or wire strippers depending on the type of antenna and connector being used.
How do I determine where to connect my WiFi antenna on my motherboard?
The location of the WiFi antenna connector can vary depending on the specific motherboard model, so it is recommended to consult your motherboard manual or manufacturer’s website for guidance.
Can any type of WiFi antenna be connected to any motherboard?
Generally speaking, most WiFi antennas will have a standard connector that should be compatible with most motherboards. However, it is always best to double check the compatibility before purchasing or attempting to install the antenna.
Is it necessary to use a particular type of WiFi antenna for optimal performance?
While any compatible WiFi antenna should technically work with a motherboard, using an antenna that is designed specifically for the intended purpose (e.g. gaming, streaming, long-range connectivity) may provide better performance and range.