
Is your computer acting up? Does it seem slower than usual? If so, it may be time to clean your motherboard. The motherboard is the brain of your computer, and it can become clogged with dust, dirt, and debris over time, which can cause it to run less efficiently. Don’t worry, though, cleaning your motherboard may sound intimidating, but it’s actually relatively simple.
In this blog, we’ll go over the steps on how to clean your motherboard, including what tools you’ll need and some tips to ensure that you don’t damage your computer. By the end of this article, you’ll have a clean motherboard and a faster, more efficient computer. So, grab a can of compressed air and let’s get started!
Gather Your Cleaning Supplies
When it comes to cleaning your motherboard, the first step is to gather all the necessary supplies. You’ll need a can of compressed air, rubbing alcohol, a microfiber cloth, and a small brush. Make sure to disconnect all cables and remove the motherboard from the computer case before starting.
Begin by using compressed air to blow any loose dust or debris from the motherboard’s surface. Then, use a small brush to gently remove any remaining debris from between the crevices. Next, dampen the microfiber cloth with rubbing alcohol and gently wipe down the motherboard’s surface.
Use a q-tip soaked in rubbing alcohol to clean any hard-to-reach areas. It’s important to be gentle during this process to avoid damaging any delicate components. By following these steps, you can effectively clean your motherboard and ensure optimal performance for your computer system.
Rubbing alcohol, cotton swabs, compressed air
When it comes to cleaning your electronic devices, it’s important to have the right supplies on hand. One of the best tools for cleaning is rubbing alcohol. This versatile substance can be used to sanitize your device without leaving any unsightly residue behind.
To apply it, simply dampen a cotton swab with the rubbing alcohol and gently wipe down the surface of your device. But before you start cleaning with rubbing alcohol, it’s worth noting that compressed air can also be a valuable tool. This type of air is compressed into a canister and is perfect for blowing away dust and debris from your device’s crevices.
It’s gentle enough that it won’t damage your device, yet strong enough to remove stubborn dirt. When gathering your cleaning supplies, it’s important to make sure you have these tools on hand. Whether you’re preparing to clean your laptop, smartphone, or any other electronic device, rubbing alcohol and compressed air can help you get the job done quickly and effectively.
So next time you’re looking to give your electronics a good clean, make sure you have these items in your toolkit.
Prepare Your Workspace
Cleaning your motherboard can be a tricky task, but with the right preparation, it can be done quickly and efficiently. First, make sure that your workspace is clear of any debris or dust that could interfere with your cleaning process. It’s also important to ensure that the area is well-ventilated to prevent the buildup of any harmful fumes or particles.
Before starting, unplug your computer and remove any peripherals or components that may be connected to the motherboard. Next, gently remove the motherboard from its housing and place it on a flat, clean surface. Use compressed air or a soft-bristled brush to remove any loose dust or debris on the surface of the motherboard.
Finally, you can use a specialized cleaning solution or isopropyl alcohol to remove any stubborn stains or buildup on the motherboard. Be sure to follow the instructions carefully, and never use water or harsh chemicals that could damage your components. With these steps, you can effectively clean your motherboard and ensure that your computer continues to function properly.
Unplug computer, ground yourself, remove components
When it comes to upgrading or repairing your computer, it’s important to first prepare your workspace. Begin by unplugging your computer from any power source to avoid any electrical mishaps. Then, ground yourself by touching a metal object to discharge any static electricity you may be carrying.
Finally, remove any components from your computer before beginning any work. Setting up your workspace properly and taking the necessary precautions can prevent damage to your computer and ensure a successful upgrade or repair. Grounding yourself may seem like a small step, but it can prevent electrostatic discharge from damaging sensitive computer components.
Removing components like the RAM or hard drive can also be beneficial as it can give you more space to work with and prevent any accidental damage. It’s important to keep in mind that every computer is different, and there may be specific instructions or steps needed for your particular model. Always refer to the manufacturer’s instructions or do thorough research before beginning any work on your computer.
Taking the time to properly set up your workspace and prepare for the task at hand can save you time and money in the long run, as well as ensure your computer is running at its best.
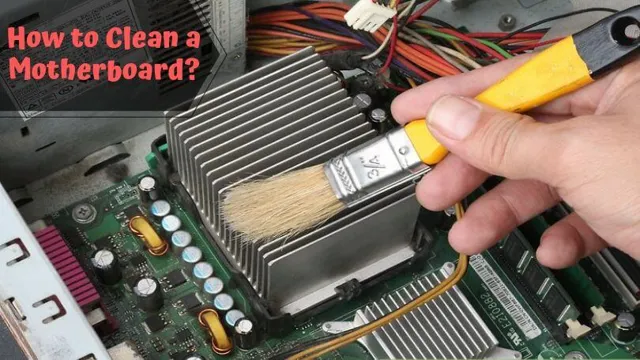
Clean the Motherboard
Cleaning the motherboard is an essential task that every computer owner should perform regularly. Over time, dust and other particles can accumulate on the motherboard’s surface, causing it to overheat and malfunction. To clean the motherboard, you’ll need to start by turning off and unplugging your computer, removing the side panel, and locating the motherboard.
Once you’ve found it, use a can of compressed air to blow away any loose debris and dust. Be sure to target the areas around the CPU and other components that tend to collect dust. You can also use a soft-bristled brush to gently clean off any remaining particles.
Avoid using water or cleaning solutions as they can damage the motherboard’s delicate components. Once you’ve finished cleaning, replace the side panel and power on your computer to ensure that everything is working correctly. By regularly cleaning your motherboard, you can extend the life of your computer and prevent costly repairs.
So, don’t neglect this vital task, and keep your system running smoothly!
Dip cotton swabs in rubbing alcohol and gently clean
When it comes to maintaining your computer, cleaning the motherboard is important to ensure its longevity and performance. Dust and debris can accumulate over time, leading to potential damage or malfunction. Dip cotton swabs in rubbing alcohol and gently clean the surface of the motherboard to remove any grime or dirt.
Rubbing alcohol is a great cleaner because it quickly evaporates and doesn’t leave any residue. When cleaning, be sure to avoid using too much force as it can damage the sensitive components on the motherboard. Additionally, it’s essential to ensure that the motherboard is dry before turning on the computer.
Taking these steps to clean your motherboard will help keep your computer running smoothly. Remember, a clean motherboard is a happy and healthy motherboard.
Use compressed air to remove debris and dust
When it comes to maintaining the health and performance of your computer, cleaning your motherboard is a crucial aspect that can’t be overlooked. Over time, dust and debris can accumulate on the motherboard, which can cause it to overheat and malfunction. To avoid this, it’s important to regularly clean the motherboard using compressed air.
This powerful tool helps to blow away any dust or debris that may be clogging up the motherboard’s components. It’s important to note that while compressed air can be effective at removing dust, it’s important to use caution to avoid damaging any delicate components on the motherboard. To do this, it’s best to use compressed air from a safe distance and aim it away from any sensitive areas or connectors.
By incorporating regular motherboard cleaning sessions into your computer maintenance routine, you can help to keep your computer running at its best for years to come. Remember, a little bit of preventative maintenance can go a long way in preventing bigger problems down the line. So don’t wait until it’s too late, grab some compressed air and get to cleaning!
Reassemble Your Computer
After thoroughly cleaning your motherboard, you will need to reassemble your computer. Begin by reinstalling any removed parts such as the CPU and RAM. Check the motherboard manual to ensure proper placement and alignment of these parts.
Then, reconnect all cables and wires, making sure everything is snug and secure. Finally, reattach the cover of your computer case and power it on to ensure everything is functioning properly. Cleaning your motherboard can be a daunting task, but taking time to clean it will improve your computer’s performance and prolong its life.
So, grab your cleaning supplies and get to work!
Replace components and plug in computer
Now that you have successfully replaced any components in your computer, it’s time to reassemble everything back together. Start by carefully placing the motherboard back into the case, making sure all screws are in place and secured. Connect all the necessary cables to the motherboard and plug in any additional components, such as the graphics card or sound card.
Don’t forget to screw these components tightly into place as well. Once everything is in the right place, place the side panel back onto the computer and screw it in place. Finally, plug in the power cord and turn on your computer to test everything out.
Are you nervous about turning your computer on after putting it back together? Don’t worry, take a deep breath and press that power button. It’s just like putting together a puzzle, and you’ve done a great job. Congratulations on reassembling your computer!
Additional Tips and Warnings
When it comes to cleaning your motherboard, there are a few additional tips and warnings you should keep in mind to ensure safe and effective cleaning. First and foremost, never attempt to clean a motherboard while it is still connected to power. This can result in serious damage to both you and your device.
When removing the motherboard for cleaning, be sure to label and properly store all cables and components to avoid confusion during reassembly. When cleaning the motherboard and its components, avoid using any harsh chemicals or abrasive materials that could cause damage. Instead, opt for a soft, lint-free cloth and a mild cleaning solution specifically designed for electronics.
Finally, be sure to take your time and be thorough in your cleaning, paying special attention to any hard-to-reach areas. By following these additional tips and taking caution, you can successfully clean your motherboard and ensure it continues to function properly.
Avoid liquid spills, don’t touch sensitive components
When it comes to using electronics, spills are always a risk, and they can be detrimental to your device. Liquid spills can cause irreparable damage to sensitive components, so it’s important to avoid them. Make sure you keep beverages and other liquids away from your electronics, especially if they’re open.
If a liquid spill does occur, turn off your device immediately and unplug it. If the spill was significant, you may need to take your device to a professional for repairs. In addition to avoiding spills, it’s also important to handle your electronics with care.
Don’t touch components that are sensitive or fragile, as this can cause damage or even break them. Avoid rough handling, and store your devices in a safe, dry place when not in use. By following these simple tips, you can help ensure the longevity and optimal performance of your electronics.
Conclusion
Cleaning your motherboard is like giving it a spa day – you want to make sure it’s pampered and rejuvenated to keep it running smoothly. Follow these simple steps to give your motherboard the TLC it deserves. And remember, a clean motherboard is a happy motherboard!”
FAQs
Why is it important to clean the motherboard?
It is important to clean the motherboard to prevent dust buildup and ensure proper functioning of all components.
Can I clean my motherboard with water?
No, water can damage the circuits on the motherboard. It is recommended to use a dry, soft cloth or compressed air for cleaning.
How often should I clean my motherboard?
It is recommended to clean your motherboard at least once every six months to prevent dust buildup and maintain proper functioning.
What is the best way to clean the motherboard?
The best way to clean the motherboard is to use a dry, soft cloth and carefully wipe away any dust or debris. Compressed air can also be used to blow away dust from hard to reach areas.