
If you’re the owner of a Brother printer, you’re probably accustomed to its efficient printing capabilities. However, every now and then, you’ll need to change out the ink toner in order to keep things running smoothly. While it might seem like a daunting task, it’s actually quite easy once you know the steps involved and have the proper tools on hand.
In this blog post, we’ll take a look at how to change ink toner in Brother Printer, step by step, so you can have your printer up and running in no time. Whether you’re a tech expert or a newbie, you’ll be able to follow along and complete this task with ease. So, let’s dive into it!
Check Printer Model and Toner Type
When it comes to changing the ink toner in your Brother printer, there are a few things to keep in mind. The first step is to check your printer model and the type of toner that it uses. Brother printers typically use either laser or inkjet toners, and each model may have a specific cartridge or drum unit that it requires.
Once you have identified the correct toner type, you can purchase a replacement cartridge and get ready to install it. Be sure to read the instructions carefully and follow the recommended steps for your specific printer model. With a little bit of know-how and some careful attention to detail, you can quickly and easily change the ink toner in your Brother printer and keep your printing running smoothly.
Locate the model number of your Brother Printer.
Brother Printer model number, Toner Type Are you having trouble finding the model number of your Brother Printer? Well, locating it is crucial if you need to order a specific toner for your device. Most Brother Printers have the model number printed on the front of the unit. Additionally, you can check the documentation that came with the printer or the box it came in.
If you can’t find the model number, you can also try checking the control panel of the device. Usually, the printer’s control panel will display the model number right after it boots up. Once you have found the model number, you can easily determine the appropriate toner type that your printer uses.
Brother Printers use different types of toners, depending on the model you have. It is essential to use the correct toner to keep your printer running smoothly and ensure high-quality printing. So, make sure to find your printer’s model number and check the toner type before placing an order.
Determine the type of toner the printer uses.
When it comes to replacing the toner cartridge in your printer, it’s essential to know exactly what type of toner your printer uses to avoid any compatibility issues. The first step in determining the type of toner your printer needs is to check the printer model and toner type. You can usually find this information by checking the user manual or doing a quick internet search using the printer’s model number.
Different printer models require different types of toner cartridges, and using the wrong one could result in poor print quality or damage to the printer. It’s also worth noting that some printers use proprietary toners that can only be purchased from the manufacturer, while others use third-party toners that are more affordable but may not always offer the same quality. By knowing exactly what type of toner your printer needs, you can ensure that you’re getting the best possible print quality and avoiding any potential compatibility issues.
Prepare the New Toner Cartridge
Changing an ink toner cartridge in a Brother printer is a straightforward process that anyone can do. First, gather the new toner cartridge and remove it from its packaging. Then, gently shake the cartridge several times to evenly distribute the toner inside.
Next, locate the cartridge slot on the printer and open it up to expose the old toner cartridge. Carefully remove it and set it aside. Now, take the new toner cartridge and remove any protective cover or seal.
Be sure to align the cartridge properly with the slot and gently push it in until you hear a click. Finally, close the cartridge slot and make sure it is securely locked in place. Congratulations! You have successfully changed the ink toner in your Brother printer and are ready to continue printing with high-quality results.
Remove the old toner cartridge from the printer.
When replacing the toner cartridge in your printer, it’s important to prepare the new one properly to ensure it works efficiently. To start, remove the old toner cartridge from the printer and set it aside. Next, take the new toner cartridge out of its packaging and give it a shake to distribute the toner evenly.
Then, remove any protective tape or seals from the cartridge. Be sure to carefully follow the instructions provided with your printer model to ensure proper installation. Additionally, it’s important to handle the cartridge carefully to avoid any damage that could impact the quality of your prints.
With a little preparation, your new toner cartridge will be ready to go and your printer will be back in business in no time. Remember, taking the time to properly prepare and install your new toner cartridge can help keep your printer running smoothly and extend its lifespan. Don’t let a simple cartridge replacement hold you up – follow these steps and get back to business!
Remove any protective packaging or seals from the new toner cartridge.
When it’s time to replace your printer’s toner cartridge, it’s important to prepare the new one properly. Before installing it into the printer, you must remove any protective packaging or seals from the new toner cartridge. This step is essential to ensure that the toner can fully dispense from the cartridge onto the paper.
Protective packaging or seals can block the toner from reaching the printer’s drum unit, which can cause printing issues or damage to the printer. To remove the protective packaging, carefully open the box and find the tab or sticker that secures the seal over the cartridge. Peel it off gently, making sure not to touch the toner or any sensitive parts of the cartridge.
Once you’ve removed the protective packaging, you can safely insert the new toner cartridge into your printer and start enjoying high-quality prints once again. Remember, taking extra care during the installation process will increase the lifespan of your printer and provide clear, crisp prints every time.
Ensure that the new toner cartridge is compatible with your printer model.
When it comes to replacing your printer’s toner cartridge, there are a few essential steps that you need to take to ensure its smooth functioning. Firstly, before you start preparing the new toner cartridge, make sure it’s compatible with your printer model. The best way to check compatibility is by cross-checking the cartridge’s product code and your printer’s model number.
Using incompatible cartridges could cause potential damage to your printer, and the toner might not work correctly, leading to print quality issues. Therefore, it’s crucial to double-check your printer’s manual or contact the manufacturer’s customer service to determine the right cartridge model for your printer. Once you’re confident that the cartridge is compatible, it’s time to prepare the cartridge by removing it from its packaging.
It’s essential to handle the cartridge carefully as rough handling could damage the drum or toner and affect print quality. Following these steps ensures that the replacement toner works in conjunction with your printer, providing top-notch print quality without any hiccups.
Install the New Toner Cartridge
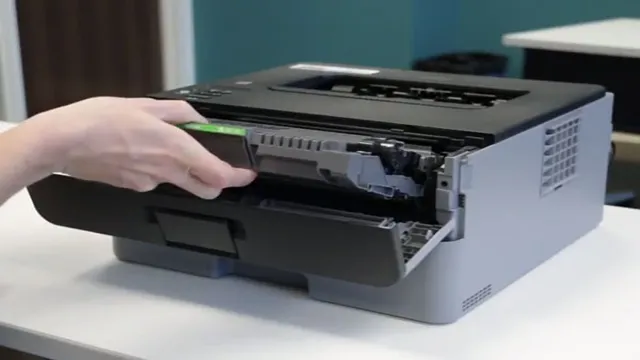
If you’re wondering how to change ink toner in your Brother printer, you’re in the right place. Replacing the toner cartridge is a straightforward process, and it will ensure that your printer continues to produce high-quality prints. To start, locate the toner compartment cover on your Brother printer and open it up.
Next, gently remove the old toner cartridge from the printer by pulling it straight out. Be sure to dispose of the old cartridge properly. Now, remove the new toner cartridge from its packaging and take off any protective tape or covers.
Align the cartridge with the tracks inside the printer and slide it in until it clicks into place. Finally, close the toner compartment cover and run a test print to make sure everything is working properly. With these simple steps, you’ll know exactly how to change ink toner in your Brother printer.
Open the printer’s top or front cover.
If you need to replace the toner cartridge in your printer, the first step is to open the top or front cover of the printer. This will give you access to the cartridges, allowing you to remove the old one and install the new one. Before you begin, it’s important to make sure you have the correct replacement cartridge for your printer.
Check the model number on the old cartridge or verify it in the printer manual. Once you have the correct cartridge, carefully remove it from the packaging, taking care not to touch the toner roller or other sensitive parts. Then, insert the new cartridge into the printer, making sure it clicks into place.
Finally, close the front or top cover, and the printer is ready to go. With a little practice, replacing your toner cartridge will become second nature, and you’ll be able to enjoy crisp, clear prints every time.
Insert the new toner cartridge into the printer.
When replacing the toner cartridge in your printer, it’s important to handle the new cartridge with care to avoid any damage to the unit. Begin by removing the packaging and any protective tabs or seals from the new toner cartridge. Next, locate the spot where the old cartridge was removed and gently insert the new cartridge, being careful not to force or shake it.
Once inserted, make sure the cartridge is securely in place and gently close any covers or doors on the printer. It’s important to note that not all toner cartridges are created equal, so be sure to use the specific cartridge recommended for your printer model to ensure optimal performance. By following these simple steps, you can easily install a new toner cartridge and get back to printing with ease.
Secure the toner cartridge in place.
When it comes to installing a new toner cartridge, the process may seem daunting at first, but it’s actually quite simple. One of the most important steps is to ensure that the cartridge is securely in place. To do this, you’ll need to locate the cartridge slot and align it properly with the printer.
Once aligned, gently insert the cartridge into the slot until it clicks into place. It’s essential to take care when doing this to avoid any damage to the cartridge or the printer. You also want to ensure that you’re using the right cartridge for your printer model, as different models require different cartridges.
This will ensure that you get the best possible results from your printer and that you don’t inadvertently cause any damage. So, the next time you’re installing a new toner cartridge in your printer, be sure to take your time and follow the instructions carefully to ensure a secure fit and optimal performance.
Test the Newly Installed Toner Cartridge
Congratulations on successfully changing the ink toner in your Brother printer! The next step is to test the newly installed toner cartridge to ensure that everything has been done correctly. To do this, turn on your printer, open the cover, and make sure that the toner is properly inserted and secured. Once you have confirmed this, run a test print to check the quality of the ink and make sure there are no error messages.
If your printout looks good and there are no problems, you can be sure that your new ink toner has been installed correctly. If you encounter any errors or issues, consult the printer manual for troubleshooting tips. Remember, regularly changing your ink toner is an important step in ensuring optimum performance and prolonging the life of your printer.
Print a test page to ensure that the new toner cartridge is properly installed.
When you install a new toner cartridge, it’s essential to test it before printing any important documents. This simple step will ensure that the cartridge is correctly installed and functioning correctly. To test the toner cartridge, go to your printer settings and look for the option to print a test page.
This page will offer a sneak peek at how the ink is distributed and whether any issues, like smudging or streaking, are evident. While printing a test page may seem like an unnecessary step, it can save you time, money, and frustration down the line. The last thing you want is to have to reprint a document because of toner issues.
So take a minute to test the new toner cartridge before diving into your printing needs. Remember to always use genuine toner cartridges, as knockoff versions may not produce the same quality results.
Conclusion
Changing ink toner in your Brother printer is a task that may seem daunting at first, but with a little patience and attention to detail, you’ll be swapping cartridges like a pro in no time. Just remember to check your user manual for specific instructions and to handle any spent cartridges with care. With a new toner in place, your printer can continue to produce high-quality prints and keep your office humming along.
So go ahead, take the plunge and swap that toner like the printer-savvy whiz you were always meant to be.”
FAQs
What is the process to change the ink toner in Brother printer?
First, open the printer cover and remove the old ink toner. Then, unpack and insert the new ink toner into the printer. Finally, close the cover and wait for the printer to recognize the new ink toner.
Can I refill the ink toner cartridge instead of buying a new one for Brother printer?
It’s not recommended to refill the ink toner cartridge as it may affect the printer’s performance and quality of prints. It’s better to purchase a new ink toner cartridge for Brother printer.
How can I check the ink level of the toner in Brother printer?
You can check the ink level of the toner in Brother printer through the control panel display or the printer software installed on your computer.
Why is it important to change the ink toner regularly in Brother printer?
Changing the ink toner regularly in Brother printer ensures that your prints are of good quality and eliminates the chances of smudging or streaking. It also prolongs the life of the printer by preventing damage caused by dried up ink toner.