
Is your Brother printer producing low-quality prints? It might be due to a dirty drum. Over time, dust, toner, and paper residue can accumulate on the drum of your printer, affecting the quality of your prints. And when you don’t clean your printer drum regularly, it can cause long-term damage to your printer’s functioning, resulting in expensive repairs or even the need for a replacement.
Cleaning your Brother printer drum is a simple and inexpensive way to maintain your printer’s performance and keep your prints looking their best. It may seem like a daunting task, but with a few tools and some easy steps, you can get your printer drum looking as good as new. In this guide, we’ll take you through the process of cleaning your Brother printer drum, from start to finish.
So, grab your cleaning supplies, and let’s get started!
Why Clean Your Drum?
Cleaning your Brother printer drum is an important task that can often be overlooked. Over time, the drum can collect dirt, dust, and other debris that can cause the printing quality to deteriorate. This can result in blotchy, faded, or even completely missing portions of text and images on your printed documents.
Not only can this be frustrating, but it can also negatively impact your business or personal reputation. By regularly cleaning your Brother printer drum, you can ensure that your prints are always of high quality and that your printer is functioning efficiently. It’s a simple process that can save you time and money in the long run.
So, why not take a few minutes to clean your drum today? Your printer (and your sanity) will thank you.
Improved Print Quality
Have you ever experienced degraded print quality? Faint prints, smudges, or streaks? The culprit behind these issues might be a dirty drum. The drum unit plays a crucial role in the image formation process and requires regular cleaning to maintain its efficiency. Debris, toner dust, and paper particles can accumulate on the surface of the drum, leading to poor print quality.
Cleaning the drum with a lint-free cloth and alcohol-based cleaner can dramatically improve print quality. It’s important to note that cleaning the drum should be done cautiously as it is a delicate component, and harsh chemicals or rough materials can damage it. By incorporating regular drum cleaning in your routine maintenance, you can avoid print quality problems and prolong the life of your printer.
Extend Drum Life
Cleaning your drum is essential for extending its lifespan and maintaining optimal performance. Over time, dirt, dust, and debris can build up inside your drum, causing it to wear down faster than it should. In addition, the presence of contaminants can result in poor sound quality and unresponsive drum heads, leading to frustration and disappointment for the player.
While it may seem like a hassle to clean your drum regularly, doing so can save you time and money in the long run by reducing the need for repairs and replacement. So, why take the risk? Invest in the maintenance of your drum today by cleaning it regularly and give yourself the best possible playing experience.
Gather Supplies
Cleaning your Brother printer drum is an essential task that can help ensure the longevity of your printer. Before starting the cleaning process, you’ll need to gather some supplies. First and foremost, you’ll need a lint-free cloth to wipe down the drum.
You’ll also need some rubbing alcohol and a cotton swab to remove any stubborn ink stains. It’s a good idea to have a pair of gloves on hand so you don’t transfer any oil or debris from your hands onto the drum. Finally, you’ll need a vacuum cleaner with a brush attachment to remove any loose toner or dust that may have accumulated in the printer.
By gathering these supplies before beginning the cleaning process, you’ll be well-prepared to give your printer drum the care it needs to run smoothly and efficiently for years to come.
Cotton Swabs or Cloth
When it comes to cleaning up messes, using the right tools is essential. That’s why before you begin, you’ll need to gather your supplies. One common question people have is whether to use cotton swabs or cloth.
While both have their uses, it’s important to know when to use each one. Cotton swabs are great for reaching tight spaces and getting into small crevices. They’re also perfect for removing tough stains and dirt.
However, they may not be the best choice for larger messes, as they are fairly small and can only clean a small surface area at once. Cloth, on the other hand, is ideal for cleaning up larger spills and messes. It can hold more liquid and is great for wiping down surfaces.
Additionally, cloth can be reused, unlike cotton swabs. Ultimately, it’s important to have both on hand and know when to use each one.
Rubbing Alcohol
Rubbing alcohol is a common household item that can be used for a range of purposes. To gather supplies, you’ll need a bottle of rubbing alcohol, cotton balls or swabs, and towels or tissues. When choosing rubbing alcohol, it’s important to look for a product that contains at least 70% isopropyl alcohol, which is the active ingredient that kills germs and bacteria.
Cotton balls or swabs can be used to apply the rubbing alcohol to surfaces or skin, and towels or tissues can be used to wipe away any excess liquid. Whether you’re using rubbing alcohol to disinfect surfaces in your home or clean wounds on your body, it’s important to always use it safely and follow the instructions on the label. By keeping these supplies on hand, you can always be prepared for any situation that may require the use of rubbing alcohol.
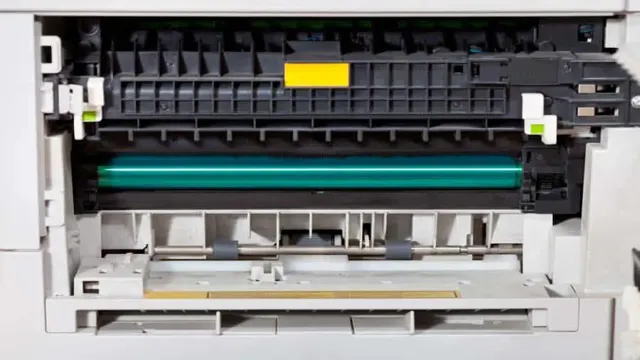
Clean the Drum
One important aspect of maintaining your Brother printer is cleaning the drum regularly. The drum unit is responsible for transferring toner from the cartridge onto the paper to create your prints. As such, it can accumulate residue and debris over time, affecting the quality of your prints and potentially causing damage to your printer.
To clean the drum, start by turning off the printer and unplugging it from the power source. Next, locate the drum unit and remove it from the printer. Gently clean the drum with a soft, lint-free cloth or special cleaning wipes designed for printers, taking care not to scratch the surface.
Avoid touching the drum with your hands, as oils from your skin can damage the surface. Once you’ve cleaned the drum, carefully reinstall it into your printer and turn it back on. By taking the time to clean the drum regularly, you can ensure your Brother printer continues to produce high-quality prints and lasts for years to come.
Remove Toner
Removing toner is a crucial step in maintaining your printer’s drum. A dirty drum can lead to poor print quality and even damage to the printer itself. Fortunately, cleaning the drum is a simple task.
To start, turn off the printer and unplug it. Open the printer’s toner compartment and carefully remove the toner cartridge. Using a lint-free cloth, gently wipe away any excess toner or debris from the drum.
Be sure to avoid touching the drum with your fingers as this can leave fingerprints which can cause print quality issues. Once you have cleaned the drum, carefully replace the toner cartridge and close the toner compartment. Remember to avoid shaking the toner cartridge as this can cause toner to spill.
By regularly cleaning your printer’s drum, you can ensure high-quality prints and prolong the life of your printer.
Wipe Drum with Cloth or Swab
Keeping your drum clean is essential to maintain optimal sound quality and prolong its lifespan. Once you’ve finished playing your drums, it’s crucial to wipe the drum with a soft cloth or swab to prevent dirt buildup. Dirt buildup not only affects the sound quality of the drum but also damages the drumheads.
Use a dry cloth or swab to remove any excess moisture from the drum, making sure to wipe in circular motions to ensure that all areas are covered. Avoid using any harsh chemicals or cleaning agents, as this could damage the drum’s finish. Consistently cleaning your drum will prevent the accumulation of dirt and keep it looking and performing at its best.
Proper care and maintenance of your drum will ultimately save you money and ensure that you get the most out of your investment. So make sure to give your drum a proper wipe-down after every session and keep it in tip-top shape!
Clean the Corona Wire
It’s essential to keep your printer clean to ensure that it works correctly and produces high-quality prints. One common area that requires cleaning is the drum. The drum is responsible for transferring toner onto the paper, and over time, it can accumulate debris, dust, and toner particles that can affect the print quality.
To clean the drum, start by turning off the printer and letting it cool down. Then, remove the drum and wipe it gently with a lint-free cloth. Avoid using any solvents or liquid cleaners as they can damage the drum.
Once you’ve cleaned the drum, reinstall it and turn on the printer. It’s also a good idea to clean the corona wire, which is a small wire responsible for charging the drum and transferring toner particles. You can clean the corona wire by gently sliding a dry cotton swab back and forth across the wire.
This process will remove any dust or debris that may interfere with the electrical charge and improve the print quality. By regularly cleaning the drum and corona wire, you can ensure that your printer produces high-quality prints every time.
Restart Your Printer
If you’ve been using a Brother printer for a while, you may have noticed that the print quality is not as good as it used to be. This is often a sign that the drum needs cleaning. The drum is an essential component of the printer, responsible for transferring the toner onto the paper.
Over time, the drum can accumulate toner and other debris, which can cause streaking and smudging on your printouts. To clean the drum, you can follow some simple steps. The first step is to restart your printer.
This can help clear any errors or glitches that may be causing the problem. Once you’ve restarted your printer, you can then clean the drum with a soft, lint-free cloth. Be sure to avoid using any cleaning chemicals or rough materials that could damage the drum.
To conclude, cleaning your Brother printer drum is an easy process that can help improve the print quality of your documents. By simply restarting the printer and gently cleaning the drum, you can keep your printer running smoothly for years to come. So, if you’ve noticed any streaking or smudging on your printouts, be sure to give your drum a good cleaning.
Reinstall Drum and Toner
If you’re experiencing issues with your printer such as streaks or smudges on the page, it may be time to reinstall the drum and toner. This is a straightforward process that can help improve the quality of your prints. Start by opening the printer’s cover and removing the drum and toner units.
Check for any damage or signs of wear and tear, and replace them if necessary. Next, reinsert the units back into the printer and ensure they are securely in place. Finally, restart your printer and try printing a page to see if the issue has been resolved.
By following these simple steps, you can keep your printer running smoothly and maintain its print quality.
Run Cleaning Cycle
If you’re having trouble with your printer, a good first step is to restart it. This can help clear out any software issues that might be causing the problem. Additionally, it’s a good idea to run a cleaning cycle on your printer.
Printers can build up dust and other debris over time, which can affect print quality. Running a cleaning cycle can help remove these foreign particles and ensure that your printer is functioning at its best. Don’t forget to check your printer’s user manual for specific instructions on how to run a cleaning cycle on your model.
By restarting your printer and running a cleaning cycle, you can improve the performance and lifespan of your printer.
In Conclusion
In conclusion, cleaning your Brother printer drum is like giving it a spa day – it refreshes and rejuvenates the drum, ensuring that your prints come out looking clean and sharp. Just like how we all need a little bit of self-care, so too does your printer deserve some TLC from time to time. By cleaning the drum regularly, you can improve the longevity of your printer and ensure that it continues to provide you with high-quality prints for years to come.
So give your Brother printer drum some love today – and just watch as your prints start sparkling like new!”
FAQs
How often should I clean my brother printer drum?
It is recommended to clean your brother printer drum every time you replace the toner cartridge or after every 3-4 months, depending on how often you use the printer.
Can I clean my brother printer drum myself?
Yes, you can clean your brother printer drum by following the instructions provided in your printer’s user manual. You can also use a lint-free cloth and isopropyl alcohol to clean the drum.
What should I do if my brother printer drum is damaged?
If your brother printer drum is damaged, you will need to replace it. You can purchase a new drum from an authorized dealer or from the Brother website and then follow the instructions to replace it.
How can I prevent my brother printer drum from getting damaged?
To prevent your brother printer drum from getting damaged, make sure to only use genuine Brother toner cartridges. Using third-party cartridges can cause damage to the drum and other printer components. Also, avoid exposing the drum to direct sunlight or high temperatures.